Quick Start Guide
Hardware
Arducam V3Link Camera Solution Kit
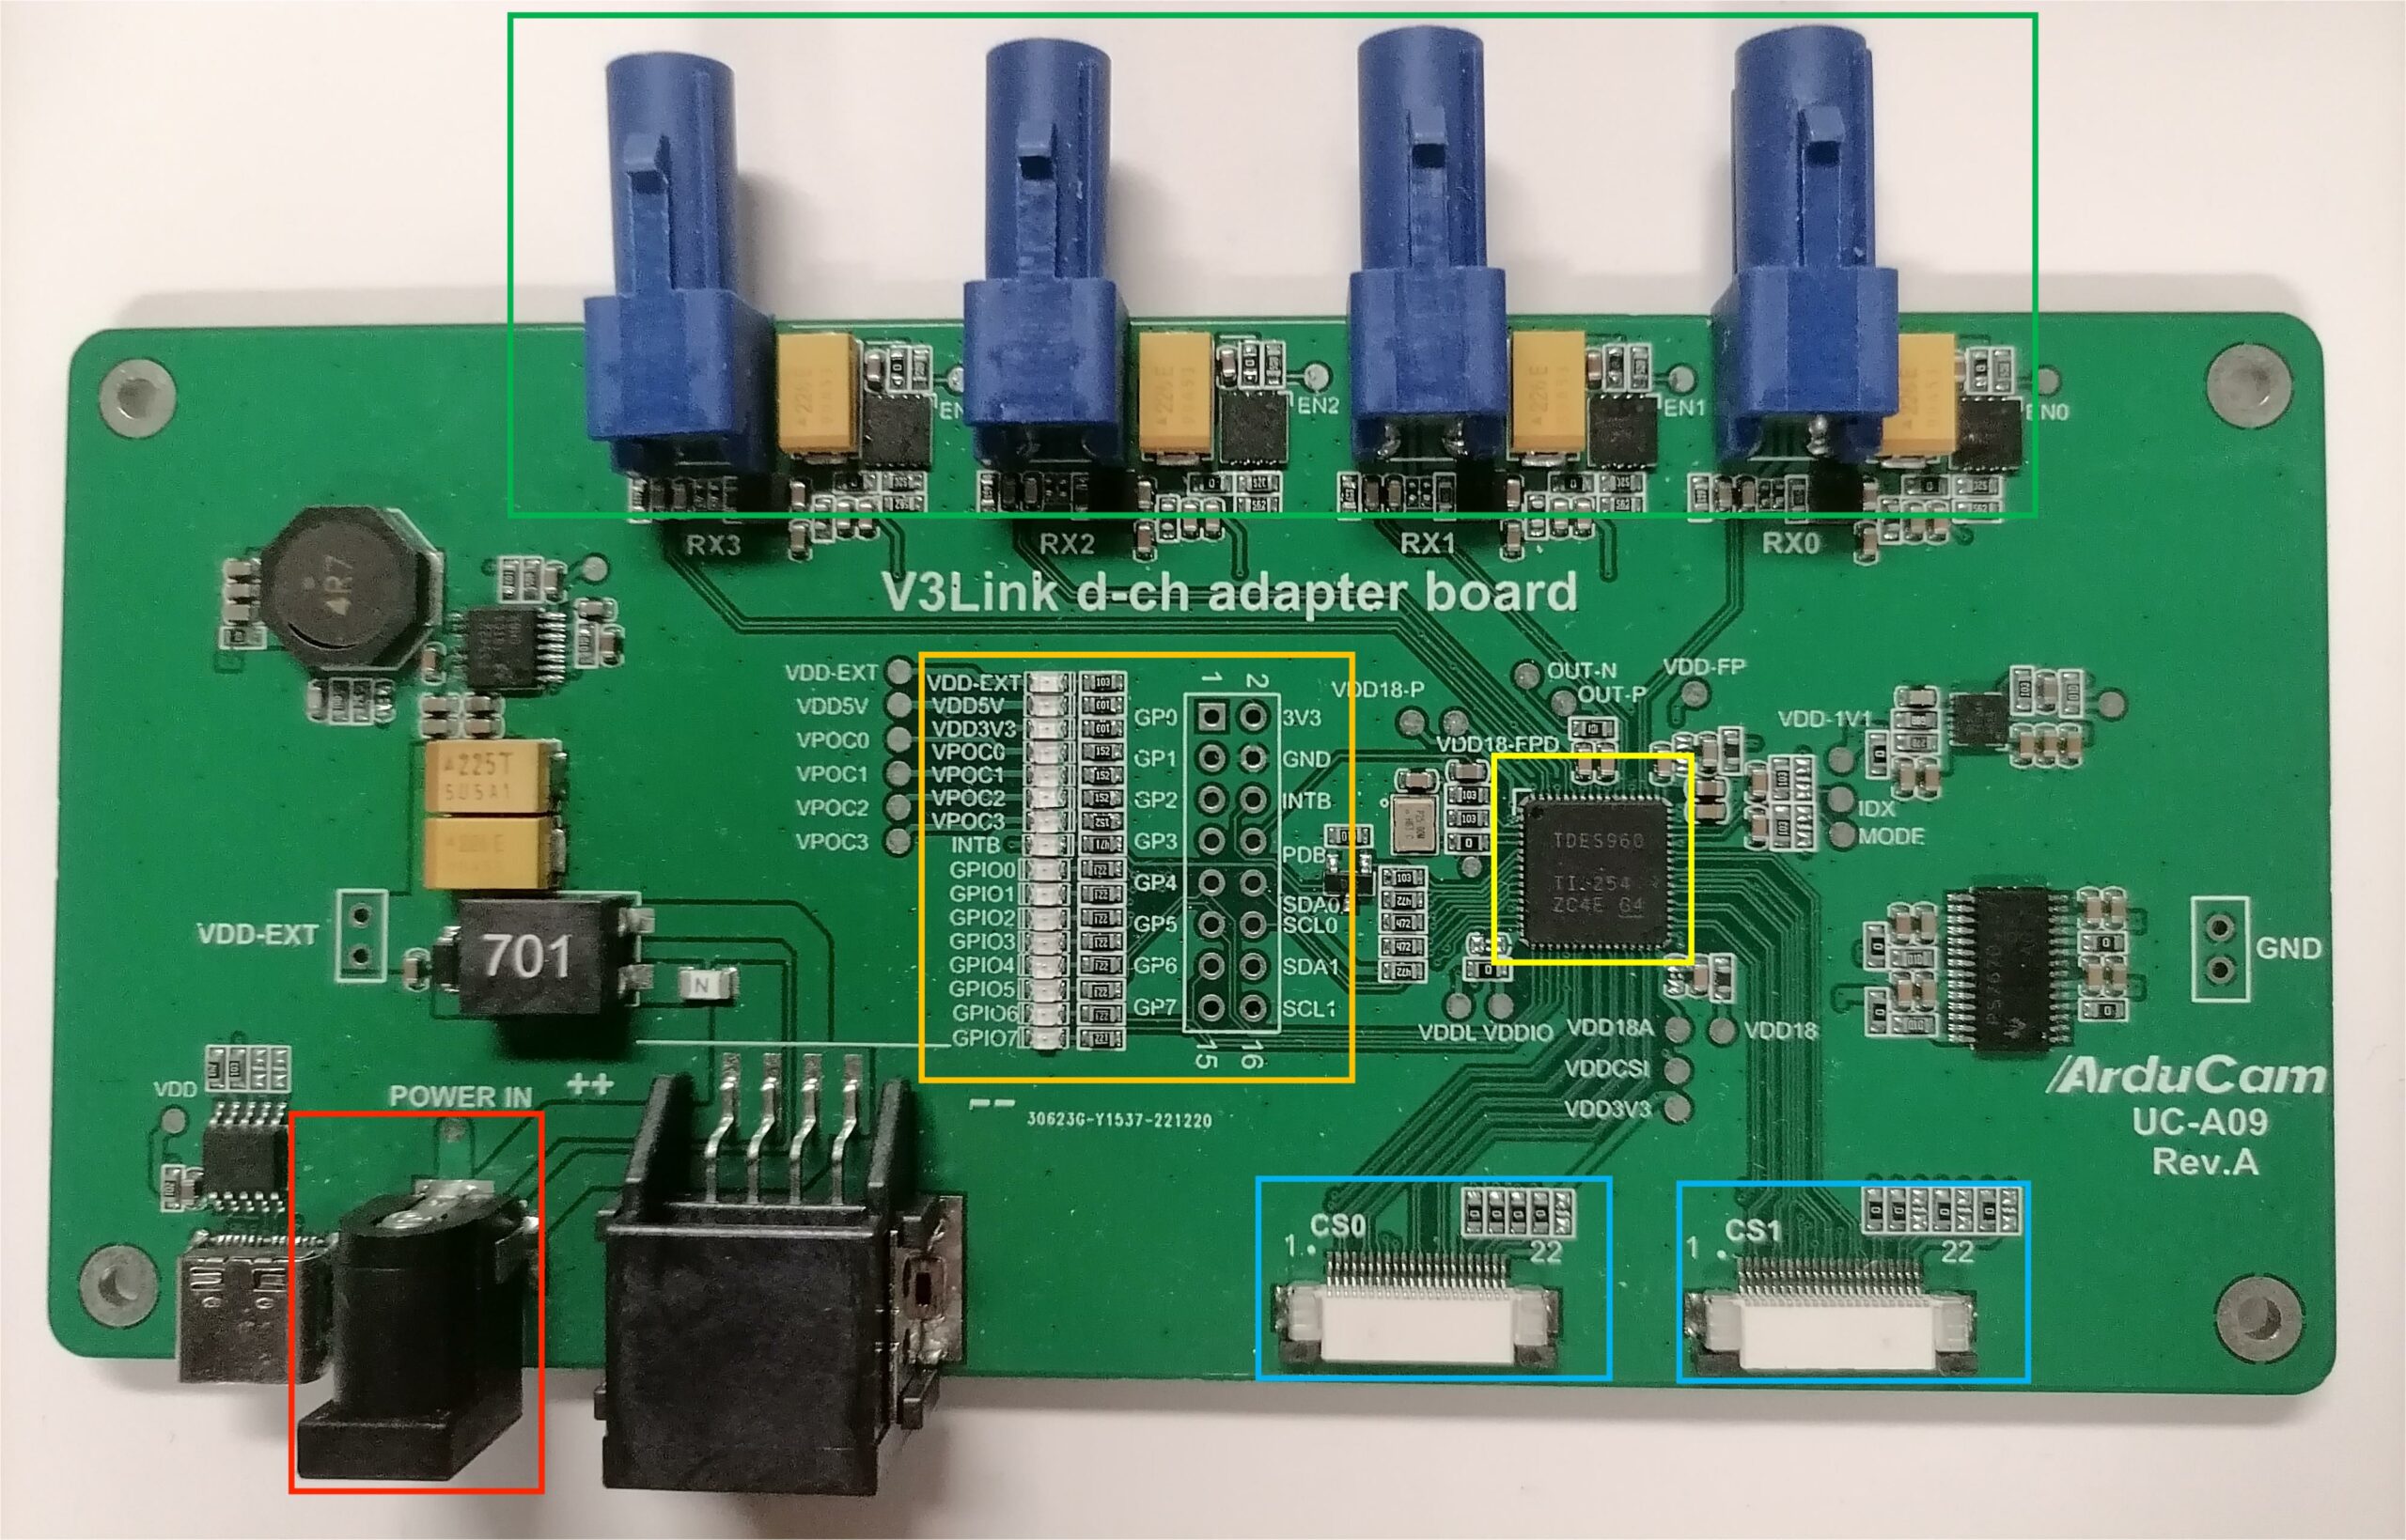
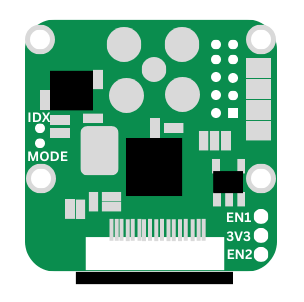
V3Link d-ch Adapter Board
- Schematic
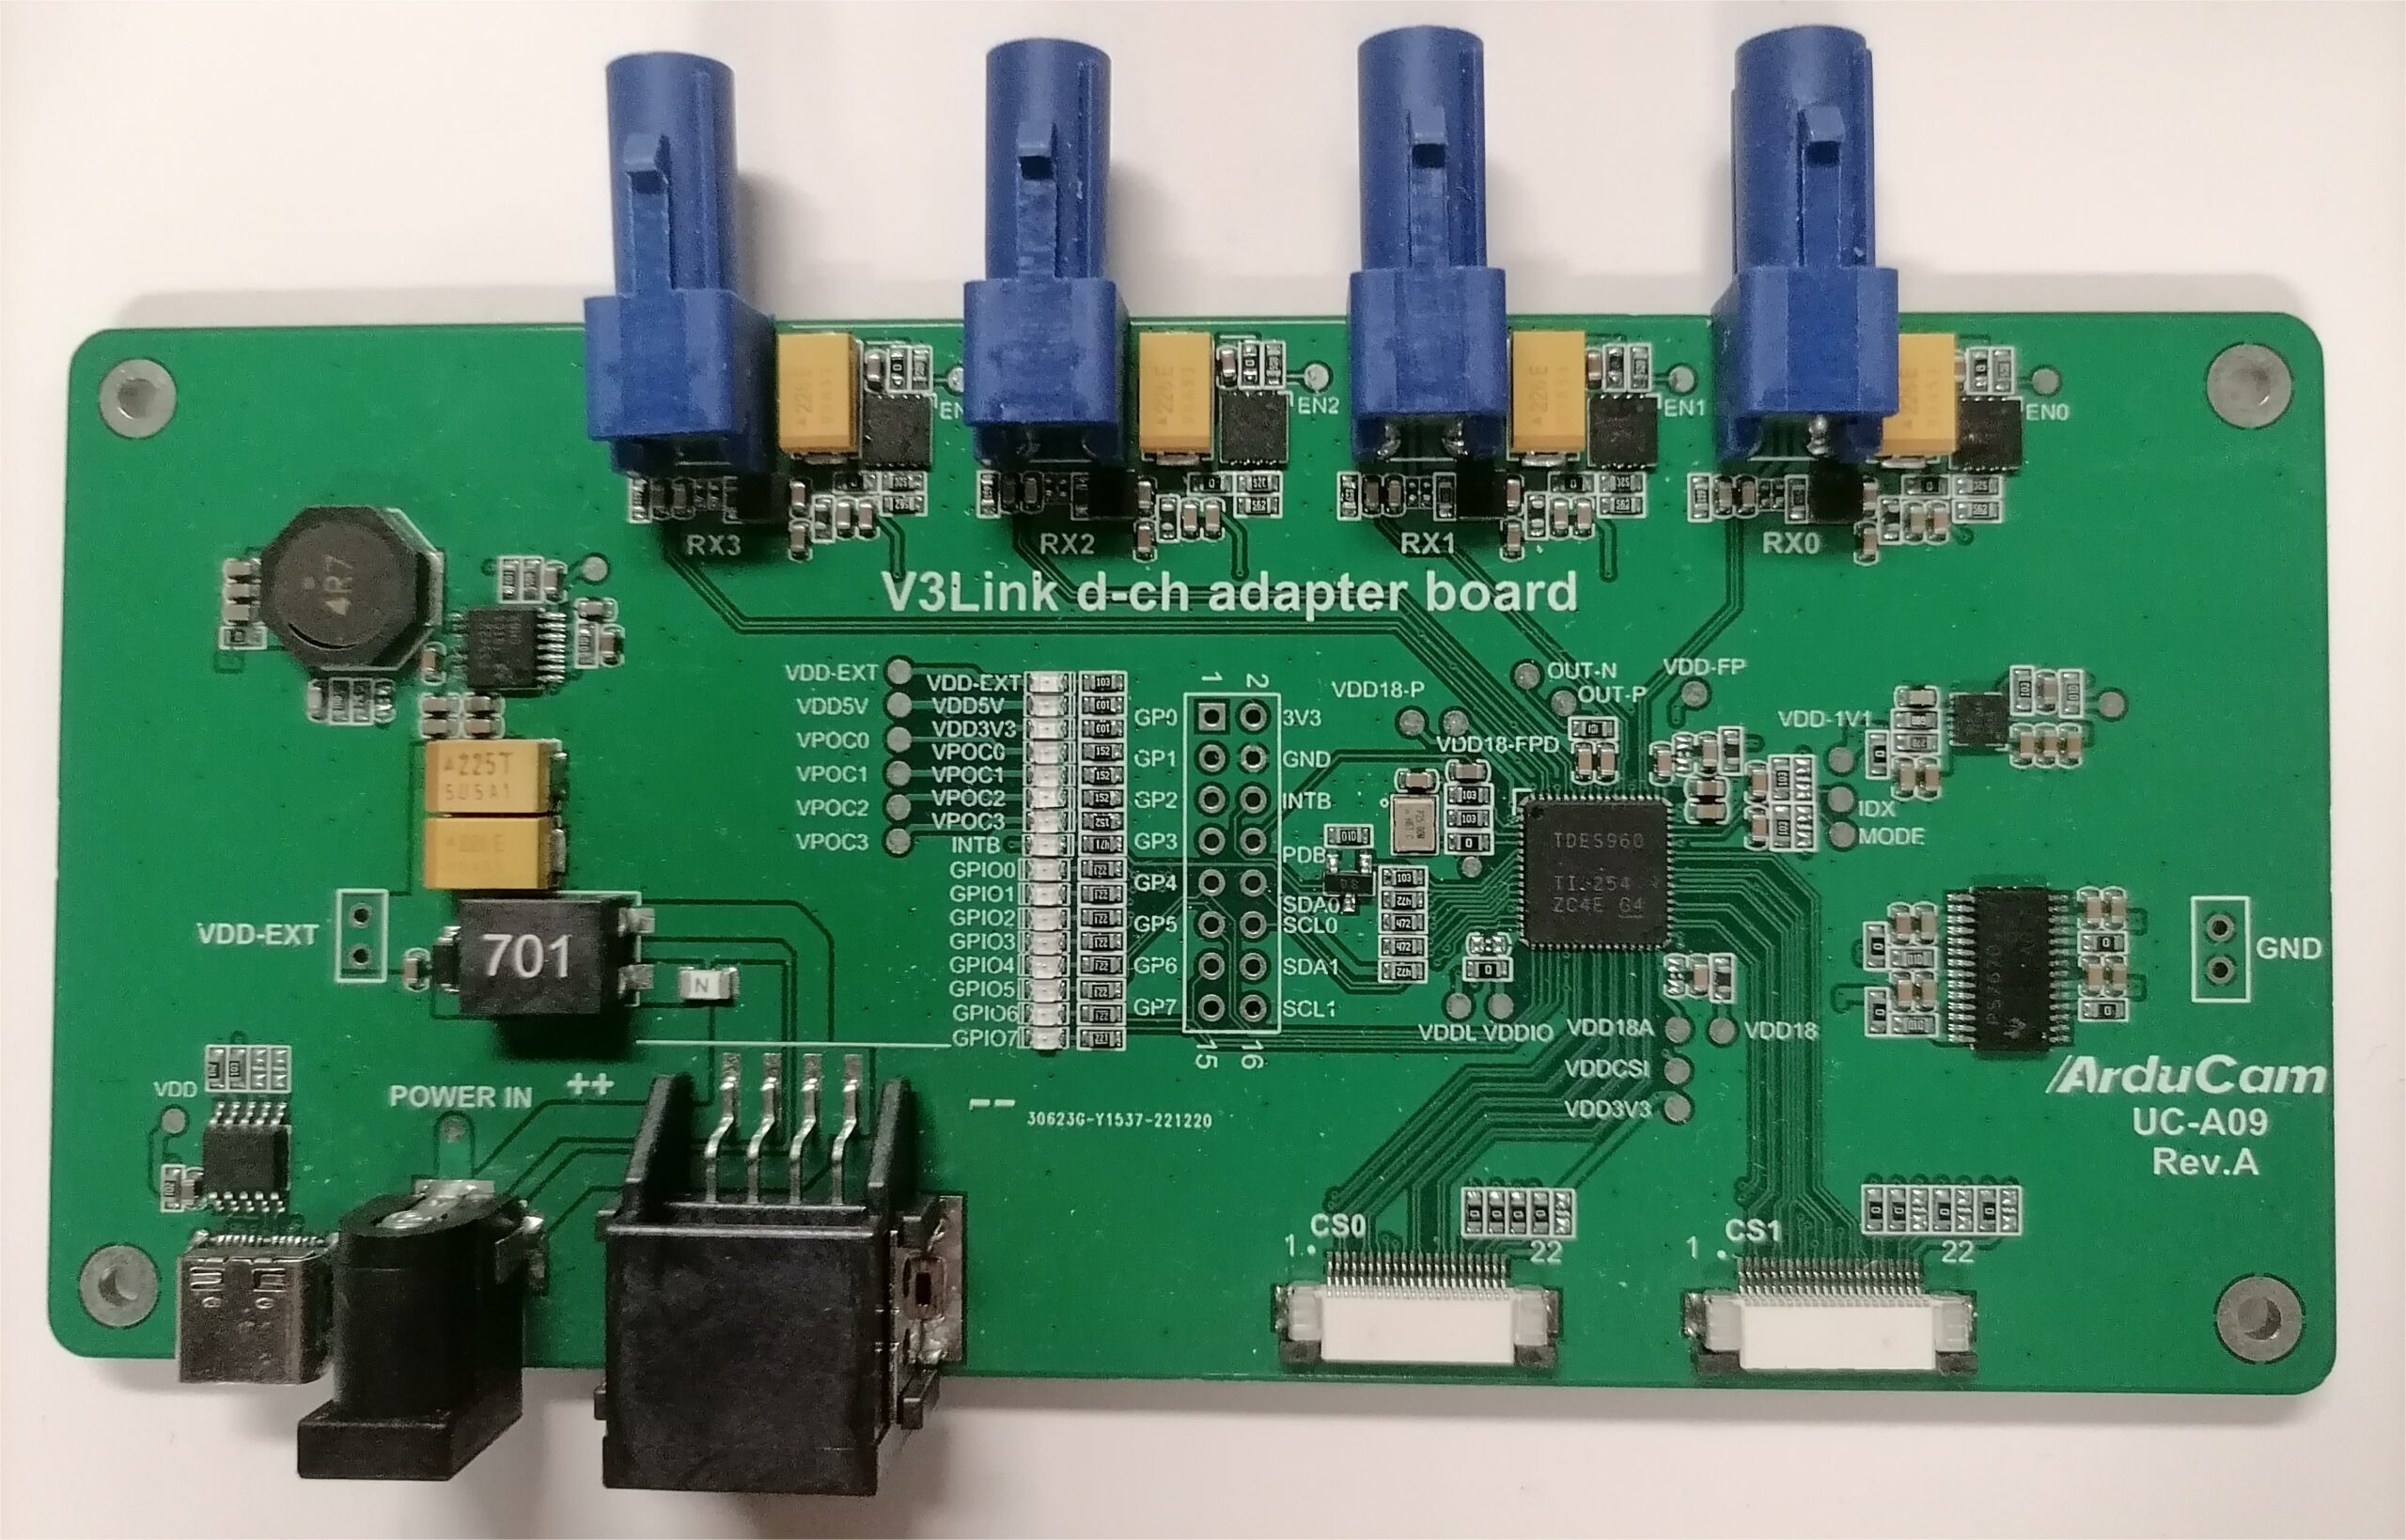
- Interface
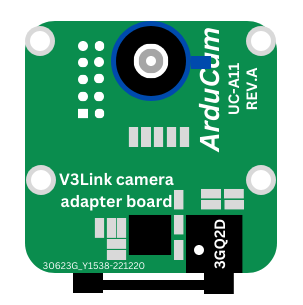
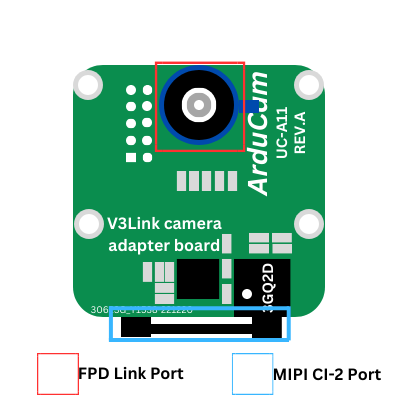
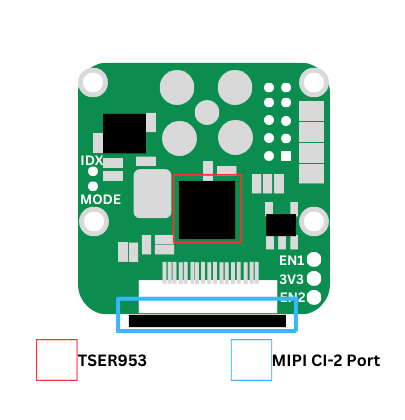
V3Link Camera Adapter Board
- Schematic (Front)
- Schematic (Back)
- Interface (Front)
- Interface (Back)
Hardware Requirements
-
TI SK-AM62A-LP Development Board
-
Arducam V3Link d-ch adapter board x 1
-
Arducam V3Link camera adapter board x 4
-
Fakra Z Female to Female RF Coaxial Cable x 4
- Arducam IMX219 Camera Module x 4
- microSD/TF card (≥ 16GB)
- SD card reader
- Ethernet Cable or Micro USB (USB A-MicroB) Cable
- HDMI Cable
Demo
Physical Connection
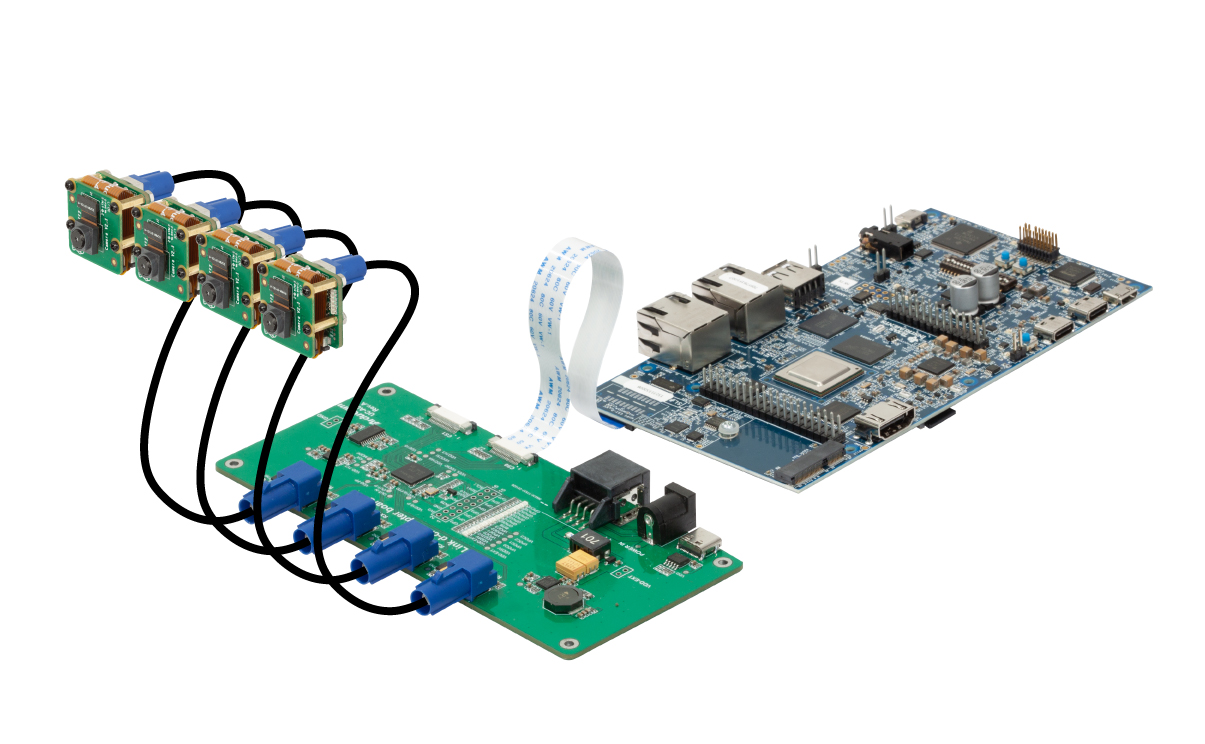
Connect four IMX219 cameras to the Arducam V3-Link adapter board and connect the V3-Link adapter board with the TI SK-AM62A starter kit.
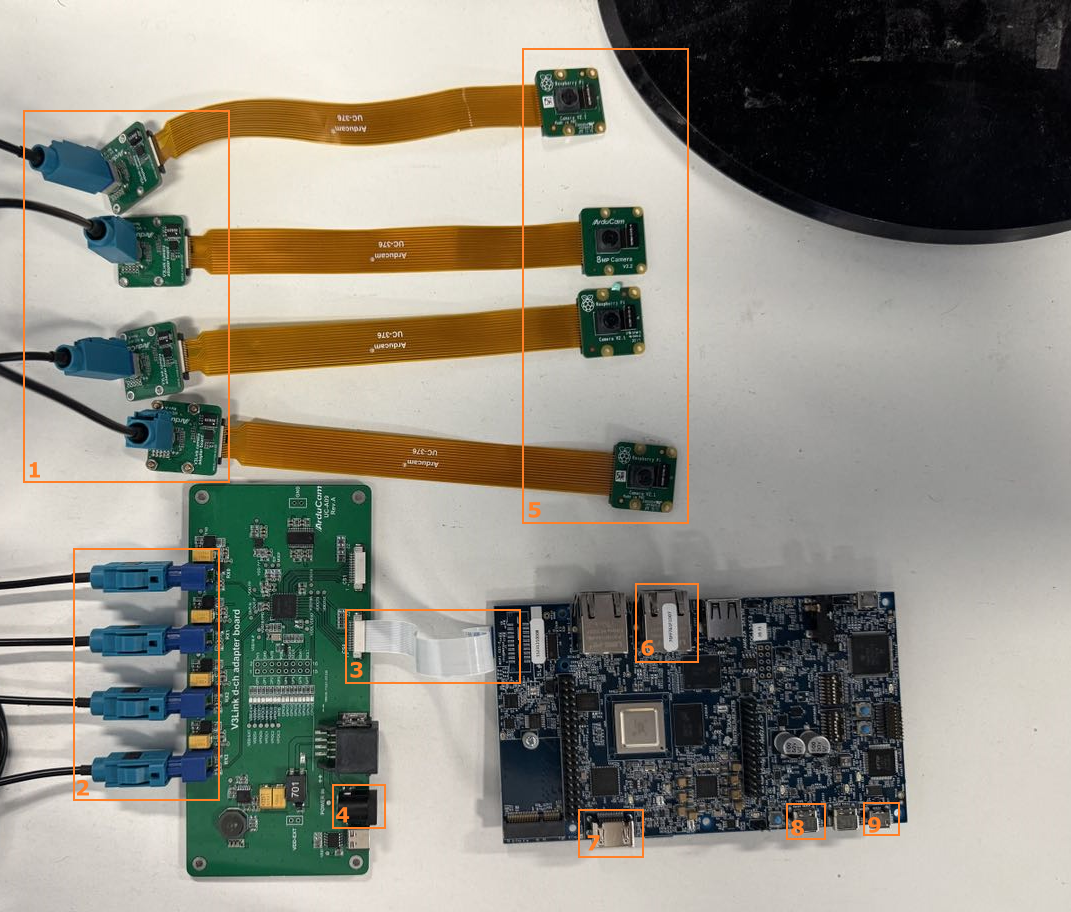
- 5-1 is camera imx219 connected to Arducam V3Link camera adapter board.
- 1-2 is the Arducam V3Link d-ch adapter board connected to the Arducam V3Link camera adapter board.
- 3 is Arducam V3Link d-ch adapter board csi0 connected to SK-AM62A-LP CSI.
- 4 Requirements Power supply Mini Fusion EVM with 12V.
- 6 Connect to the LAN using an Ethernet cable.
- 7 Connect the monitor using HDMI cable.
- 8 USB-C Power Delivery.
- 9 Serial port connected to host via microUSB
Connection Diagram
Software
Tip
Currently, we only support the compatible use of Arducam imx219 camera on TI SK-AM62A-LP development board. The following steps are only applicable to imx219 camera.
Please follow the following steps to use the Arducam V3-Link camera kit with the TI SK-AM62A-LP starter kit board.
Environment configuration
Flashing the Image onto Memory Card
- Download the latest EDGE AI SDK.WIC.XZ image from the link above.
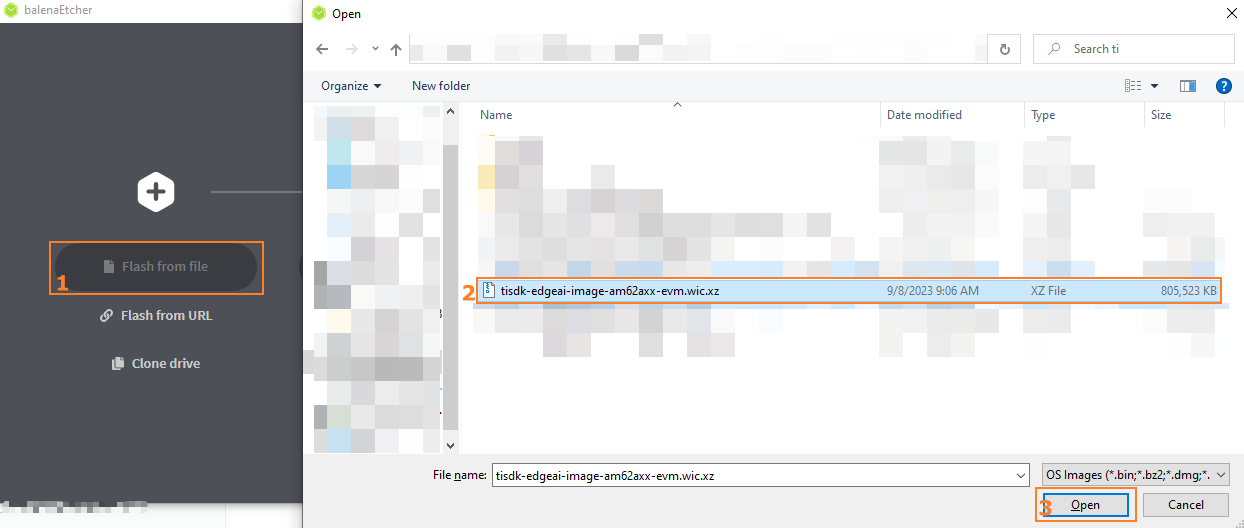
- Flash the image to SD card using Balena Etcher.
a. Select the image you want to flash
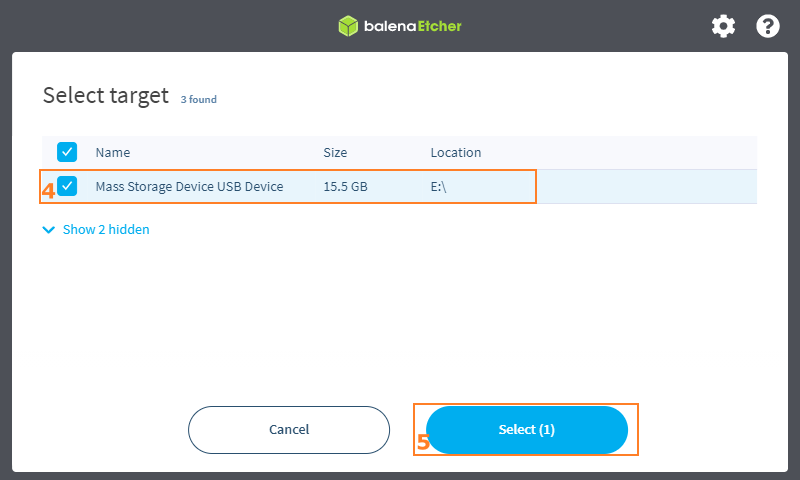
b. Insert your microSD-Card into the Card Reader that is connected to your computer.
c. Click the
Flash!button and wait for the programming to complete.
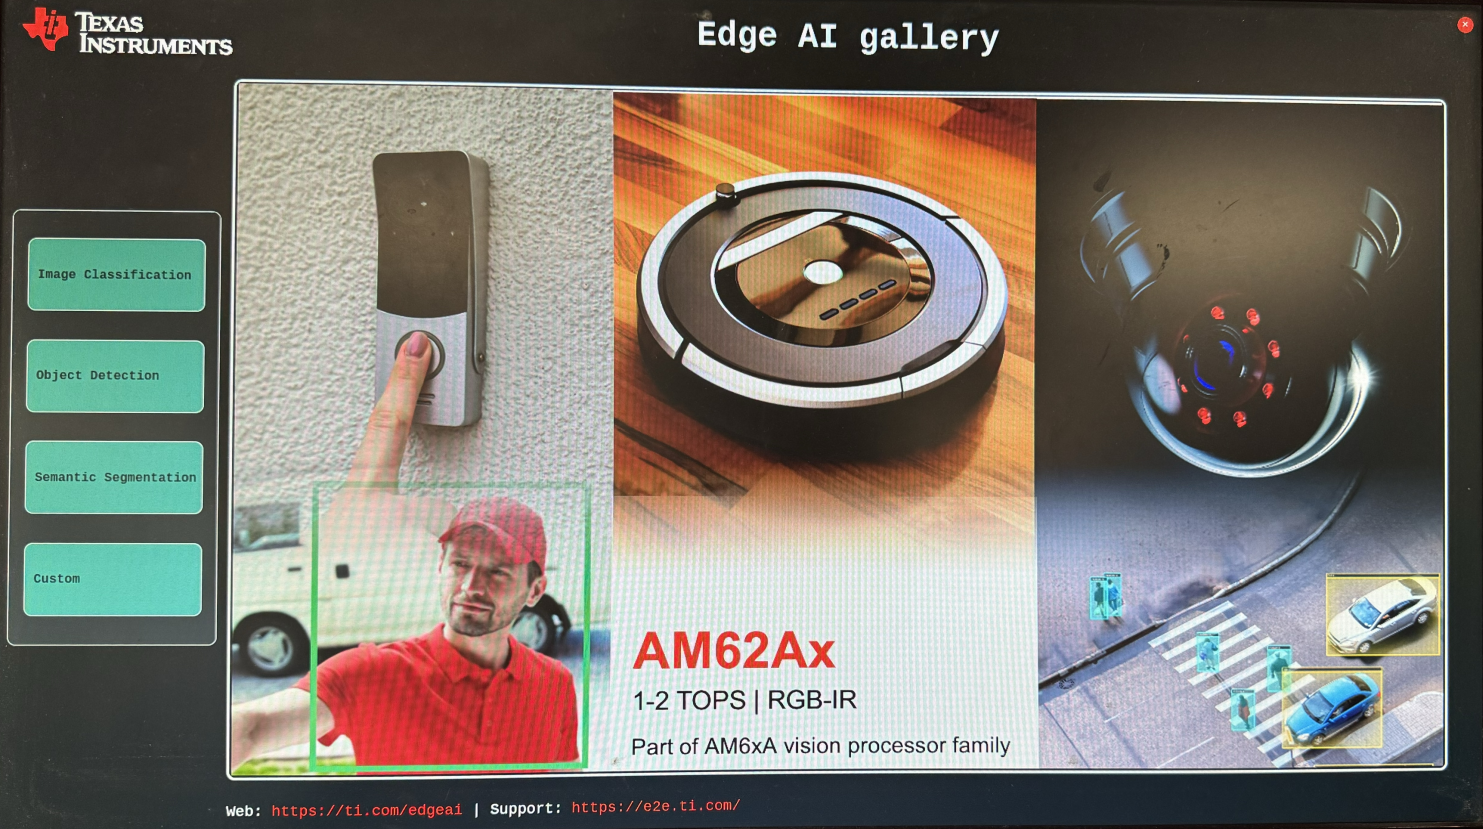
- Completion
Wait for flashing to complete,Insert the programmed microSD card into SK-AM62A-LP, first power the V3Link d-ch adapter board, and then power the SK-AM62A-LP. This is very important and the order cannot be changed! ! ! After waiting for a while you can see the following screen on the display.
Add relevant drivers and change configuration
Log in to the system through the serial port
a. You can download PUTTY according to the link provided. https://www.chiark.greenend.org.uk/~sgtatham/putty/latest.html
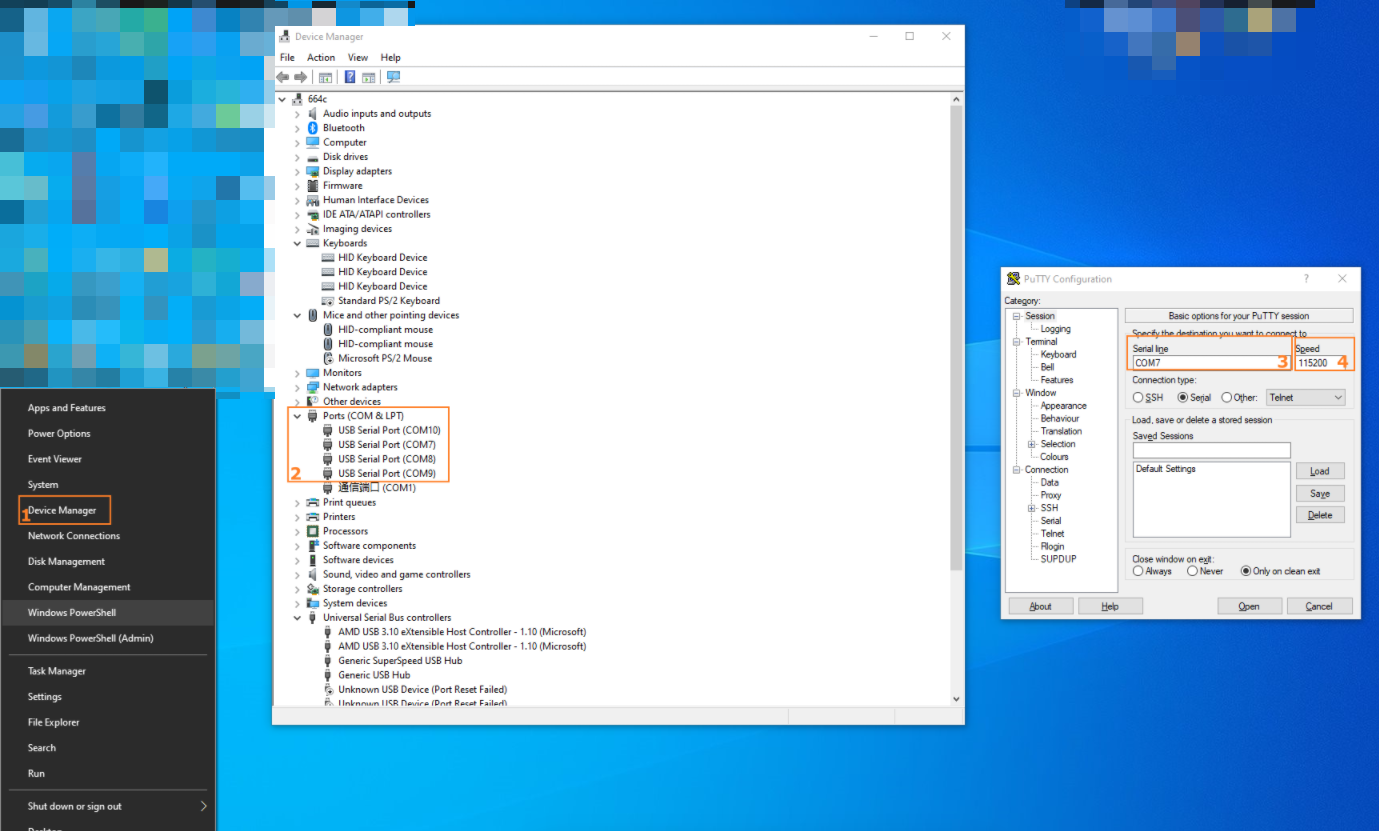
b. Right-click the start button on the taskbar, select Device Manager, and you can see several new serial ports in Ports (COM&LPT).
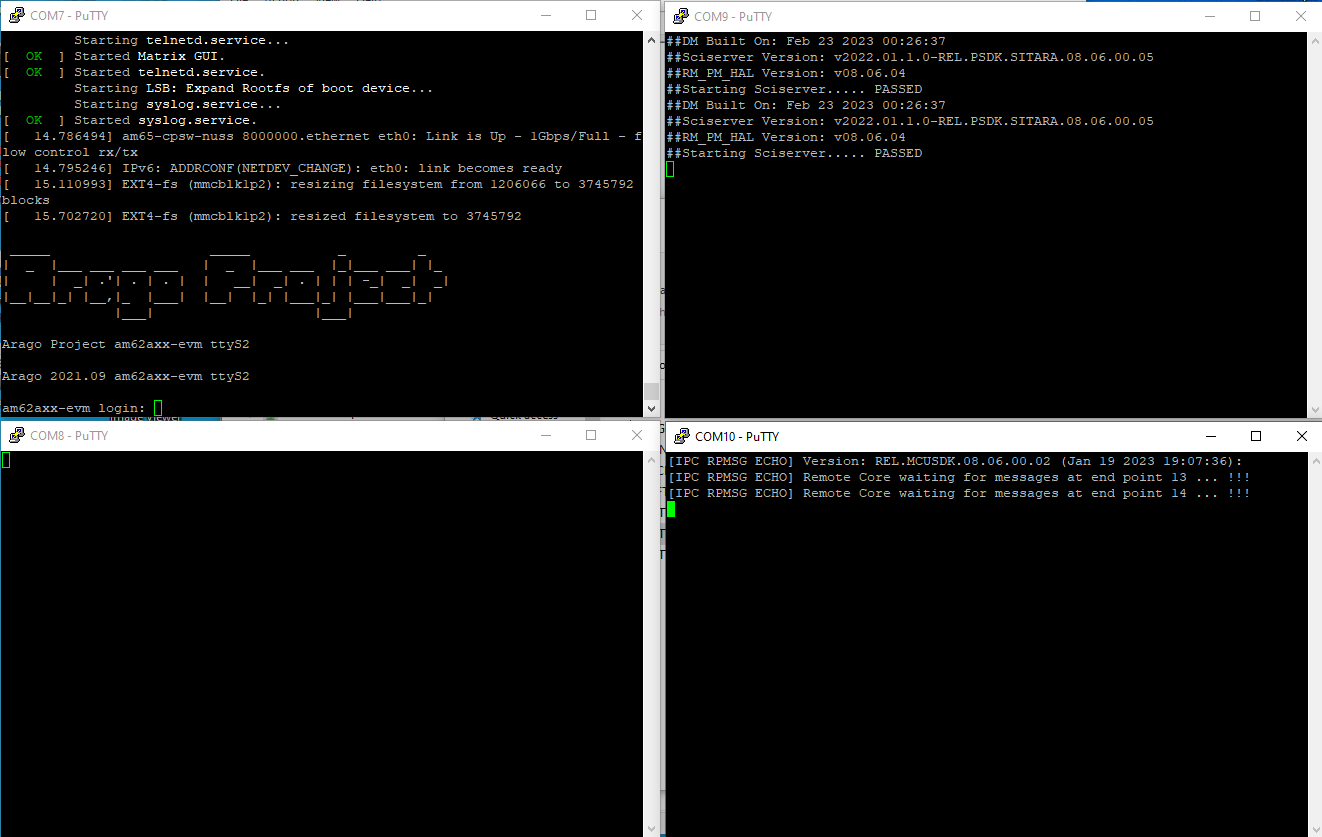
c. Open PUTTY, select Serial, enter the newly added COM port, change the baud rate to 115200, click to open, there is no exact text description, the serial port terminal is fixed at the smallest port, I recommend opening all four ports and powering on again to view the output information.
d. The output information is as shown in the figure below. COM7 is a serial port terminal. Enter the user name root and there is no need to enter a password to log in to the system.
e. Download AM62ASK-V3Link.zip
Configure the System
- Check local ip
# AM62A
root@am62axx-evm:/opt/edgeai-gst-apps# ip a
1: lo: <LOOPBACK,UP,LOWER_UP> mtu 65536 qdisc noqueue state UNKNOWN group default qlen 1000
    link/loopback 00:00:00:00:00:00 brd 00:00:00:00:00:00
    inet 127.0.0.1/8 scope host lo
       valid_lft forever preferred_lft forever
    inet6 ::1/128 scope host
       valid_lft forever preferred_lft forever
2: eth0: <BROADCAST,MULTICAST,UP,LOWER_UP> mtu 1500 qdisc mq state UP group default qlen 1000
    link/ether 1c:63:49:17:20:b0 brd ff:ff:ff:ff:ff:ff
    inet 192.168.137.206/24 brd 192.168.137.255 scope global dynamic eth0
       valid_lft 604792sec preferred_lft 604792sec
    inet6 fe80::1e63:49ff:fe17:20b0/64 scope link
       valid_lft forever preferred_lft forever
3: docker0: <NO-CARRIER,BROADCAST,MULTICAST,UP> mtu 1500 qdisc noqueue state DOWN group default
    link/ether 02:42:b2:42:d6:22 brd ff:ff:ff:ff:ff:ff
    inet 172.17.0.1/16 brd 172.17.255.255 scope global docker0
       valid_lft forever preferred_lft forever\
- Copy to AM62A
# PC
PS \$USER_PATH\> scp .\AM62ASK-V3Link.zip root@192.168.137.206:
root@192.168.137.206's password:
AM62ASK-V3Link.zip                                     100%  411KB   4.6MB/s   00:00
- Configure system environment
# AM62A
root@am62axx-evm:~# unzip AM62ASK-V3Link.zip
Archive:  AM62ASK-V3Link.zip
   creating: AM62ASK-V3Link/
   creating: AM62ASK-V3Link/dtbs/
  inflating: AM62ASK-V3Link/dtbs/k3-am62a7-sk-v3link-fusion-0.dtbo
  inflating: AM62ASK-V3Link/dtbs/k3-am62a7-sk.dtb
  inflating: AM62ASK-V3Link/dtbs/k3-v3link-imx219-0-0.dtbo
  ...
# Copy modules/ds90ub960.ko and modules/im219.ko to/
root@am62axx-evm:~# cp ~/AM62ASK-V3Link/modules/ds90ub960.ko  /lib/modules/5.10.168-g2c23e6c538/kernel/drivers/media/i2c/
root@am62axx-evm:~# cp ~/AM62ASK-V3Link/modules/imx219.ko  /lib/modules/5.10.168-g2c23e6c538/kernel/drivers/media/i
2c/
# Copy dtbs/*.dtbo to /boot
root@am62axx-evm:~# cp ~/AM62ASK-V3Link/dtbs/*.dtbo /boot/
root@am62axx-evm:~# cp ~/AM62ASK-V3Link/dtbs/*.dtb /boot/
# Copy dtbs/uEnv.txt to /run/media/mmcblk1p1/
root@am62axx-evm:~# cp ~/AM62ASK-V3Link/dtbs/uEnv.txt /run/media/mmcblk1p1/uEnv.txt
reboot
- Preview
You need to set the camera format setup-imx219.sh first, and then use stream-4ximx219.sh to preview the picture, followed by the four camera parameters video_index subdev_index, as shown below:
root@am62axx-evm:~# chmod +x ~/AM62ASK-V3Link/scripts/*
root@am62axx-evm:/opt/edgeai-gst-apps# ~/AM62ASK-V3Link/scripts/setup-imx219-640x480.sh
IMX219 Camera 0 detected
    device = /dev/video3
    name = IMX219 7-0010
    format = [fmt:SRGGB8_1X8/640x480 field: none]
    subdev_id = /dev/v4l-subdev5
    isp_required = yes
    ldc_required = yes
IMX219 Camera 1 detected
    device = /dev/video4
    name = IMX219 8-0010
    format = [fmt:SRGGB8_1X8/640x480 field: none]
    subdev_id = /dev/v4l-subdev7
    isp_required = yes
    ldc_required = yes
IMX219 Camera 2 detected
    device = /dev/video2
    name = IMX219 6-0010
    format = [fmt:SRGGB8_1X8/640x480 field: none]
    subdev_id = /dev/v4l-subdev9
    isp_required = yes
    ldc_required = yes
IMX219 Camera 3 detected
    device = /dev/video5
    name = IMX219 9-0010
    format = [fmt:SRGGB8_1X8/640x480 field: none]
    subdev_id = /dev/v4l-subdev10
    isp_required = yes
    ldc_required = yes
root@am62axx-evm:/opt/edgeai-gst-apps# ~/AM62ASK-V3Link/scripts/stream-4ximx219-640x480.sh 3 5 4 7 2 9 5 10
# or
root@am62axx-evm:/opt/edgeai-gst-apps# ~/AM62ASK-V3Link/scripts/setup-imx219.sh
root@am62axx-evm:/opt/edgeai-gst-apps# ~/AM62ASK-V3Link/scripts/stream-4ximx219.sh 3 5 4 7 2 9 5 10