Troubleshooting
Notice
Notice
When the camera works abnormally, reconfirm the following basic
details:
- Make sure the cable line connection is normal and stable
- Make sure the camera you are using is normal version instead of specific version for camarray board.
- Make sure you are using the appropriate bullseye OS version (legacy buster version is not recommended)
- Follow the libcamera installation guide, make sure the driver, specific libcamera-dev and libcamera-apps installed normal.
More ways to check:
- Check that the driver is loaded correctly
dmesg | grep -E "imx477|imx219|arducam"

- Check if video0 has been found
ls /dev/video0

Before contacting arducam, please provide the following information so that we can help you solve problems efficiently.
- Hardware related:
Camera module number(e.g. SKU) or purchase link
Hardware connection diagram - Screenshot of operation commnad
- system related informaton which can be obtained by the following commands:
uname -a cat /etc/os-release cat /proc/meminfo cat /boot/config.txt - System log
dmesg | grep -E "imx477|imx219|arducam" - Application log
- Provide error log or screenshots about application throw out.
Troubleshooting
1. Cannot Allocate Memory
- Error Message
- Solution
Edit /boot/cmdline.txt and add cma=400M at the end.

2. The Image Displays Color Dots
- Error Message
- Solution
Add code --denoise cdn_off at the end of command.
libcamera-still -t 5000 -o test.jpg --denoise cdn_off
3. Failed to Install the Driver
- Error Message

- Solution
Please check the kernel version, we only provide the driver for the latest official kernel version image when this Pivariety camera is released.
4. Failed to import fd 19
- Error Message

If you find the same error, you may make the wrong selection about the graphics driver.
- Solution
Tip
For Raspbian Bullseye users running on Pi Zero ~ Pi 3, please execute the follows
1. Open a terminal
2. Run sudo raspi-config
3. Navigate to Advanced Options
4. Enable Glamor graphic acceleration
5. Reboot your Pi
Meanwhile, you also need to execute the following steps:
6. Open a terminal
7. Run sudo raspi-config
8. Navigate to Advanced Options
9. Navigate to GL Driver
10. Select GL (Full KMS)
11. Reboot your Pi
For more details, please refer to the official forum guide on how to configure the camera module >>
For Raspberry Pi Compute Module 3/4
You need to install the latest Raspberry Pi system (after 2022/01/28), and do not execute rpi-update
After installing the system and drivers (follow the above instructions), add the following information to /boot/config.txt:
[cm4]
dtoverlay=imx519
dtoverlay=imx519,cam0
Then
sudo reboot
List all cameras:
libcamera-still -–list-cameras
Specify camera:
libcamera-still -t 0 –camera 0
libcamera-still -t 0 –camera 1
5. Open I2C bus error
- Error Message

- Solution
sudo raspi-config
–> Interface Options
–> I2C
6. Switch to the native camera (raspistill etc.)
- Solution
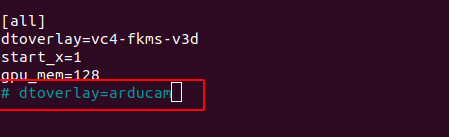
If you want to use other cameras that needs Native driver, you can edit the file of /boot/config.txt, make dtoverlay=arducam and change to # dtoverlay=arducam.
After the modification is completed, you need to reboot the Raspberry Pi.
sudo reboot
7. Cannot Allocate Memory on Arducam 64MP Hawkeye Autofocus Camera Module
- Background
At present, there is a memory allocation problem with Arducam 64MP Camera Module when shooting at the maximum resolution on the Raspberry Pi, and the performance is as follows:

There is no perfect solution for this problem currently, but we provide some methods to solve it:
- Use Raspberry Pi OS Lite version System
We used Pi4B-8G, Pi4B-1G, Pi3B-1G for a long time test, the test results show that Raspberry Pi OS Lite is more stable when using Arducam 64MP Camera to shoot at the maximum resolution (so far we have not found any failures).
- Set Preview Resolution
Modifying the preview resolution to a smaller resolution can also improve the success rate of shooting 64MP resolution images, example command:
libcamera-still -t 5000 --viewfinder-width 2312 --viewfinder-height 1736 -o 64mp.jpg
- Shoot 16MP Resolution Images
Example command:
libcamera-still -t 5000 --width 4624 --height 3472 --mode 4624:3472 -o 16mp.jpg
- Modify
cmato allocate threshold
Adding "alloc_in_cma_threshold=16" in /boot/cmdline.txt
Note
The cma value of all tests is 512M (add dtoverlay=vc4-kms-v3d,cma-512 in /boot/config.txt)
If you want the stable 64MP Resolution images, we recommend you using Raspberry Pi OS Lite, we will find more solutions for this issue continuously.
8. The Fastest Capture Speed at Full Resolution with Arducam 64MP Hawkeye AF Camera
- Background
Saving pictures with Arducam 64MP Camera will take a lot of time because of the need for coding:
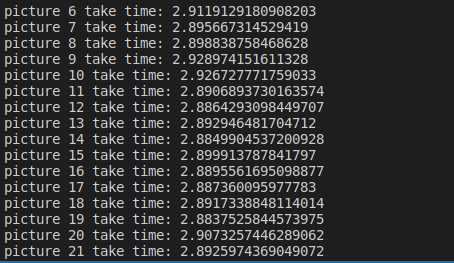
You can see that it will take more that two seconds to save the image.
At this situation, you can write a program that uses multi-threading to take out the data and save it with another thread.
- Demo
GitHub Link: Fatest Capture Time for Arducam 64MP Camera
Code:
#!/usr/bin/python3

import time

from picamera2 import Picamera2, Preview

i = 0
FrameRate = 2.7
frame_time = 1000000 // FrameRate

start = time.time()

picam2 = Picamera2()
# picam2.start_preview(Preview.QTGL)

capture_config = picam2.create_still_configuration(main={"format": 'RGB888', "size": (9152, 6944)})
picam2.configure(capture_config)

# picam2.set_controls({"FrameDurationLimits":(frame_time, frame_time)})
picam2.start()

open_camera_time = time.time()
print("open time:" + str(open_camera_time -start))

while True:
    last_photo_time = time.time()
    picam2.capture_array("main")
    photo_time = time.time()
    print("picture {} take time: {}".format(i, photo_time - last_photo_time))

    i += 1
9. The problem of horizontal fringes of images at maximum resolution with 64MP Hawkeye cameras
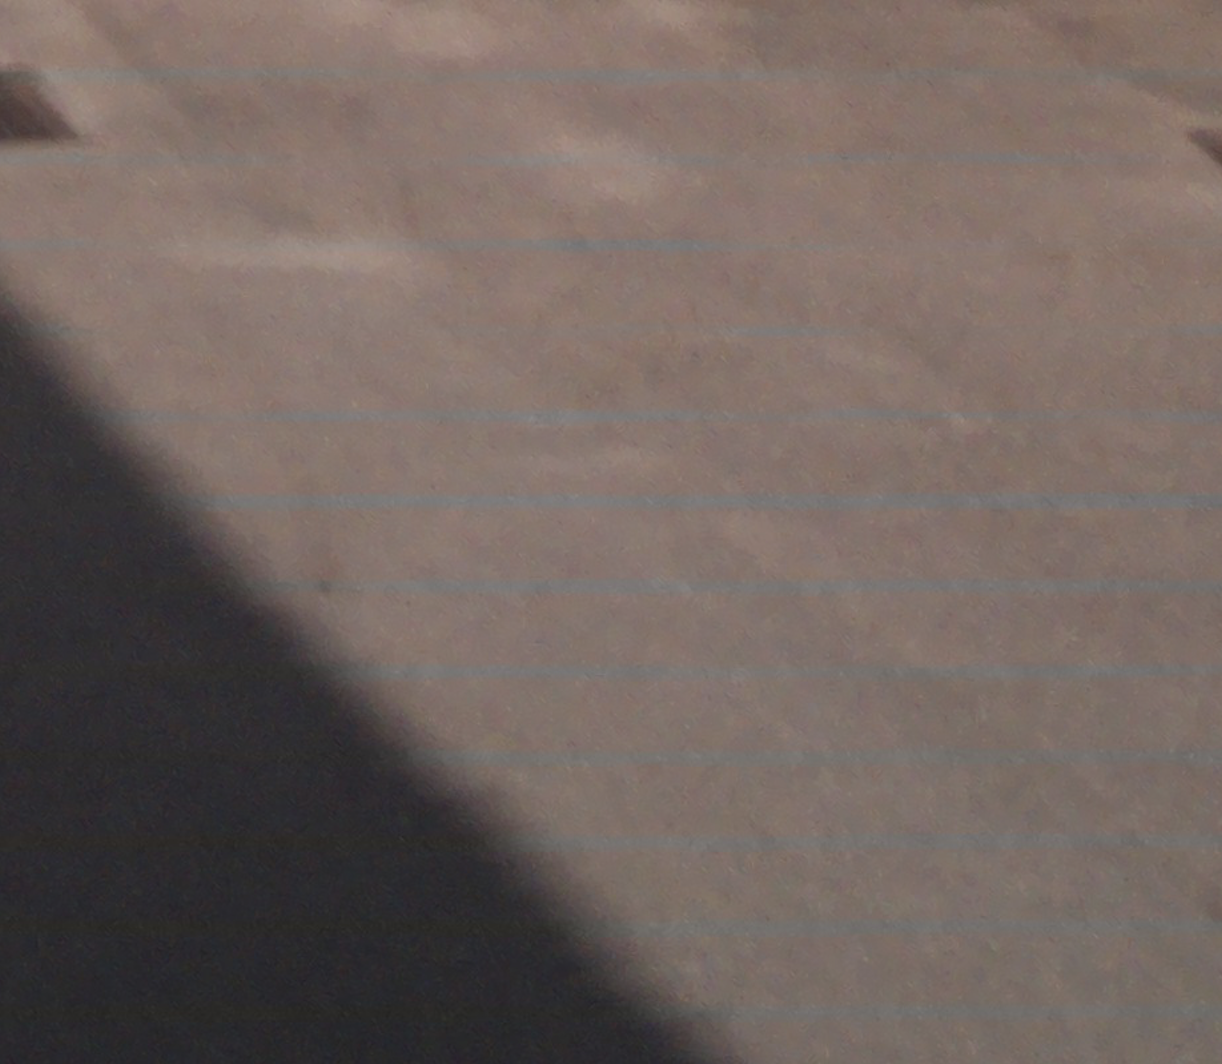
- Background
Some users may experience lateral streaks on images when shooting at maximum resolution with the Arducam 64MP autofocus camera, as follows:
- Solution
This problem may be related to the noise reduction function of the Raspberry Pi platform ISP, and the solution is as follows:
Add the --denoise cdn_off parameter when taking pictures, such as:
libcamera-still -t 5000 --denoise cdn_off --viewfinder-width 2312 --viewfinder-height 1736 --width 9152 --height 6944 -o arducam_64mp.jpg
10. picam2.switch_mode_and_capture_file freezes program and camera
- Background
Some customers have reported that when running capture_full_res.py (one of the picamera examples on Raspberry Pi GitHub repository), the camera and program will freeze, and only Ctrl + C can be used to exit. You can refer to this issue for more information. Arducam has provided a temporary solution. Please contact Arducam (support@arducam.com) and provide your Raspberry Pi kernel version, such as 6.1.21.
- Solution
Arducam will send you a customized driver version for your kernel via email. Please transfer the compressed package to your Raspberry Pi and follow the steps below:
-
Please comment out the dtoverlay=arducam-64mp in the config file(run the command sudo nano /boot/config.txt, scroll down to the bottom,you will see this sentence).
-
Run the commands below to unzip the package and install the camera driver.
tar -xvf arducam_64mp_kernel_driver_6.1.21.tar.gz Release/
cd Release/
./install_driver.sh
To this point, you need to restart Raspberry Pi to take effect. You can retry the capture_full_res.py to check if the problem is solved.
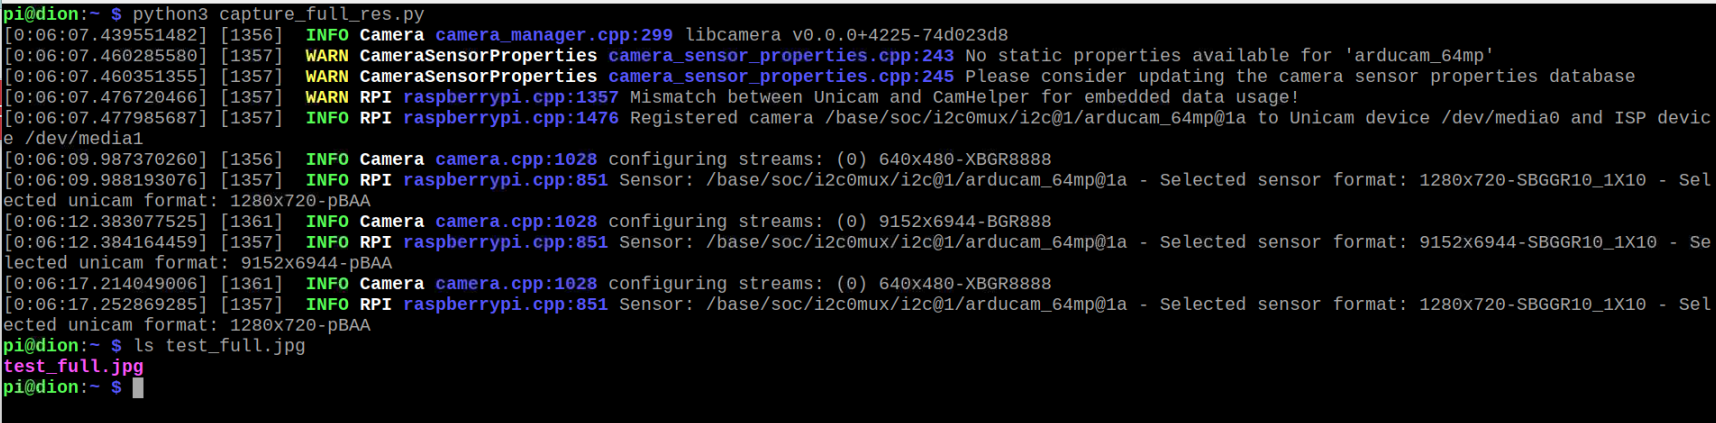
Kindly note that the customized driver may not be suitable for all Raspberry Pi camera modules and kernel versions. And the customized 64MP driver that we sent you, we will upstream it to the Raspberry Pi kernel in the future.
11. Unavailable PDAF of Arducam 64MP Hawkeye on Raspberry Pi Bookworm OS
Environment Preparation
Please first keep the kernel version on 6.1.63 and later
+'uname -v | grep -oP '\d+\.\d+\.\d+'

If the kernel version is earlier than 6.1.63, please use the following command to update the kernel and restart the system after the update.
sudo apt-get update
sudo apt-get upgrade
Please do not use sudo rpi-update to upgrade the kernel to a particularly new version
All of our support is based on stable versions of the kernel, currently for using Arducam 64MP Hawkeye camera on bookworm, our supported kernel list is:
6.1.63
Step 1. Install Bash Script
wget -O install_pivariety_pkgs.sh https://github.com/ArduCAM/Arducam-Pivariety-V4L2-Driver/releases/download/install_script/install_pivariety_pkgs.sh
chmod +x install_pivariety_pkgs.sh
Step 2. Install Camera Driver
./install_pivariety_pkgs.sh -p 64mp_pi_hawk_eye_kernel_driver
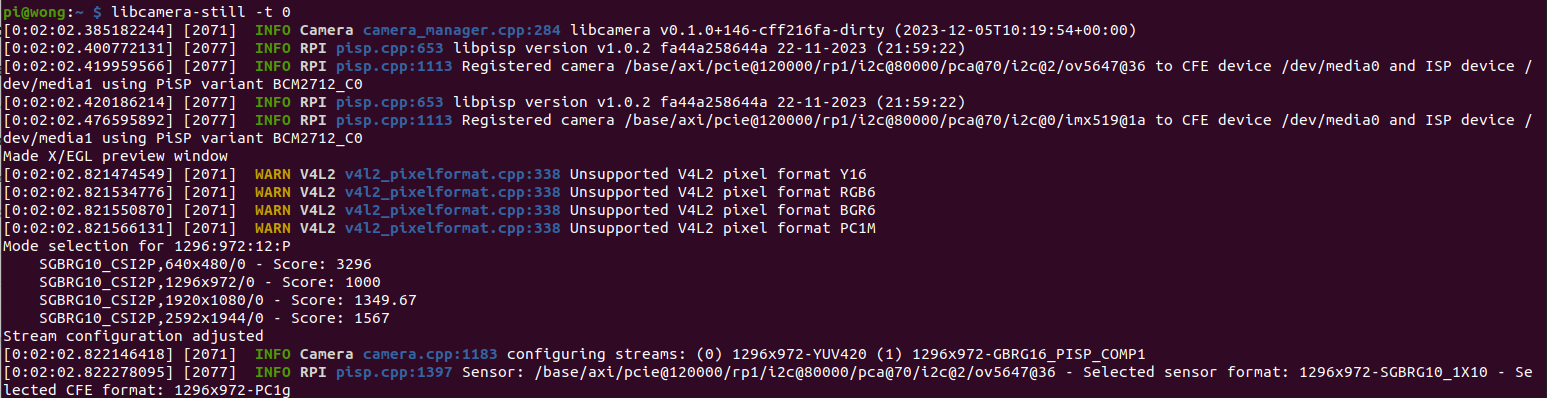
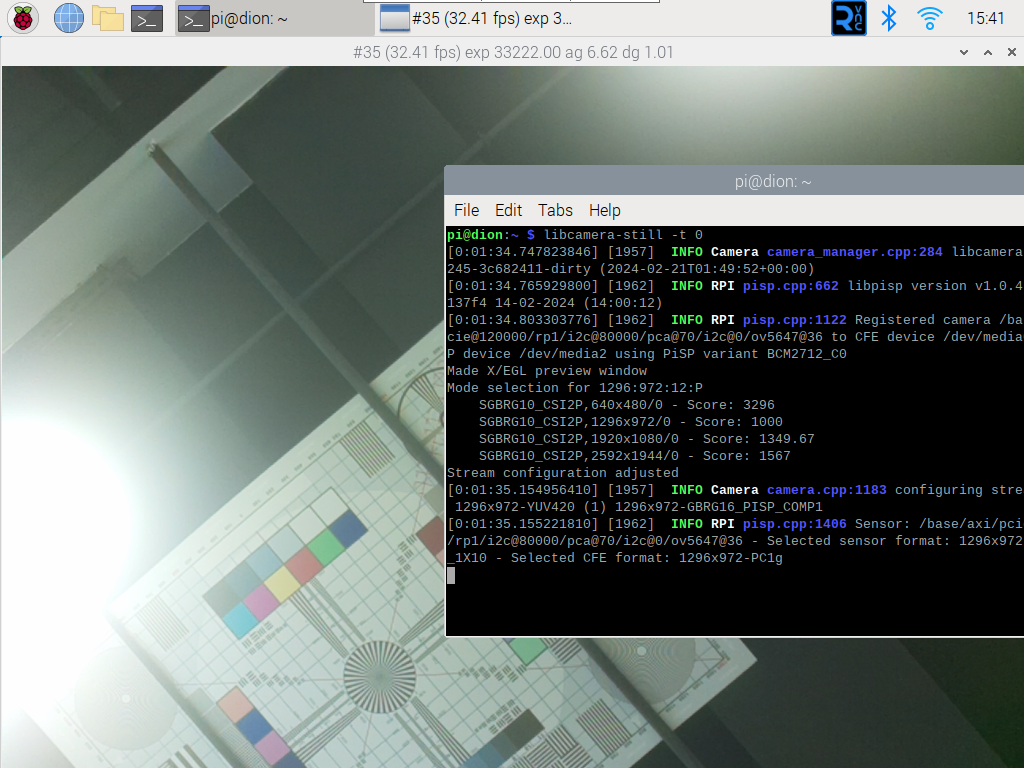
12. Time error occurs when using multi-camera adapter board on Pi5
Currently, Time out error may occur when using Arducam multi-camera adapter board(B012001) and OV5647 camera on Raspberry Pi 5.
pi@raspberrypi:~ $ libcamera-hello
WARNING: v3d support for hw version 71 is neither a complete nor a conformant OpenGL implementation. Testing use only.
Made X/EGL preview window
[0:09:41.969731058] [2860] INFO Camera camera_manager.cpp:284 libcamera v0.1.0+52-a858d20b
[0:09:41.988400159] [2865] INFO RPI pisp.cpp:657 libpisp version v0.0.1 2d39f8bff17b 22-08-2023 (09:04:26)
[0:09:42.024679523] [2865] WARN RPI pisp.cpp:1062 Mismatch between CFE and CamHelper for embedded data usage!
[0:09:42.025537897] [2865] INFO RPI pisp.cpp:1132 Registered camera /base/axi/pcie@120000/rp1/i2c@88000/ov5647@36 to CFE device /dev/media2 and ISP device /dev/media0 using PiSP variant BCM2712_C0
[0:09:42.025993380] [2860] WARN V4L2 v4l2_pixelformat.cpp:336 Unsupported V4L2 pixel format YM42
Stream configuration adjusted
[0:09:42.026329308] [2860] INFO Camera camera.cpp:1213 configuring streams: (0) 1296x972-YUV420
[0:09:42.026521179] [2865] INFO RPI pisp.cpp:1428 Sensor: /base/axi/pcie@120000/rp1/i2c@88000/ov5647@36 - Selected sensor format: 1296x972-SGBRG10_1X10 - Selected CFE format: 1296x972-PC1g
[0:09:43.101598515] [2865] WARN V4L2 v4l2_videodevice.cpp:2007 /dev/video4[21:cap]: Dequeue timer of 1000000.00us has expired!
[0:09:43.101730608] [2865] ERROR RPI pipeline_base.cpp:1337 Camera frontend has timed out!
[0:09:43.101756590] [2865] ERROR RPI pipeline_base.cpp:1338 Please check that your camera sensor connector is attached securely.
[0:09:43.101769034] [2865] ERROR RPI pipeline_base.cpp:1339 Alternatively, try another cable and/or sensor.
ERROR: Device timeout detected, attempting a restart!!!
[0:09:44.165689894] [2865] WARN V4L2 v4l2_videodevice.cpp:2007 /dev/video4[21:cap]: Dequeue timer of 1000000.00us has expired!
[0:09:44.165783117] [2865] ERROR RPI pipeline_base.cpp:1337 Camera frontend has timed out!
| Product Image | SKU | Sensor | Resolution | Pin/Connect Type | Features | Lens Type | Field of View(HxV) | Focus Type | IR Sensitivity |
|---|---|---|---|---|---|---|---|---|---|
 |
B012001 | NA | NA | NA | Quad-Camera Adapter Board | NA | NA | NA | NA |
To solve this problem, we need to modify the camera's front-end driver.
- Download the Driver file
- Switch Specific branch
First, you need to switch the system version to the 5744 branch. After the command is executed, you need to restart the Raspberry Pi to take effect.
sudo rpi-update pulls/5744
sudo reboot

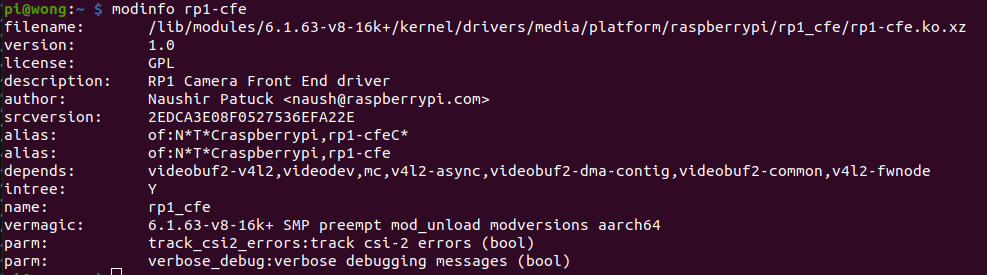
- Replace RP1 Camera Front End Driver
Check the location of the driver:
modinfo rp1-cfe
Back up the original driver:
sudo mv /lib/modules/6.1.63-v8-16k+/kernel/drivers/media/platform/raspberrypi/rp1_cfe/rp1-cfe.ko.xz /lib/modules/6.1.63-v8-16k+/kernel/drivers/media/platform/raspberrypi/rp1_cfe/rp1-cfe.ko.xz.bak

Copy the modified driver to the platform directory:
sudo cp ./rp1-cfe.ko.xz /lib/modules/6.1.63-v8-16k+/kernel/drivers/media/platform/raspberrypi/rp1_cfe/

Update module list:
sudo depmod -a
Reboot:
sudo reboot
- Preview
libcamera-still -t 0
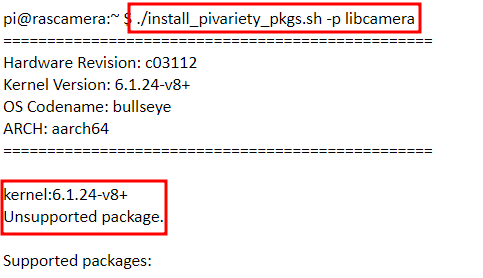
13. Libcamera installation error
If you receive the following error when installing libcamera, you can use the command ./install_pivariety_pkgs.sh -l to update your package and resolve the problem:
14. Unable to update kernel after using rpi-update command
When you use rpi-update command to update the Raspberry Pi OS kernel and VideoCore firmware to the latest pre-release version, if you encounter an error and cannot update, please refer to the following methods to solve the problem:
Error Phenomenon:
Cannot take effect use following command
sudo apt-get update
sudo apt-get upgrade
Solution:
Override the error
sudo apt-get dist-upgrade
15. Abnormal Image with IMX477 Camera
Statement
If you encounter an image abnormality in the first frame when using the IMX477 camera, you can use the following firmware upgrade solution to solve this problem.
Download the Firmware Update Package:
Unzip the package and run:
./firmware_update -i 10 -m imx477_m
