Access UVC Cameras using OpenCV, Python, and GStreamer on Windows
Arducam UVC cameras comply with UVC protocol and work with web-camera applications out-of-box. But advanced users might want to access these UVC cameras through their own code using Python and OpenCV with advanced controls for their machine vision and AI applications. In this article, we will cover how to access and control the Arducam UVC cameras in detail.
Windows
1. Capturing Video from UVC Web camera on Windows using Media Foundation
You can refer to this link for the source code.
1.1 Download the Simplecapture.exe file
Download link:
https://www.codeproject.com/KB/audio-video/559437/SimpleCapture-exe.zip
1.2 
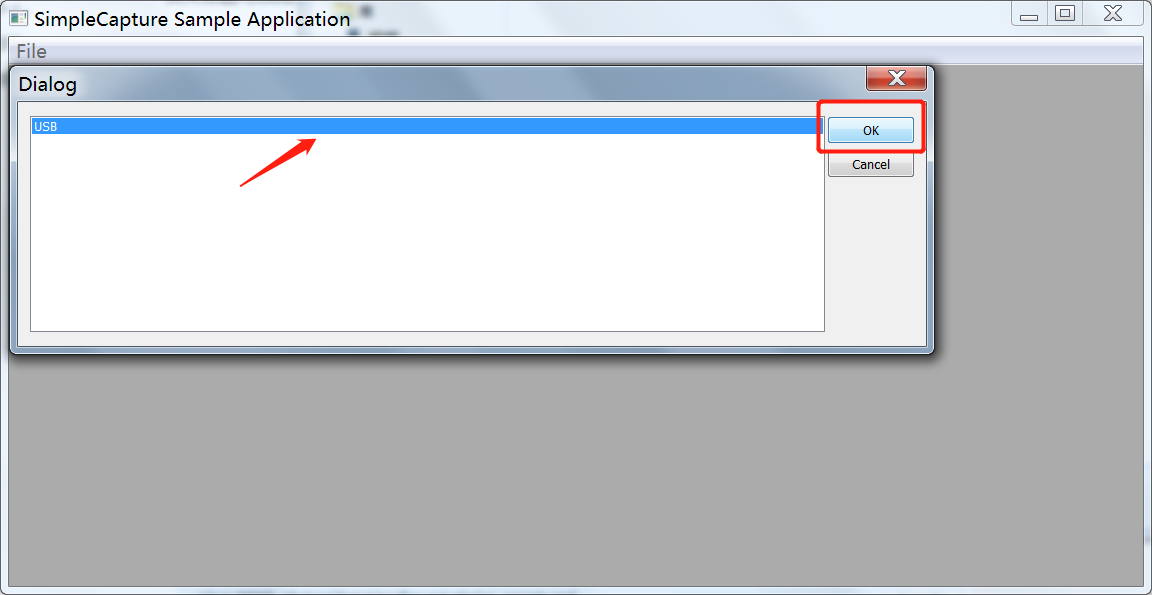
Unzip and open the Simplecapture.exe file
Select File-Choose device-USB-OK
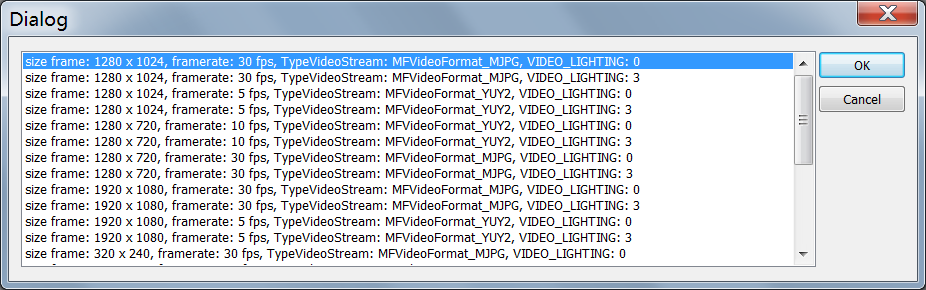
Select one the following figure list. Click OK.
1.3 Capture video
2. Access UVC Web Camera using OpenCV
You can refer to the link as following:
https://stackoverflow.com/a/606154 https://www.geeksforgeeks.org/python-opencv-capture-video-from-camera/
Note
Please use the version shown in the figure below and the upgraded version of OpenCV (the previous version of OpenCV maybe cannot access the camera normally).
2.1 How to install Python and OpenCV?
2.2 Python code
import cv2
'''
apiPreference preferred Capture API backends to use.
Can be used to enforce a specific reader implementation
if multiple are available:
e.g. cv2.CAP_MSMF or cv2.CAP_DSHOW.
'''
# open video0
cap = cv2.VideoCapture(0, cv2.CAP_MSMF)
# set width and height
# cap.set(cv2.CAP_PROP_FRAME_WIDTH, 1280)
# cap.set(cv2.CAP_PROP_FRAME_HEIGHT, 720)
# set fps
# cap.set(cv2.CAP_PROP_FPS, 30)
while(True):
# Capture frame-by-frame
ret, frame = cap.read()
# Display the resulting frame
cv2.imshow('frame', frame)
if cv2.waitKey(1) & 0xFF == ord('q'):
break
# When everything done, release the capture
cap.release()
cv2.destroyAllWindows()
3. Access multiple UVC Web Camera
3.1 Modify device name and serial number
It is different from Linux, you need to identify your UVC cameras by device name when using multiple UVC cameras on windows. Please refer to the document to modify Arducam UVC Camera serial number.
Note
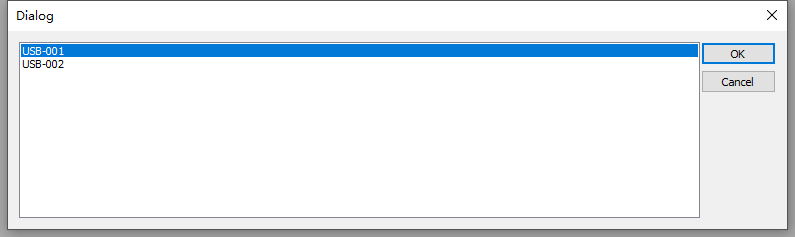
Different UVC cameras should have different device names and serial numbers.
After modified:
3.2 Python Code
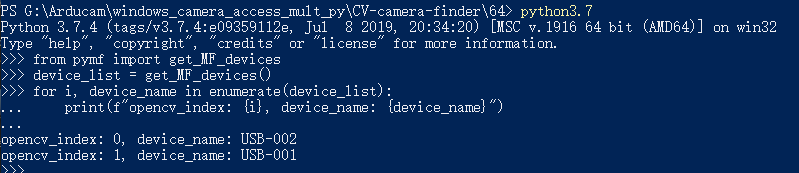
from pymf import get_MF_devices
device_list = get_MF_devices()
for i, device_name in enumerate(device_list):
print(f"opencv_index: {i}, device_name: {device_name}")
Note
You can refer to here to install pymf
. Please do not install pymf
using pip
(the pymf
in pip
is different from download by yourself).
4. Troubleshooting
4.1 Check camera function
Before using OpenCV to access the camera, you can check whether the camera is working properly through a graphical interface application firstly.
Way1 – You can refer to the doc to check your camera.
Way2 – You can use the .exe file to check your camera, download, and how to use refer to the chapter.
4.2 Fail to access camera
If you have the same problem, please follow the steps below:
1.Switch API(cv2.CAP_MSMF or cv2.CAP_DSHOW).
2.Set a larger frame rate.
4.3 Frame rate cannot set, and is too slow
Using cv2.CAP_DSHOW API backends may encounter frame rates that cannot be set and is at a very low level. At this time, it is recommended to use cv2.CAP_MSMF API backend.
Linux
1. Identify the Video Node, Supported Resolution, and Frame Rate
Before you opening a UVC camera, you have to check which is correct the video node.
In General, cameras with H.264 encoding have two or four video nodes:
-
For cameras with two nodes, the video0 formats including YUV, MJEPG, etc, and video1 is H.264.
-
For cameras with four nodes, the video0 formats including YUV, MJEPG, etc, and video2 is H.264.
Use the following command to view the supported formats.
The following pictures are example of the UVC camera with four video nodes.
Use the following command to check resolutions and frame rates supported by each format, if you want.
2. Access the camera and Send control with OpenCV
Use python OpenCV to access the camera(OpenCV can be installed via Pip, code: pip install OpenCV-python).
import cv2
# open video0
cap = cv2.VideoCapture(0)
# The control range can be viewed through v4l2-ctl -L
cap.set(cv2.CAP_PROP_BRIGHTNESS, 64)
cap.set(cv2.CAP_PROP_CONTRAST, 0)
while(True):
# Capture frame-by-frame
ret, frame = cap.read()
# Display the resulting frame
cv2.imshow('frame', frame)
if cv2.waitKey(1) & 0xFF == ord('q'):
break
# When everything done, release the capture
cap.release()
cv2.destroyAllWindows()
v4l2-ctl -L example.
How to achieve manual focus of autofocus camera using OpenCV
There are two different ways to achieve manual focus of autofocus camera:
1.Controlling values through code
import cv2
import time
# open video0
cap = cv2.VideoCapture(0)
cap.grab()
cap.set(cv2.CAP_PROP_AUTOFOCUS, 1)
time.sleep(2)
cap.set(cv2.CAP_PROP_AUTOFOCUS, 0)
time.sleep(2)
cap.set(cv2.CAP_PROP_FOCUS, 123)
cap.set(cv2.CAP_PROP_FRAME_WIDTH, 640)
cap.set(cv2.CAP_PROP_FRAME_HEIGHT, 480)
while(True):
# Capture frame-by-frame
ret, frame = cap.read()
# Display the resulting frame
cv2.imshow('frame', frame)
if cv2.waitKey(1) & 0xFF == ord('q'):
break
# When everything done, release the capture
cap.release()
cv2.destroyAllWindows()
2. Controlling values through UI interface
import cv2
import argparse
import configparser
from pathlib import Path
import time
parser = argparse.ArgumentParser()
parser.add_argument("-v", "--vid", default="0", help="Video sourse, default 0")
parser.add_argument(
"-f", "--auto_focus", action="store_true", default=False, help="Turn on auto focus"
)
parser.add_argument(
"-c",
"--config",
default="focus.ini",
help="Focus config file, default focus.ini",
)
args = parser.parse_args()
try:
vid = int(args.vid)
except ValueError:
vid = args.vid
config_path = (Path(__file__).parent / Path(args.config)).resolve().absolute()
print("config file :", config_path)
config = configparser.ConfigParser()
config.read(config_path, encoding="utf-8")
cap = cv2.VideoCapture(vid)
cap.grab()
cap.set(cv2.CAP_PROP_AUTOFOCUS, 1)
if not args.auto_focus and config.has_section("Focus"):
auto_focus = (
config.getint("Focus", "auto_focus")
if config.has_option("Focus", "auto_focus")
else 1
)
focus = (
config.getint("Focus", "focus")
if config.has_option("Focus", "focus")
else int(cap.get(cv2.CAP_PROP_FOCUS))
)
else:
auto_focus = 1
focus = None
print("config auto_focus = %s" % auto_focus)
print("config focus = %s" % focus)
print("*" * 10)
if not auto_focus:
cap.set(cv2.CAP_PROP_AUTOFOCUS, 0)
time.sleep(2)
if focus:
cap.set(cv2.CAP_PROP_FOCUS, focus)
cv2.namedWindow("frame")
def set_auto_focus(x):
cap.set(cv2.CAP_PROP_AUTOFOCUS, x)
cv2.createTrackbar(
"0: OFF\r\n 1: ON\r\nauto_focus",
"frame",
int(cap.get(cv2.CAP_PROP_AUTOFOCUS)),
1,
set_auto_focus,
)
def set_focus(x):
cap.set(cv2.CAP_PROP_FOCUS, x)
cv2.createTrackbar("focus", "frame", int(cap.get(cv2.CAP_PROP_FOCUS)), 1023, set_focus)
while cap.isOpened():
# cap frame-by-frame
ret, frame = cap.read()
if not ret:
break
focus = int(cap.get(cv2.CAP_PROP_FOCUS))
cv2.setTrackbarPos("focus", "frame", focus)
af = int(cap.get(cv2.CAP_PROP_AUTOFOCUS))
cv2.setTrackbarPos("0: OFF\r\n 1: ON\r\nauto_focus", "frame", af)
cv2.imshow("frame", frame)
if cv2.waitKey(1) & 0xFF == ord("q"):
break
# When everything done, release the cap
cap.release()
cv2.destroyAllWindows()
if not config.has_section("Focus"):
config.add_section("Focus")
print("set auto_focus = 0")
config.set("Focus", "auto_focus", "0")
print("set focus = %s" % focus)
config.set("Focus", "focus", str(focus))
config.write(open(config_path, "w"))
Please refer to here for more control parameters.
Please refer to here for more information about OpenCV access to the camera.
3. Access Multiple UVC Cameras
Sometimes you want to connect multiple UVC cameras at the same time but hard to identify them. Arducam UVC camera comes with a unique serial number, it allows you to recognize and control the camera separately. We will introduce you to two ways to check the serial number.
3.1. Use the video node
3.2. Use the python node
- Install dependencies
- Code
import pyudev
def getSerialNumber(device = 0):
context = pyudev.Context()
device_file = "/dev/video{}".format(device)
device = pyudev.Devices.from_device_file(context, device_file)
info = { item[0] : item[1] for item in device.items()}
return info["ID_SERIAL_SHORT"]
Note
If you want a different serial number, please contact us.
4. Streaming the Video Using GStreamer
GStreamer becomes a popular and powerful open-source multimedia framework to help users to build their own video streaming, playback, editing applications with various codec and functionalities on top of its high-level APIs.
Note
You can go to the chapter of Identify the Video Node, Supported Resolution, and Frame Rate to learn more about video node formats.
4.1. Set the video format
There are three video formats.
- MJPEG (the video0 format output)
gst-launch-1.0 v4l2src device=/dev/video0 ! \
image/jpeg,width=1280,height=720,framerate=30/1 ! \
decodebin ! autovideosink
- YUV (the video0 format output)
gst-launch-1.0 -vv v4l2src device=/dev/video0 ! \
video/x-raw,format=YUY2,width=1280,height=720,framerate=10/1 ! \
videoconvert ! autovideosink
- H.264 (the video2 format output)
gst-launch-1.0 v4l2src device=/dev/video2 ! queue ! \
video/x-h264,width=1280,height=720,framerate=30/1 ! \
avdec_h264 ! autovideosink
4.2. Streaming
YUV is different from compression formats such as MJPEG and H.264, and the amount of data is relatively large, which is not suitable for streaming.
- MJPEG
# server
gst-launch-1.0 v4l2src device=/dev/video0 ! \
image/jpeg,width=1280,height=720,framerate=30/1 ! \
tcpserversink host=0.0.0.0 port=5001
# client
# change xxx.xxx.xxx.xxx to the actual ip address
gst-launch-1.0 -v tcpclientsrc host=xxx.xxx.xxx.xxx port=5001 ! \
decodebin ! autovideosink
- H.264
# server
gst-launch-1.0 v4l2src device=/dev/video2 ! queue ! \
video/x-h264,width=1280,height=720,framerate=30/1 ! \
rtph264pay ! gdppay ! tcpserversink host=0.0.0.0 port=5001
# client
# change xxx.xxx.xxx.xxx to the actual ip address
gst-launch-1.0 -v tcpclientsrc host=xxx.xxx.xxx.xxx port=5001 ! \
gdpdepay ! rtph264depay ! avdec_h264 ! autovideosink
4.3. Access the camera
- Save Video
gst-launch-1.0 v4l2src device=/dev/video0 ! image/jpeg,width=1280,height=720,framerate=30/1 ! jpegdec ! x264enc ! qtmux ! filesink location=test.mp4 -e
- Save Image
gst-launch-1.0 v4l2src device=/dev/video0 num-buffers=1 ! jpegenc ! filesink sync=false location=file.jpg
- Preview