Troubleshooting
Notice
When the camera works abnormally, reconfirm the following basic
details:
- Make sure the cable line connection is normal and stable
- Make sure the camera you are using is normal version instead of specific version for camarray board.
- Make sure you are using the appropriate bullseye OS version (legacy buster version is not recommended)
- Follow the libcamera installation guide, make sure the driver, specific libcamera-dev and libcamera-apps installed normal.
More ways to check:
- Check that the driver is loaded correctly
dmesg | grep -E "imx477|imx219|arducam"

- Check if video0 has been found
ls /dev/video0

Before contacting arducam, please provide the following information so that we can help you solve problems efficiently.
- Hardware related:
Camera module number(e.g. SKU) or purchase link
Hardware connection diagram - Screenshot of operation commnad
- system related informaton which can be obtained by the following commands:
uname -a cat /etc/os-release cat /proc/meminfo cat /boot/config.txt - System log
dmesg | grep -E "imx477|imx219|arducam" - Application log
- Provide error log or screenshots about application throw out.
Troubleshooting
1. Cannot Allocate Memory
[3:45:35.833744413] [6019] INFO RPI raspberrypi.cpp:611 Sensor: / base/soc/i2c0mux/i2c@1/arducam@0c – Selected mode: 5344×4012-pRAA [3:45:35.948442507] [6019] ERROR V4L2 v4l2_videodevice.cpp:1126 /dev/video14[17:cap]: Unable to request 4 buffers: Cannot allocate memory [3:45:35.948551358] [6019] ERROR RPI raspberrypi.cpp:808 Failed to allocate buffers ERROR: failed to start camera
Edit /boot/cmdline.txt and add cma=400M at the end.

2. The Image Displays Color Dots
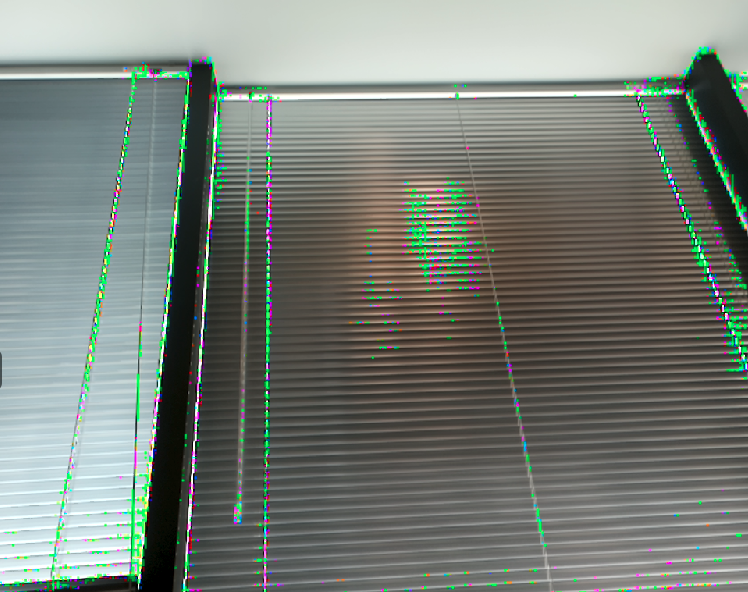
Add code --denoise cdn_off at the end of command.
libcamera-still -t 5000 -o test.jpg --denoise cdn_off
3. Failed to Install the Driver

Please check the kernel version, we only provide the driver for the latest official kernel version image when this Pivariety camera is released.
Note: If you want to compile the kernel driver by yourself, please refer to How to build Raspberry Pi Kernel Driver-Pivariety Camera.
4. Failed to import fd 19

If you find the same error, you may make the wrong selection about the graphics driver.
Warning
For Raspbian Bullseye users running on Pi Zero ~ Pi 3, please execute the follows
1. Open a terminal
2. Run sudo raspi-config
3. Navigate to Advanced Options
4. Enable Glamor graphic acceleration
5. Reboot your Pi
Meanwhile, you also need to execute the following steps:
6. Open a terminal
7. Run sudo raspi-config
8. Navigate to Advanced Options
9. Navigate to GL Driver
10. Select GL (Full KMS)
11. Reboot your Pi
For more details, please refer to the official forum guide on how to configure the camera module >>
For Raspberry Pi Compute Module 3/4
You need to install the latest Raspberry Pi system (after 2022/01/28), and do not execute rpi-update
After installing the system and drivers (follow the above instructions), add the following information to /boot/config.txt:
[cm4]
dtoverlay=imx519
dtoverlay=imx519,cam0
Then
sudo reboot
List all cameras:
libcamera-still -–list-cameras
Specify camera:
libcamera-still -t 0 –camera 0
libcamera-still -t 0 –camera 1
5. Open I2C bus error

Solution:
sudo raspi-config
–> Interface Options
–> I2C
6. Switch to the native camera (raspistill etc.)
If you want to use other cameras that needs Native driver, you can edit the file of /boot/config.txt, make dtoverlay=arducam and change to # dtoverlay=arducam.
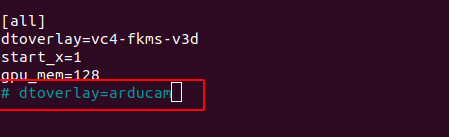
After the modification is completed, you need to reboot the Raspberry Pi.
sudo reboot
7. Unable to update kernel after using rpi-update command
When you use rpi-update command to update the Raspberry Pi OS kernel and VideoCore firmware to the latest pre-release version, if you encounter an error and cannot update, please refer to the following methods to solve the problem:
Error Phenomenon:
Cannot take effect use following command
sudo apt-get update
sudo apt-get upgrade
Solution:
Override the error
sudo apt-get dist-upgrade