Quick Start Guide for Arducam CamArray HAT Kit
Hardware
Dimension

Pin Definition
MIPI RX0/RX1/RX2/RX3
Connector Part Number:F32R-1A7H1-11022
FFC: Top on One Side, Bottom on Other, Backers on Both Sides(Opposite side)
| Pin No. | PIN NAME | TYPE | DESCRIPTION | Level |
|---|---|---|---|---|
| 1 | DGND | Ground | Power ground | GND |
| 2 | MDN0 | Input | Pixel Data Lane0 Negative | 1.2V |
| 3 | MDP0 | Input | Pixel Data Lane0 Positive | 1.2V |
| 4 | DGND | Ground | Power ground | GND |
| 5 | MDN1 | Input | Pixel Data Lane1 Negative | 1.2V |
| 6 | MDP1 | Input | Pixel Data Lane1Positive | 1.2V |
| 7 | DGND | Ground | Power ground | GND |
| 8 | MCN | Input | Pixel Clock Output Form Sensor Negative | 1.2V |
| 9 | MCP | Input | Pixel Clock Output Form Sensor Positive | 1.2V |
| 10 | DGND | Ground | Power ground | GND |
| 11 | NC | NC | NC | NC |
| 12 | NC | NC | NC | NC |
| 13 | DGND | Ground | Power ground | GND |
| 14 | NC | NC | NC | NC |
| 15 | NC | NC | NC | NC |
| 16 | DGND | Ground | Power ground | GND |
| 17 | POWER-EN | Output | Camera Power Enable | 3.3V |
| 18 | XCLK | Output | Camera XCLK | 1.8V |
| 19 | DGND | Ground | Power ground | GND |
| 20 | SCL | Output | SCCB serial interface clock Output | 3.3V |
| 21 | SDA | I/O | SCCB serial interface data I/O | 3.3V |
| 22 | VCC | Power | 3.3V Power supply | POWER |
MIPI TX
Part Number:F32R-1A7H1-11022
| Pin No. | PIN NAME | TYPE | DESCRIPTION | Level |
|---|---|---|---|---|
| 1 | DGND | Ground | Power ground | GND |
| 2 | MDN0 | Output | Pixel Data Lane0 Negative | 1.2V |
| 3 | MDP0 | Output | Pixel Data Lane0 Positive | 1.2V |
| 4 | DGND | Ground | Power ground | GND |
| 5 | MDN1 | Output | Pixel Data Lane1 Negative | 1.2V |
| 6 | MDP1 | Output | Pixel Data Lane1 Positive | 1.2V |
| 7 | DGND | Ground | Power ground | GND |
| 8 | MCN | Output | Pixel Clock Output Form Sensor Negative | 1.2V |
| 9 | MCP | Output | Pixel Clock Output Form Sensor Positive | 1.2V |
| 10 | DGND | Ground | Power ground | GND |
| 11 | MDN2 | Output | Pixel Data Lane2 Negative | 1.2V |
| 12 | MDP2 | Output | Pixel Data Lane2 Positive | 1.2V |
| 13 | DGND | Ground | Power ground | GND |
| 14 | MDN3 | Output | Pixel Data Lane3 Negative | 1.2V |
| 15 | MDP3 | Output | Pixel Data Lane3 Positive | 1.2V |
| 16 | DGND | Ground | Power ground | GND |
| 17 | POWER-EN | Input | Camera Power Enable | 3.3V |
| 18 | NC | NC | NC | NC |
| 19 | DGND | Ground | Power ground | GND |
| 20 | SCL | Input | SCCB serial interface clock Input | 3.3V |
| 21 | SDA | I/O | SCCB serial interface data I/O | 3.3V |
| 22 | NC | NC | NC | NC |
Hardware Connection
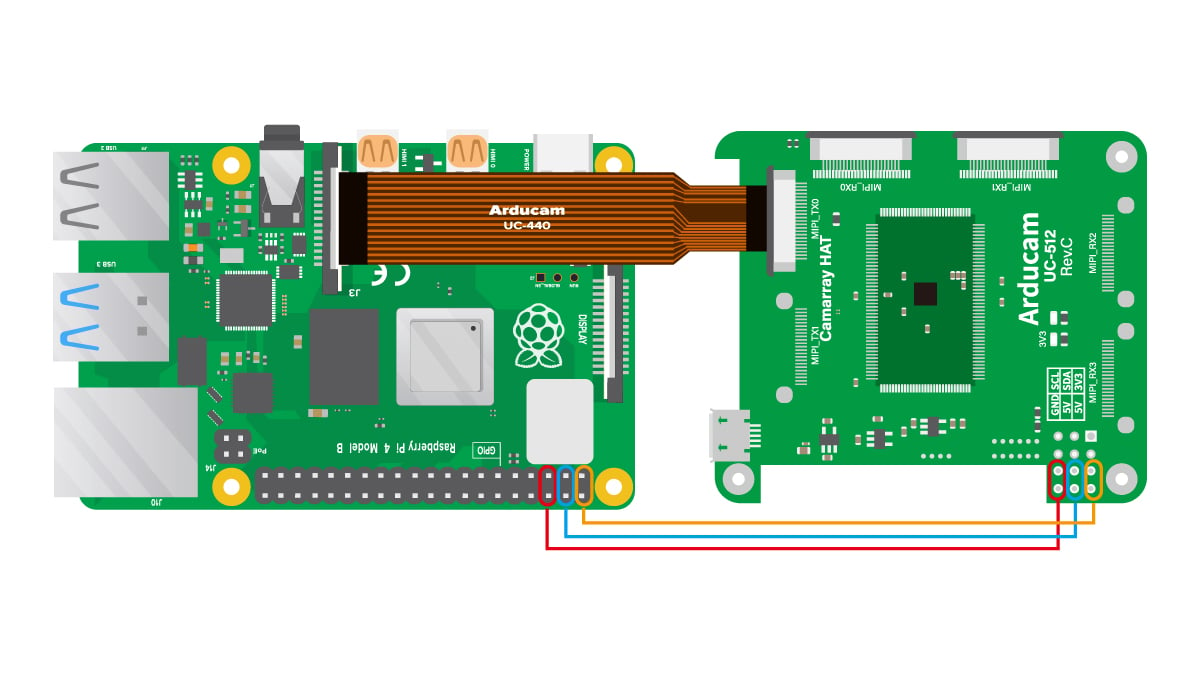
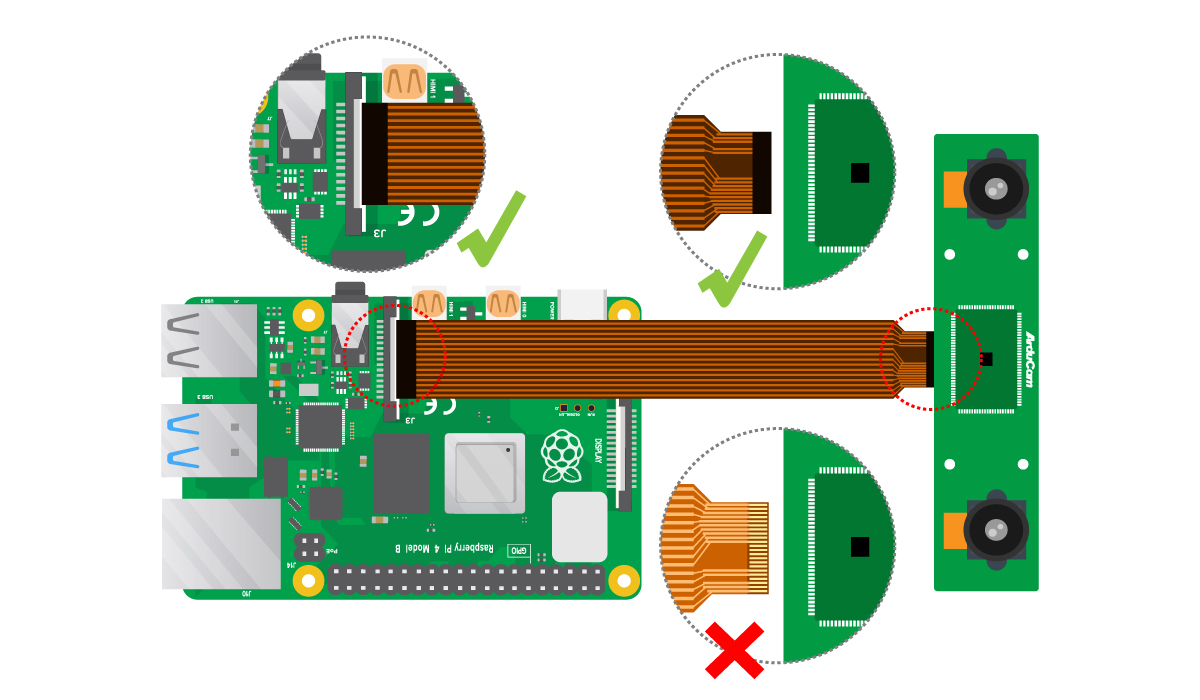
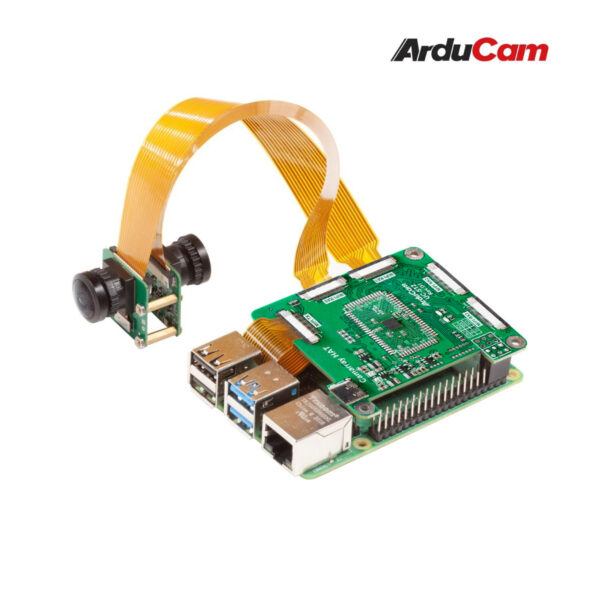
Connect CamArray HAT(Variable Baseline version) to Raspberry Pi:
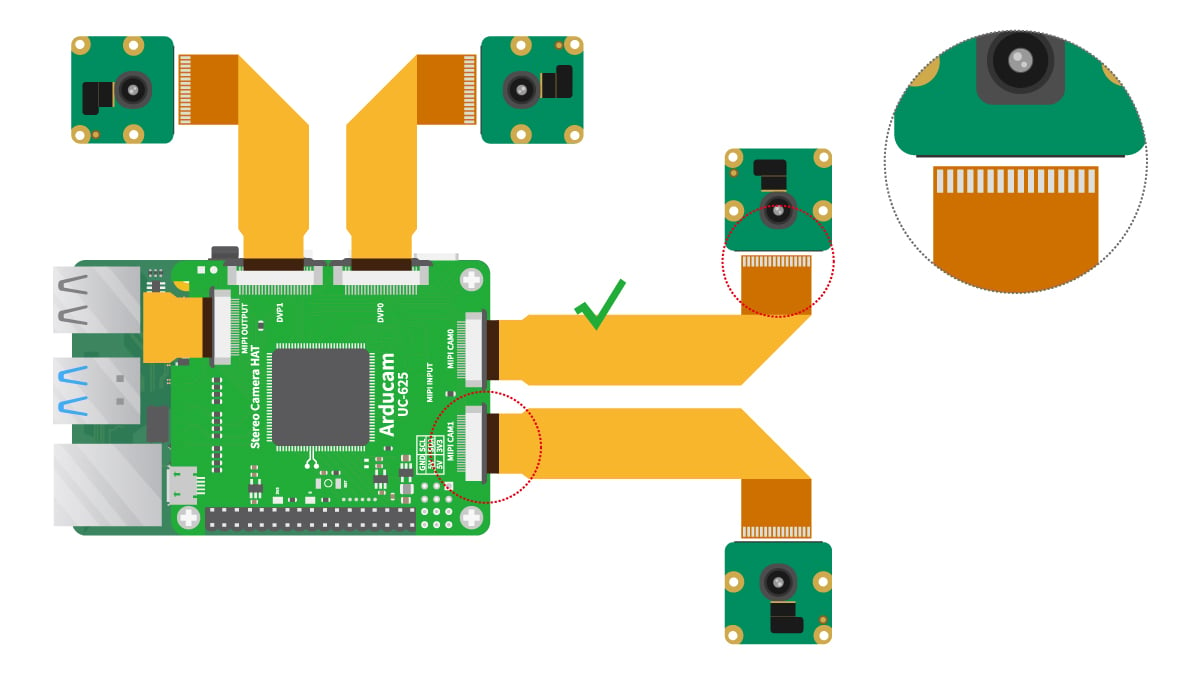
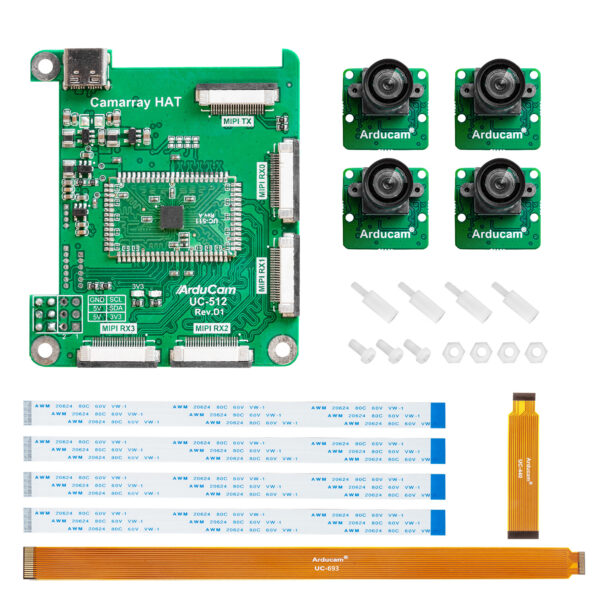
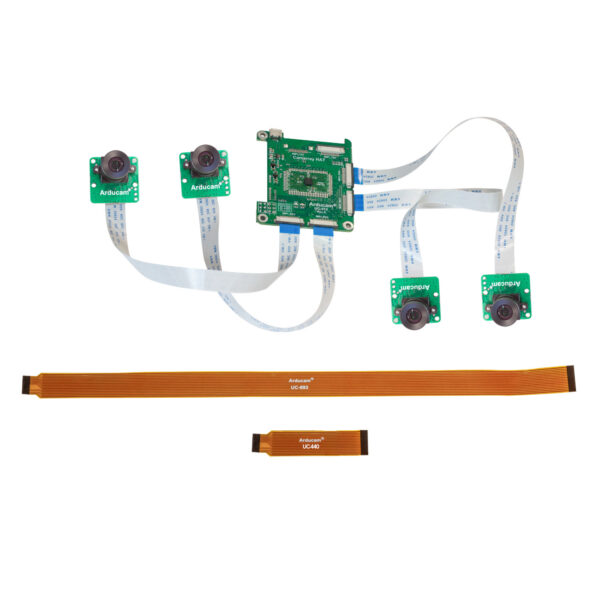
Connect four-cameras to Camarray HAT(Variable Baseline version):
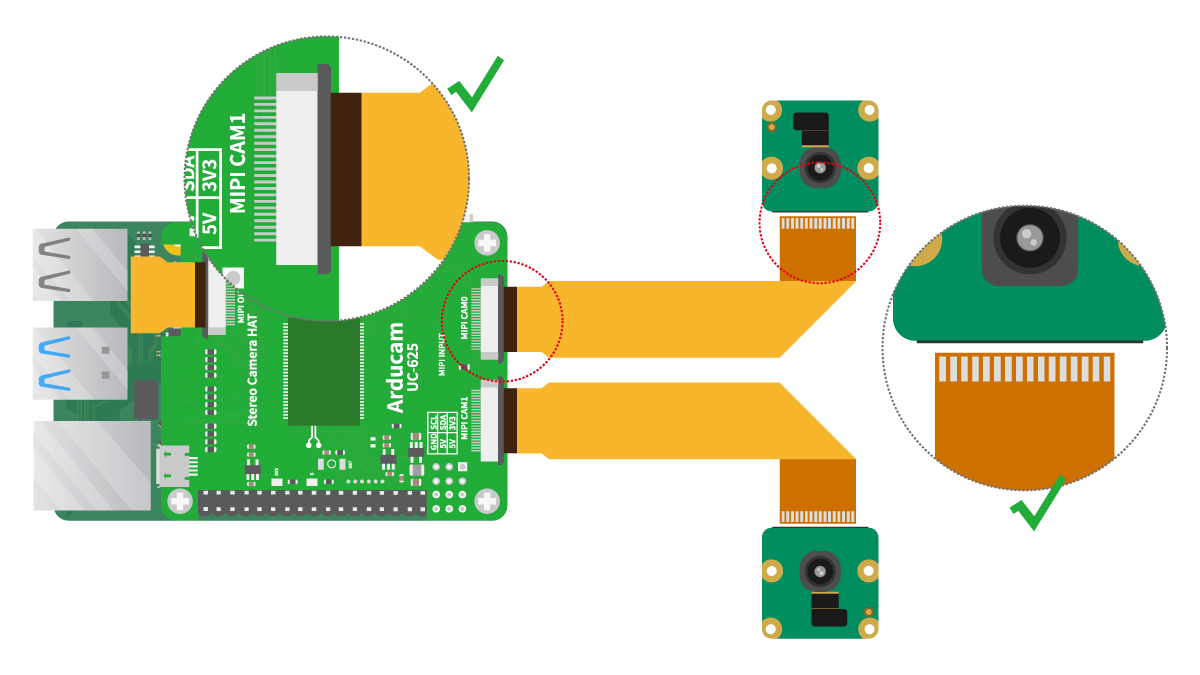
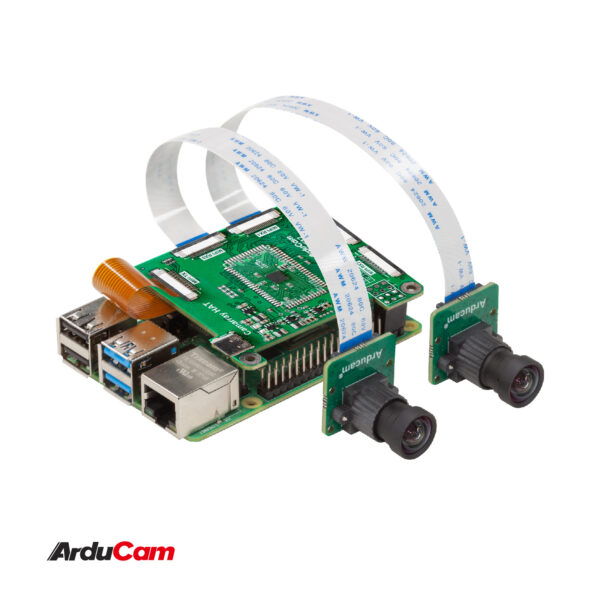
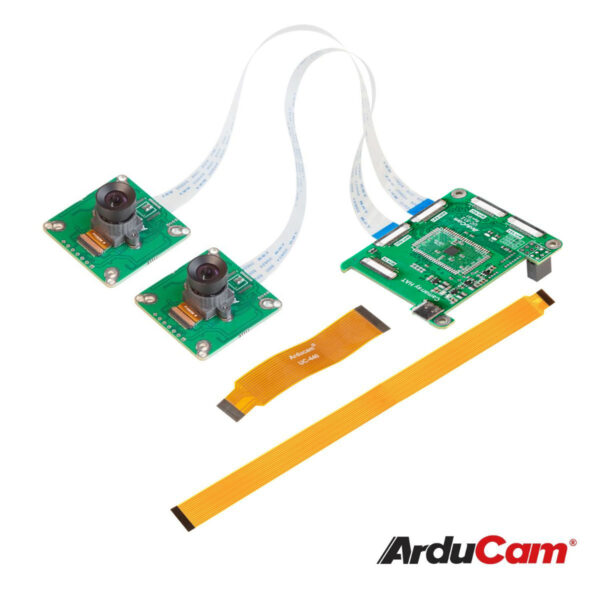
Connect two-cameras to Camarray HAT(Variable Baseline version):
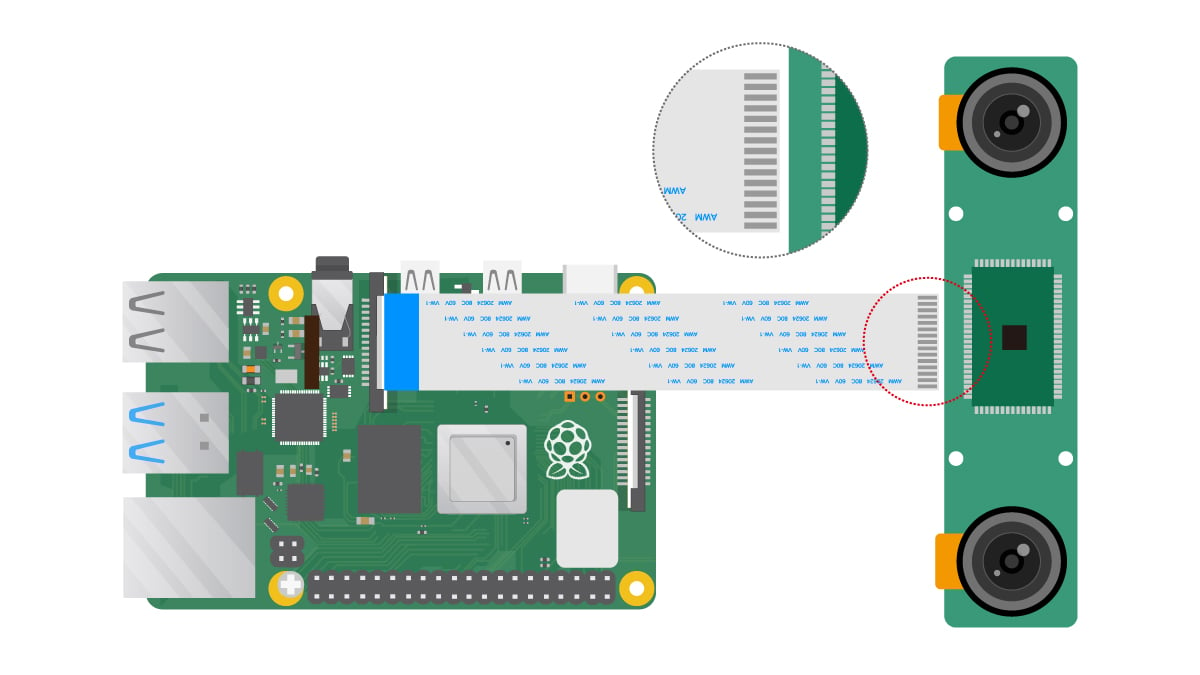
Connect Stereo camera kit(Fixed Baseline version) to Raspberry Pi:
Tip
Arducam has released binocular cameras with two connection methods: 15pin and 22pin connected cameras
- This is the connection of 15pin binocular camera:
- This is the connection of 22pin binocular camera:
Software
Find your corresponding camera in the following two links, and then execute the following command
Native cameras
| Product Image | SKU | Sensor | Resolution | Pin/Connect Type | Features | Lens Type | Field of View(HxV) | Focus Type | IR Sensitivity |
|---|---|---|---|---|---|---|---|---|---|
 |
B0347R | IMX477 | 12MP | 15/Bottom | Stereo Camera | M12 | 75°(H) x 56°(V) | Manual Focus | 650nm IR-cut filter |
 |
B0396 | IMX219 | 8MP | Quad Camera | Stock Lens | 62.2° (H) x 48.8(V) | Fixed Focus | ||
 |
B0397 | IMX477 | 12MP | M12 | 75°(H) x 56°(V) | Manual Focus | |||
 |
B0265R | IMX477 | 12MP | 15/Bottom | Stereo Camera | CS | 65°(H) x 48.7°(V) | Manual Focus | 650nm IR-cut filter |
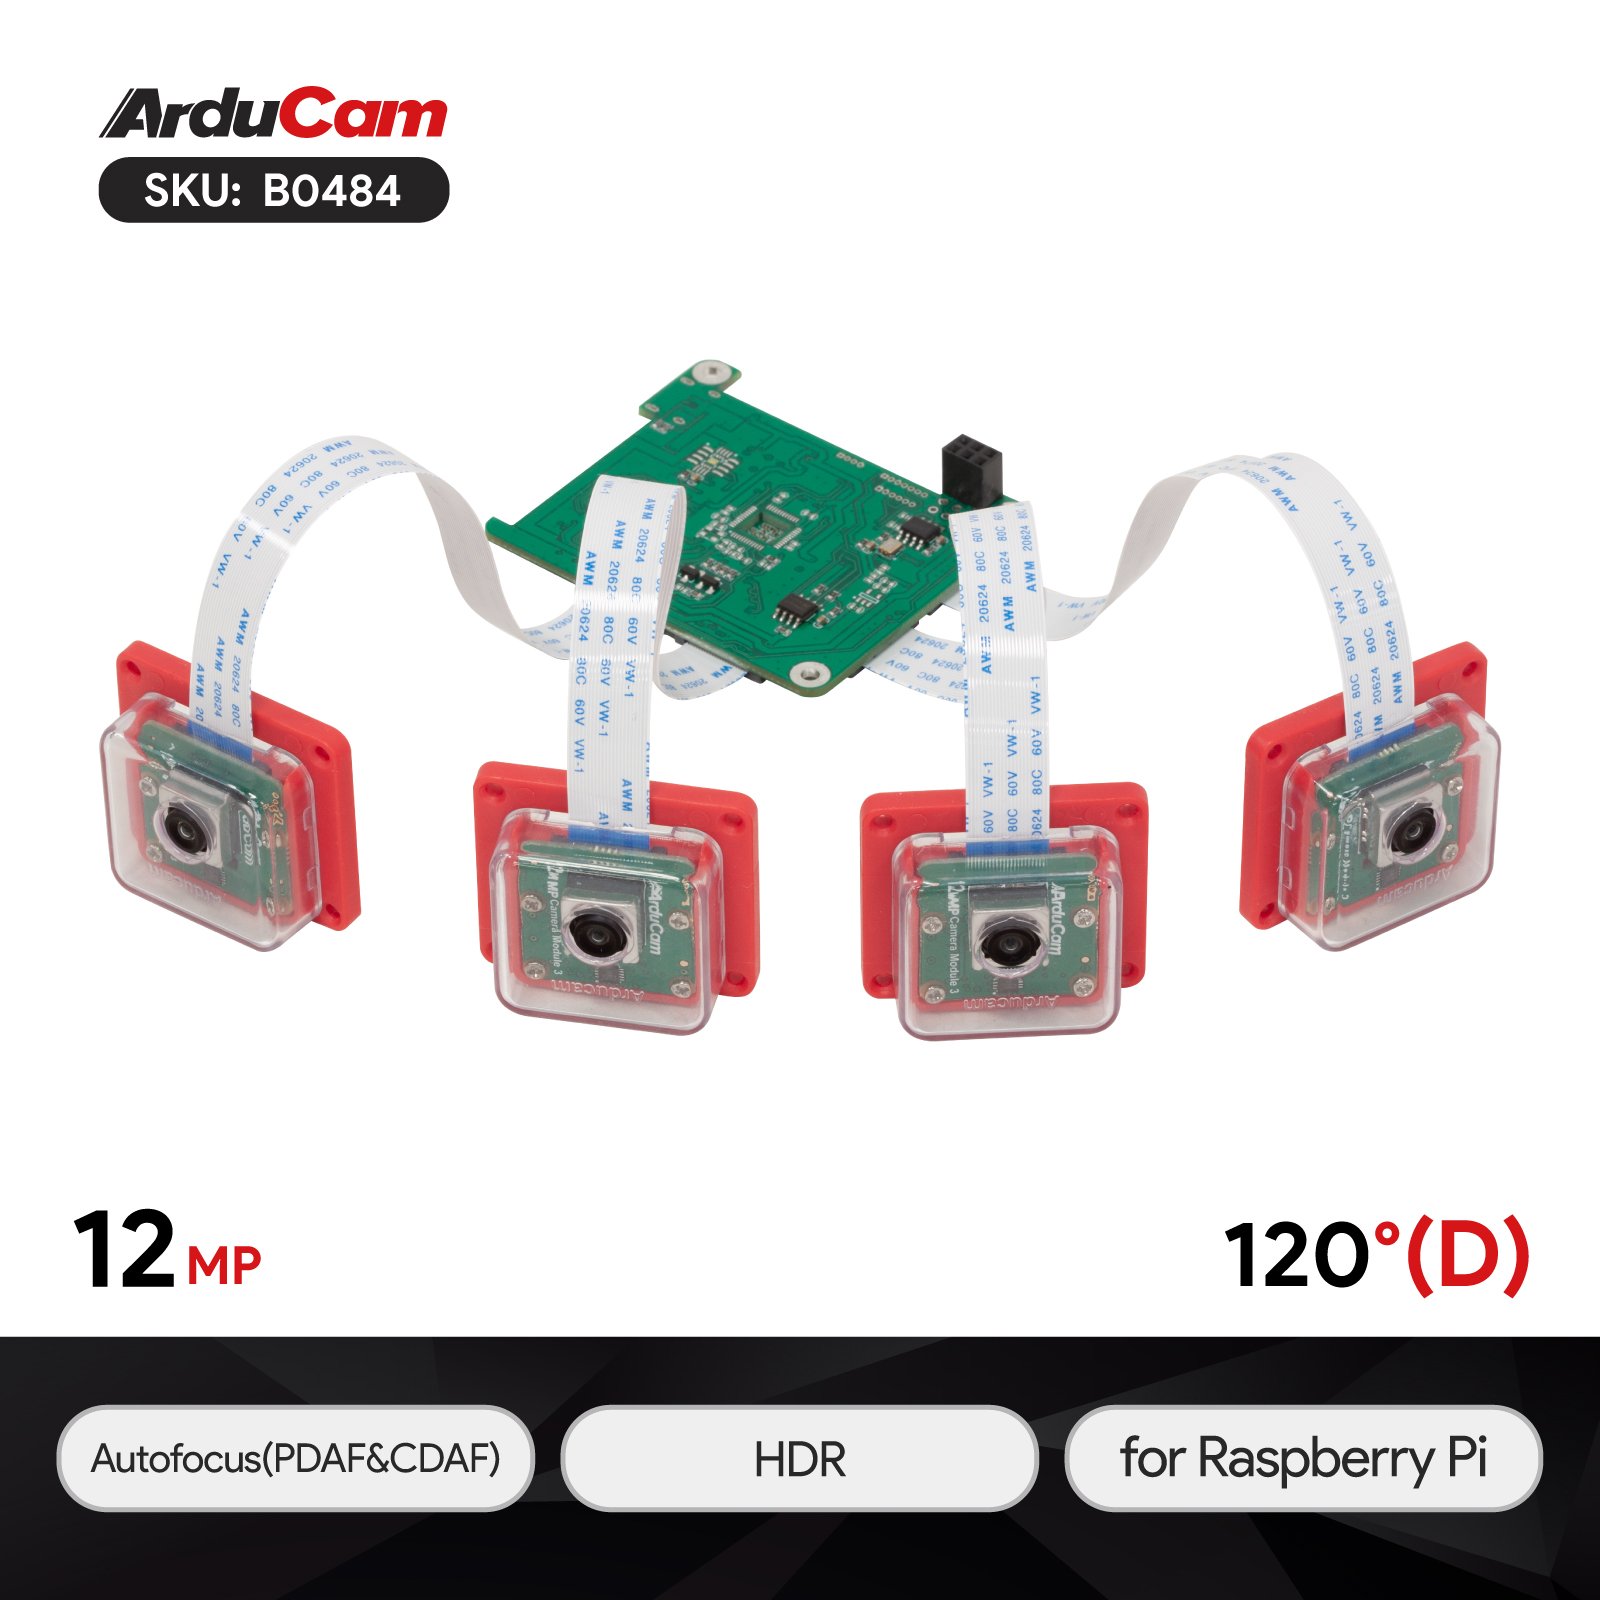 |
B0484 | IMX708 | 12MP | 15/Bottom | Quad Camera | Stock Lens | 120°(D)x100°(H)x72°(V) | Autofocus | 650nm IR-cut filter |
 |
B0388 | IMX519 | 16MP | 15/Bottom | Quad Camera | Stock Lens | 66°(H) x 49.5°(V) | Motorized Focus | 650nm IR-cut filter |
 |
B0402 | 64MP | 64MP | 15/Bottom | Quad Camera | Stock Lens | 72°(H) x 54.6°(V) | Motorized Focus | 650nm IR-cut filter |
Supported Platforms and OS
| Note for Supported Platform and OS | |||
|---|---|---|---|
| Platform | Bookworm(rpicam/libcamera) | Bullseye(libcamera) | Buster(raspistill) |
| Raspberry Pi 5 | √ | ||
| Raspberry Pi 4B / 3B+ / 3A+ / Zero / Zero 2 W | √ | √ | |
| Raspberry Pi CM3 / CM3+ / CM4 (extra adapter board required) |
√ | √ | |
IMX219 Multi-camera Kit:
Note
Please make sure you are running the latest version of Raspberry Pi OS. (January 28th, 2022 or later releases, Debian version:11(Bullseye) and Bookworm OS). You need to update the config file and use libcamera apps.
- For Raspberry Pi Bookworm users running on Pi 5, please do the following:
sudo nano /boot/firmware/config.txt
#Find the line: camera_auto_detect=1, update it to:
camera_auto_detect=0
dtoverlay=imx219
#Save and reboot.
If you want to enable the camera kit on the
cam0port of Pi5, please refer to the following modifications:
sudo nano /boot/firmware/config.txt
#Find the line: camera_auto_detect=1, update it to:
camera_auto_detect=0
dtoverlay=imx219,cam0
#Save and reboot.
- For Raspberry Pi Bookworm/Bullseye users running on Pi 4, please do the following:
Bookworm OS on Pi4
sudo nano /boot/firmware/config.txt
#Find the line: camera_auto_detect=1, update it to:
camera_auto_detect=0
dtoverlay=imx219
#Save and reboot.
Bullseye OS on Pi4
sudo nano /boot/config.txt
#Find the line: camera_auto_detect=1, update it to:
camera_auto_detect=0
dtoverlay=imx219
#Save and reboot.
- For Bullseye users running on Pi 0 ~ 3, please also:
Open a terminal
Run sudo raspi-config
Navigate to Advanced Options
Enable Glamor graphic acceleration
Reboot your Pi
If you encounter the display issues, please also execute the following steps:
Open a terminal
Run sudo raspi-config
Navigate to Advanced Options
Navigate to GL Driver
Select GL (Full KMS)
Reboot your Pi
- For Raspberry Pi Compute Module 3/4
The latest software only supports one camera at this time, CM4 uses CAM1 by default.
IMX477 Multi-Camera Kit:
Note
Please make sure you are running the latest version of Raspberry Pi OS. (January 28th, 2022 or later releases, Debian version:11(Bullseye) and Bookworm OS). You need to update the config file and use libcamera apps.
- For Raspberry Pi Bookworm users running on Pi 5, please do the following:
sudo nano /boot/firmware/config.txt
#Find the line: camera_auto_detect=1, update it to:
camera_auto_detect=0
dtoverlay=imx477
#Save and reboot.
If you want to enable the camera kit on the
cam0port of Pi5, please refer to the following modifications:
sudo nano /boot/firmware/config.txt
#Find the line: camera_auto_detect=1, update it to:
camera_auto_detect=0
dtoverlay=imx477,cam0
#Save and reboot.
- For Raspberry Pi Bookworm/Bullseye users running on Pi 4, please do the following:
Bookworm OS on Pi4
sudo nano /boot/firmware/config.txt
#Find the line: camera_auto_detect=1, update it to:
camera_auto_detect=0
dtoverlay=imx477
#Save and reboot.
Bullseye OS on Pi4
sudo nano /boot/config.txt
#Find the line: camera_auto_detect=1, update it to:
camera_auto_detect=0
dtoverlay=imx477
#Save and reboot.
- For Bullseye users running on Pi 0 ~ 3, please also:
Open a terminal
Run sudo raspi-config
Navigate to Advanced Options
Enable Glamor graphic acceleration
Reboot your Pi
If you encounter the display issues, please also execute the following steps:
Open a terminal
Run sudo raspi-config
Navigate to Advanced Options
Navigate to GL Driver
Select GL (Full KMS)
Reboot your Pi
- For Raspberry Pi Compute Module 3/4
The latest software only supports one camera at this time, CM4 uses CAM1 by default.
IMX708 Multi-Camera Kit:
Note
Please make sure you are running the latest version of Raspberry Pi OS. (January 28th, 2022 or later releases, Debian version:11(Bullseye) and Bookworm OS). You need to update the config file and use libcamera apps.
- For Raspberry Pi Bookworm users running on Pi 5, please do the following:
sudo nano /boot/firmware/config.txt
#Find the line: camera_auto_detect=1, update it to:
camera_auto_detect=0
dtoverlay=imx708
#Save and reboot.
If you want to enable the camera kit on the
cam0port of Pi5, please refer to the following modifications:
sudo nano /boot/firmware/config.txt
#Find the line: camera_auto_detect=1, update it to:
camera_auto_detect=0
dtoverlay=imx708,cam0
#Save and reboot.
- For Raspberry Pi Bookworm/Bullseye users running on Pi 4, please do the following:
Bookworm OS on Pi4
sudo nano /boot/firmware/config.txt
#Find the line: camera_auto_detect=1, update it to:
camera_auto_detect=0
dtoverlay=imx708
#Save and reboot.
Bullseye OS on Pi4
sudo nano /boot/config.txt
#Find the line: camera_auto_detect=1, update it to:
camera_auto_detect=0
dtoverlay=imx708
#Save and reboot.
- For Bullseye users running on Pi 0 ~ 3, please also:
Open a terminal
Run sudo raspi-config
Navigate to Advanced Options
Enable Glamor graphic acceleration
Reboot your Pi
If you encounter the display issues, please also execute the following steps:
Open a terminal
Run sudo raspi-config
Navigate to Advanced Options
Navigate to GL Driver
Select GL (Full KMS)
Reboot your Pi
- For Raspberry Pi Compute Module 3/4
The latest software only supports one camera at this time, CM4 uses CAM1 by default.
IMX519 Multi-Camera Kit:
Note
Please make sure you are running the latest version of Raspberry Pi OS. (January 28th, 2022 or later releases, Debian version:11(Bullseye) and Bookworm OS). You need to update the config file and use libcamera apps.
- Download the bash scripts
wget -O install_pivariety_pkgs.sh https://github.com/ArduCAM/Arducam-Pivariety-V4L2-Driver/releases/download/install_script/install_pivariety_pkgs.sh
chmod +x install_pivariety_pkgs.sh
- Install
libcameraandlibcamera-apps
./install_pivariety_pkgs.sh -p libcamera
./install_pivariety_pkgs.sh -p libcamera_apps
- For Raspberry Pi Bookworm users running on Pi 5, please do the following:
sudo nano /boot/firmware/config.txt
#Find the line: [all], add the following item under it:
dtoverlay=imx519
#Save and reboot.
If you want to enable the camera kit on the
cam0port of Pi5, please refer to the following modifications:
sudo nano /boot/firmware/config.txt
#Find the line: [all], add the following item under it:
dtoverlay=imx519,cam0
#Save and reboot.
- For Raspberry Pi Bookworm/Bullseye users running on Pi 4, please do the following:
Tip
If you are running this camera kit on earlier Raspberry Pi Bullseye OS versions (the versions before Bullseye 6.1.21). Please refer to the following page:
IMX519 Camera on Raspberry Pi(Before Raspberry Pi Bullseye OS 6.1.21 version)
Bookworm OS on Pi4
sudo nano /boot/firmware/config.txt
#Find the line: [all], add the following item under it:
dtoverlay=imx519
#Save and reboot.
Bullseye OS on Pi4 (Bullseye 6.1.21 and later versions)
sudo nano /boot/config.txt
#Find the line: [all], add the following item under it:
dtoverlay=imx519
#Save and reboot.
- For Bullseye users running on Pi 0 ~ 3, please also:
Open a terminal
Run sudo raspi-config
Navigate to Advanced Options
Enable Glamor graphic acceleration
Reboot your Pi
If you encounter the display issues, please also execute the following steps:
Open a terminal
Run sudo raspi-config
Navigate to Advanced Options
Navigate to GL Driver
Select GL (Full KMS)
Reboot your Pi
- For Raspberry Pi Compute Module 3/4
The latest software only supports one camera at this time, CM4 uses CAM1 by default.
64MP Hawkeye Multi-Camera Kit:
Note
Please make sure you are running the latest version of Raspberry Pi OS. (January 28th, 2022 or later releases, Debian version:11(Bullseye) and Bookworm OS). You need to update the config file and use libcamera apps.
- Download the bash scripts
wget -O install_pivariety_pkgs.sh https://github.com/ArduCAM/Arducam-Pivariety-V4L2-Driver/releases/download/install_script/install_pivariety_pkgs.sh
chmod +x install_pivariety_pkgs.sh
- Install
libcameraandlibcamera-apps
./install_pivariety_pkgs.sh -p libcamera_dev
./install_pivariety_pkgs.sh -p libcamera_apps
- Install Camera drivers
Tip
The Raspberry PI Bookworm OS can turn on arducam_64mp directly by configuring dtoverlay=arducam-64mp, but the driver may not be up to date and some issues have not been fixed. If you run into problems, try using the installation script below to install the latest driver.
./install_pivariety_pkgs.sh -p 64mp_pi_hawk_eye_kernel_driver
Please reboot your Pi when you finish the installation.
sudo reboot
- For Raspberry Pi Bookworm users running on Pi 5, please do the following:
sudo nano /boot/firmware/config.txt
#Find the line: [all], add the following item under it:
dtoverlay=arducam-64mp
#Save and reboot.
If you want to enable the camera kit on the
cam0port of Pi5, please refer to the following modifications:
sudo nano /boot/firmware/config.txt
#Find the line: [all], add the following item under it:
dtoverlay=arducam-64mp,cam0
#Save and reboot.
- For Raspberry Pi Bookworm/Bullseye users running on Pi 4, please do the following:
Tip
If you are running this camera kit on earlier Raspberry Pi Bullseye OS versions (the versions before Bullseye 6.1.21). Please refer to the following page:
64MP Camera on Raspberry Pi(Before Raspberry Pi Bullseye OS 6.1.21 version)
Bookworm OS on Pi4
sudo nano /boot/firmware/config.txt
#Find the line: [all], add the following item under it:
dtoverlay=arducam-64mp
#Save and reboot.
Bullseye OS on Pi4 (Bullseye 6.1.21 and later versions)
sudo nano /boot/config.txt
#Find the line: [all], add the following item under it:
dtoverlay=arducam-64mp
#Save and reboot.
- For Bullseye users running on Pi 0 ~ 3, please also:
Open a terminal
Run sudo raspi-config
Navigate to Advanced Options
Enable Glamor graphic acceleration
Reboot your Pi
If you encounter the display issues, please also execute the following steps:
Open a terminal
Run sudo raspi-config
Navigate to Advanced Options
Navigate to GL Driver
Select GL (Full KMS)
Reboot your Pi
- For Raspberry Pi Compute Module 3/4
The latest software only supports one camera at this time, CM4 uses CAM1 by default.
64MP OV64A40 Multi-Camera Kit
Preparation
- Please keep the kernel up-to-date and restart after updating.
sudo apt-get update
sudo apt-get upgrade
Raspberry Pi Kernel version supported currently((Please do not update the kernel to a non-stable version, such as via sudo rpi-update)):
6.1.58
You can check your kernel version by:
uname -v | grep -oP '\d+\.\d+\.\d+'

- Supported Raspberry Pi platforms(All tested)
Raspberry Pi 5/Raspberry Pi 4/Raspberry Pi 3
Operation Guide
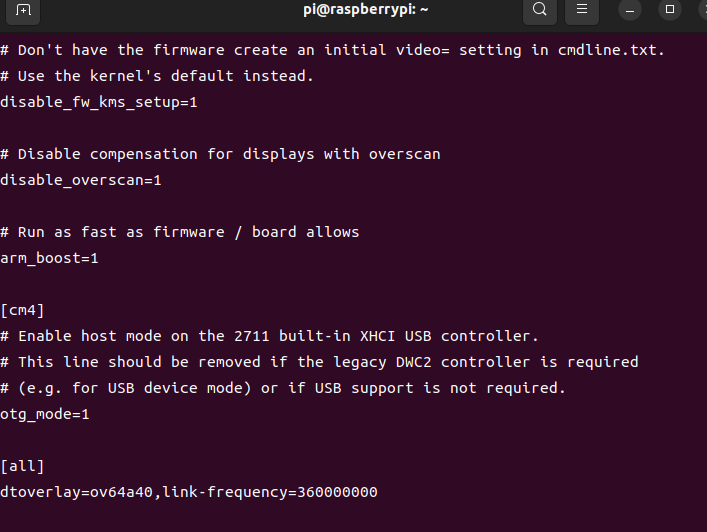
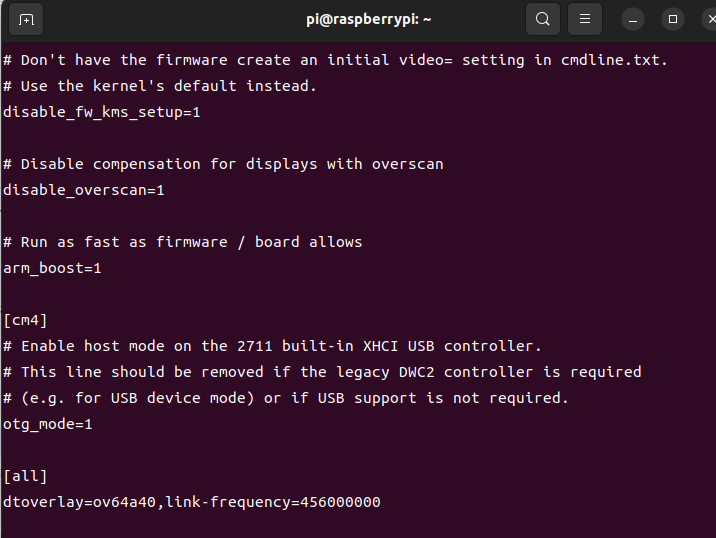
Step 1. Open and edit the config file
sudo nano /boot/firmware/config.txt
Step 2. Add dtoverlay to enable the OwlSight camera
Note
Arducam OV64A40 camera supports adjusting the image speed (link-freq parameter under config.txt).
There are currently two speeds: 360000000 and 456000000
1. If you want to choose link-freq 360000000, you need to add the sentence below under [all] in the config file:
dtoverlay=ov64a40,link-frequency=360000000
The
cam1port is enabled on Pi 5 by default. If you want to enable the camera on thecam0port of Pi5, please refer to the following modifications:
sudo nano /boot/firmware/config.txt
#Find the line: [all], add the following item under it:
dtoverlay=ov64a40,cam0,link-frequency=360000000
#Save and reboot.
2. If you want to choose link-freq 456000000, you need to add the sentence below under [all] in the config file:
dtoverlay=ov64a40,link-frequency=456000000
The
cam1port is enabled on Pi 5 by default. If you want to enable the camera on thecam0port of Pi5, please refer to the following modifications:
sudo nano /boot/firmware/config.txt
#Find the line: [all], add the following item under it:
dtoverlay=ov64a40,cam0,link-frequency=456000000
#Save and reboot.
Warning
-
Please make sure you have only one
dtoverlay sentenceenabled in your config file, either 360000000 or 456000000. -
If both
dtoverlay sentencesare enabled in your config file,there will be a conflict. -
In addition, When link-frequency=456000000 is settled, the camera extension solution may have data transfer issues. Only a single camera can be used at this time. Please also ensure that the length of the flexible cable is short.
Step 3. Reboot to take effect
Please reboot your Pi when you finish the installation.
sudo reboot
- Step3. Use libcamera to access Camera
Preview 5 seconds.
libcamera-still -t 5000
If you don't have a display screen, you can save an image without displaying it. And an image of test.jpg will be saved in the current directory.
libcamera-still -t 5000 -n -o test.jpg
For more instructions, please refer to:
libcamera User Guide and Long Exposure/Adjust link-frequency on 64MP OV64A40 Camera
Arducam Pivariety cameras
| Product Image | SKU | Sensor | Resolution | Pin/Connect Type | Features | Lens Type | Field of View(HxV) | Focus Type | IR Sensitivity |
|---|---|---|---|---|---|---|---|---|---|
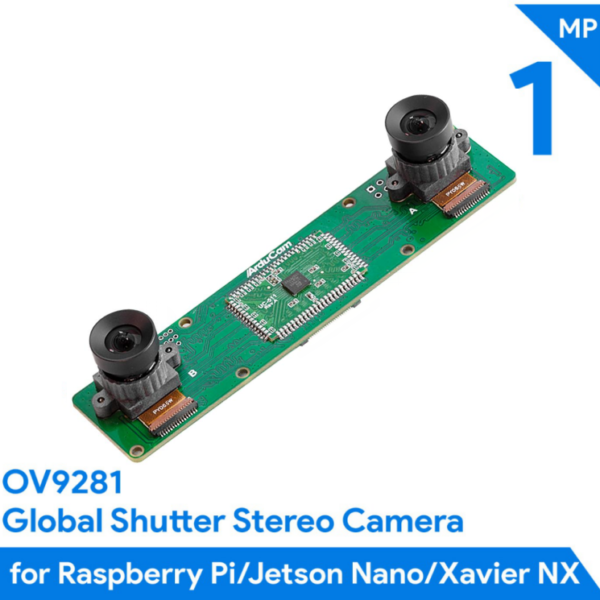 |
B0263 | OV9281 | 1MP | 15/Bottom | Mono Global Shutter Stereo Camera | M12 | 70°(H) x 43.75°(V) | Manual Focus | without IR-cut filter |
| B0264 | OV2311 | 2MP | 83°(H) x 67.5°(V) | ||||||
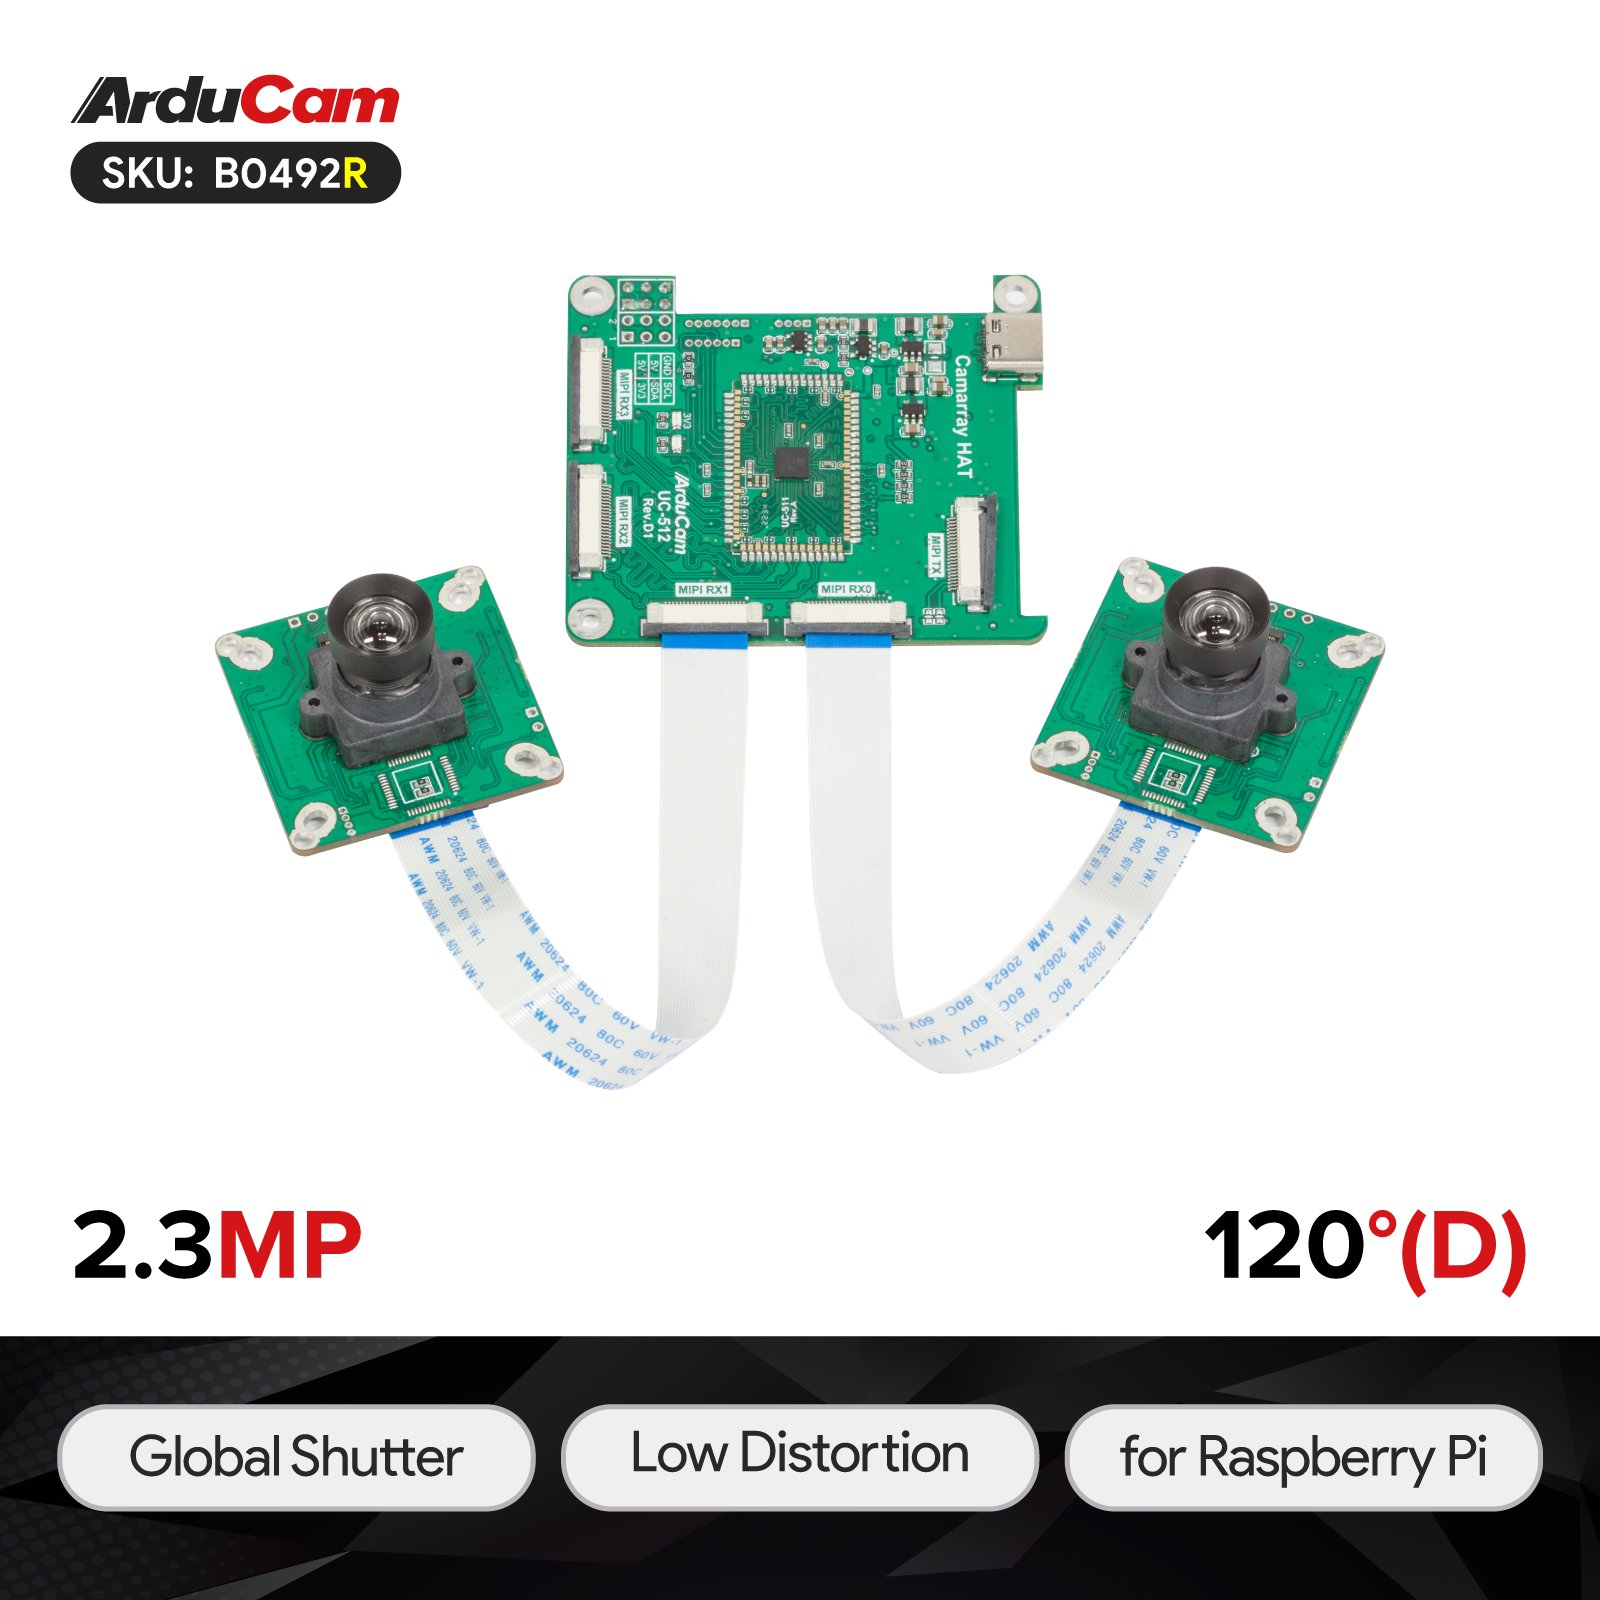 |
B0492R | AR0234 | 2MP | 22/Bottom | Color Global Shutter | M12 | 120°(D)×90°(H)×75°(V) | Manual Focus | Integrate IR-cut filter |
 |
B0350 | IMX219 | 8MP | 15/Bottom | 360° Stereo Camera | M12 | 220°(H) x 166°(V) | Manual Focus | 650nm IR-cut filter |
 |
B0331 | OV9782 | 1MP | Color Global Shutter Quad Camera | 75°(H) x 46.8°(V) | without IR-cut filter | |||
 |
B0266 | OV9281 | 1MP | 15/Bottom | Mono Global Shutter Stereo Camera | M12 | 70°(H) x 43.75°(V) | Manual Focus | without IR-cut filter |
| B0267 | 75°(H) x 46.8°(V) |
Tip
If you do not find your camera please contact us.(support@arducam.com)
Supported Platforms and OS
| Note for Supported Platform and OS | |||
|---|---|---|---|
| Platform | Bookworm(rpicam/libcamera) | Bullseye(libcamera) | Buster(raspistill) |
| Raspberry Pi 5 | √ | ||
| Raspberry Pi 4B / 3B+ / 3A+ / Zero / Zero 2 W | √ | √ | |
| Raspberry Pi CM3 / CM3+ / CM4 (extra adapter board required) |
√ | √ | |
Use libcamera to access Arducam Pivariety Camera
Info
If you are using Arducam Pivariety Multi-Camera kit on Raspberry Pi 5, please connect your camera module to camera 1 port.(The camera 1 port is enabled default.)
Info
If you are using Arducam Pivariety Multi-Camera kit on Raspberry Pi 5, please connect your camera module to camera 1 port.(The camera 1 port is enabled default.)
Raspberry Pi Bullseye OS 6.1.21 and Later/Bookworm OS
Step 1. Download the bash scripts
wget -O install_pivariety_pkgs.sh https://github.com/ArduCAM/Arducam-Pivariety-V4L2-Driver/releases/download/install_script/install_pivariety_pkgs.sh
chmod +x install_pivariety_pkgs.sh
Step 2. Install libcamera
./install_pivariety_pkgs.sh -p libcamera_dev
Step 3. Install libcamera-apps
./install_pivariety_pkgs.sh -p libcamera_apps
Step 4. Modify .Config file
- For Raspberry Pi Bookworm users running on Pi 5, please do the following:
sudo nano /boot/firmware/config.txt
#Find the line: [all], add the following item under it:
dtoverlay=arducam-pivariety
#Save and reboot.
If you want to enable the camera kit on the
cam0port of Pi5, please refer to the following modifications:
sudo nano /boot/firmware/config.txt
#Find the line: [all], add the following item under it:
dtoverlay=arducam-pivariety,cam0
#Save and reboot.
- For Raspberry Pi Bookworm/Bullseye users running on Pi 4, please do the following:
Bookworm OS on Pi4
sudo nano /boot/firmware/config.txt
#Find the line: [all], add the following item under it:
dtoverlay=arducam-pivariety
#Save and reboot.
Bullseye OS on Pi4 (Bullseye 6.1.21 and later versions)
sudo nano /boot/config.txt
#Find the line: [all], add the following item under it:
dtoverlay=arducam-pivariety
#Save and reboot.
- For Bullseye users running on Pi 0 ~ 3, please also:
Open a terminal
Run sudo raspi-config
Navigate to Advanced Options
Enable Glamor graphic acceleration
Reboot your Pi
If you encounter the display issues, please also execute the following steps:
Open a terminal
Run sudo raspi-config
Navigate to Advanced Options
Navigate to GL Driver
Select GL (Full KMS)
Reboot your Pi
Step5. Use libcamera to access Arducam Pivariety Camera
Preview 5 seconds.
libcamera-still -t 5000
If you don't have a display screen, you can save an image without displaying it. And an image of test.jpg will be saved in the current directory.
libcamera-still -t 5000 -n -o test.jpg
Before Raspberry Pi Bullseye OS 6.1.21
Step 1. Install Bash Script
wget -O install_pivariety_pkgs.sh https://github.com/ArduCAM/Arducam-Pivariety-V4L2-Driver/releases/download/install_script/install_pivariety_pkgs.sh
chmod +x install_pivariety_pkgs.sh
Step 2. Install libcamera
./install_pivariety_pkgs.sh -p libcamera_dev
Step 3. Install libcamera-apps
./install_pivariety_pkgs.sh -p libcamera_apps
Step 4. Install Camera drivers
# PivarietyPlease se
./install_pivariety_pkgs.sh -p kernel_driver
sudo reboot
Step5. libcamera-apps
Preview 5 seconds.
libcamera-still -t 5000
If you do not have a display screen, you can save an image without displaying it. And an image of test.jpg will be saved in the current directory.
libcamera-still -t 5000 -n -o test.jpg
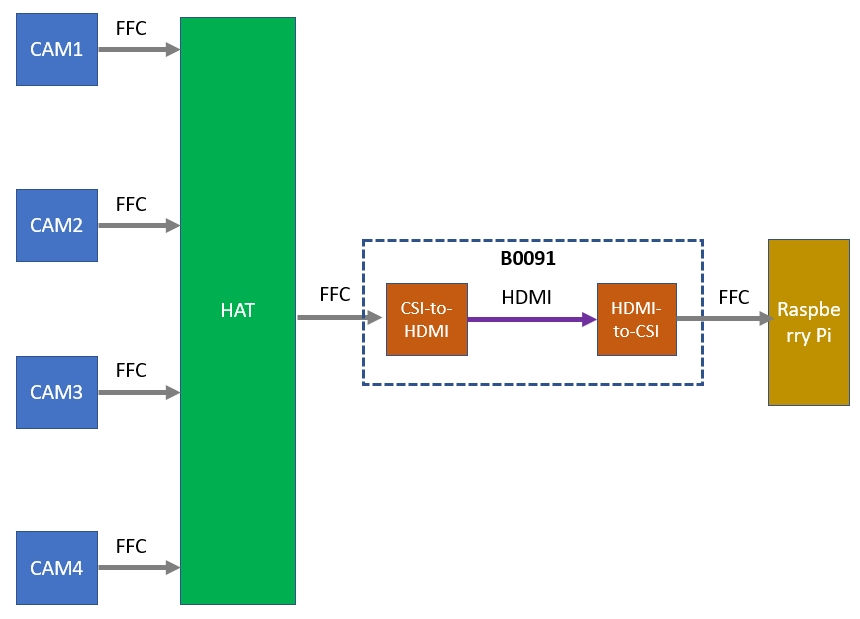
Extension Solution for Multi Camera
Extend HAT-Pi
Extend the connection between the HAT and Raspberry Pi, you can consider the following two solutions:
- Option1:
SKU: B0091 HDMI cable
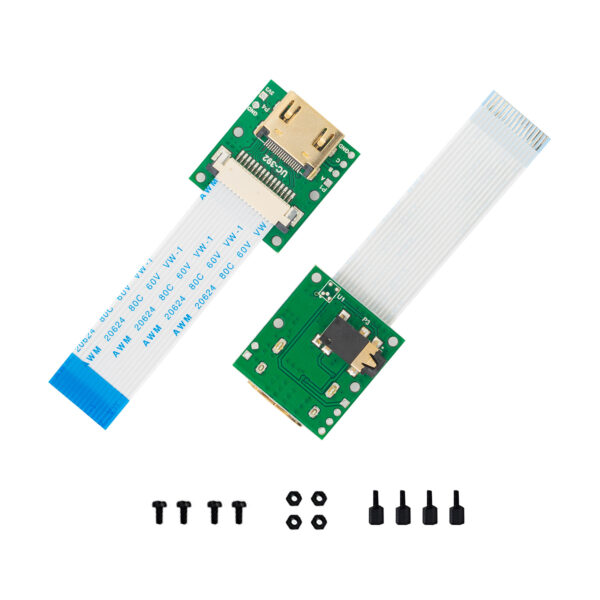
It transmits MIPI signal through HDMI cable, which can be transmitted farther than through FFC cable, about 3M.
- Option2:
SKU: U6248 LAN cable
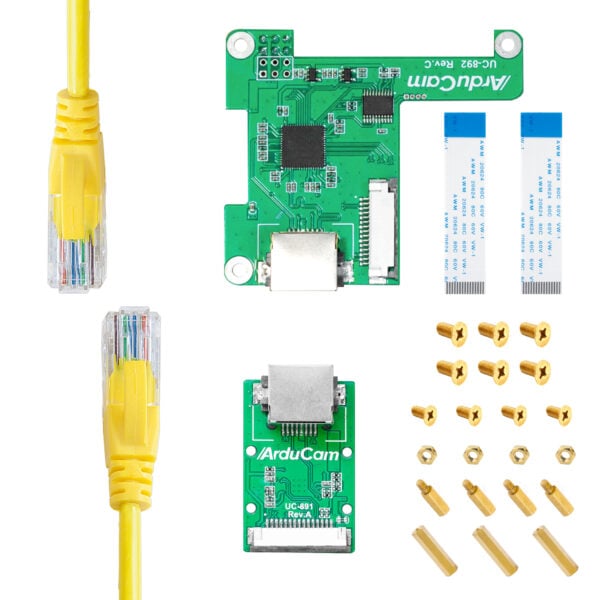
It transmits MIPI signal through LAN cable, which can be transmitted farther than through FFC cable, about 10M.
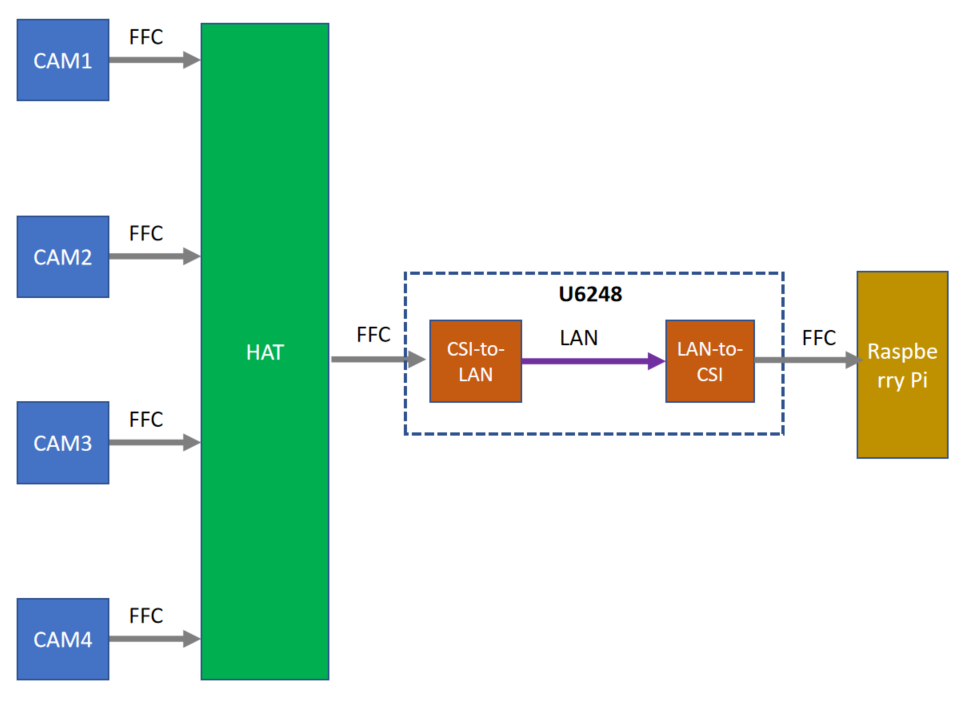
In this form, we have tried 3 meter of LAN cable before, and it works normally. The HDMI cable should be longer.
Switch Composition Mode
Arducam Team has achieved the channel-switch function on some Quad-Camera kits. You can refer to the following guide to switch the Composition Mode.
Check I2C node:
You can input the following command to check if your camera kit supports switching the composition mode.
pi@raspberrypi:~ $ i2cdetect -l
i2c-1   i2c         bcm2835 (i2c@7e804000)              I2C adapter
i2c-22  i2c         bcm2835 (i2c@7e205000)              I2C adapter
i2c-0   i2c         i2c-22-mux (chan_id 0)              I2C adapter
i2c-10  i2c         i2c-22-mux (chan_id 1)              I2C adapter
If you get some messages as above, then you can continue the following steps:
Detect I2C signal:
Take i2c 10 node as an example
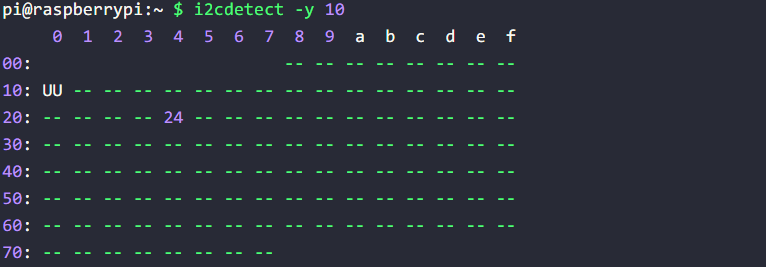
Select the Channel:
Example:
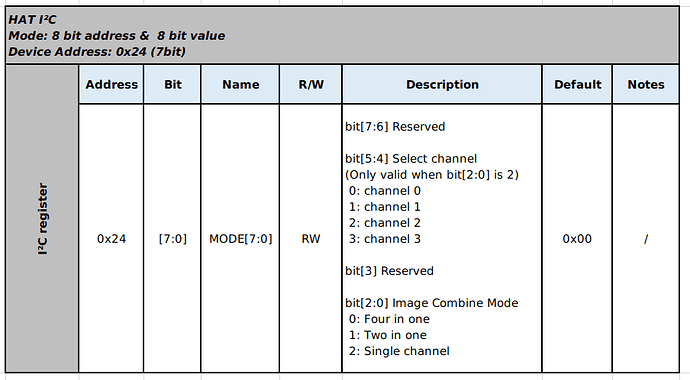
# Set to single channel 0
i2cset -y 10 0x24 0x24 0x02
# Set to single channel 1
i2cset -y 10 0x24 0x24 0x12
# Set to single channel 2
i2cset -y 10 0x24 0x24 0x22
# Set to single channel 3
i2cset -y 10 0x24 0x24 0x32
# Set to double channel (single channel 0 and single channel 1)
i2cset -y 10 0x24 0x24 0x01
# Set to double channel (single channel 2 and single channel 3)
i2cset -y 10 0x24 0x24 0x11
# Set to four in one mode (Default)
i2cset -y 10 0x24 0x24 0x00
Test:
Single-channel test:
#Single channel test
pi@raspberrypi:~ $ i2cset -y 10 0x24 0x24 0x02
pi@raspberrypi:~ $ libcamera-still -t 0
After setting the channel, you can directly use the libcamera command to capture images.
Dual-channel test:
#Dual channels test
pi@raspberrypi:~ $ i2cset -y 10 0x24 0x24 0x01
pi@raspberrypi:~ $ libcamera-still -t 0
Note
By default, the quad-camera kit works in synchronized 4-channel mode, and Raspberry Pi recognizes the whole kit as one camera Any manual focus or camera control adjustments (exposure/gain/white balance/etc.) will also be applied to 4 cameras at the same time.
If you encounter any problems when using the camera kit, please directly contact support@arducam.com for help.