Quick start
Hardware
-
Locate the camera connector (CSI). It’s on the side of the carrier board, opposite to the GPIO pins.
-
Pull up on the plastic edges of the camera port. Do it gently to avoid pulling it off.
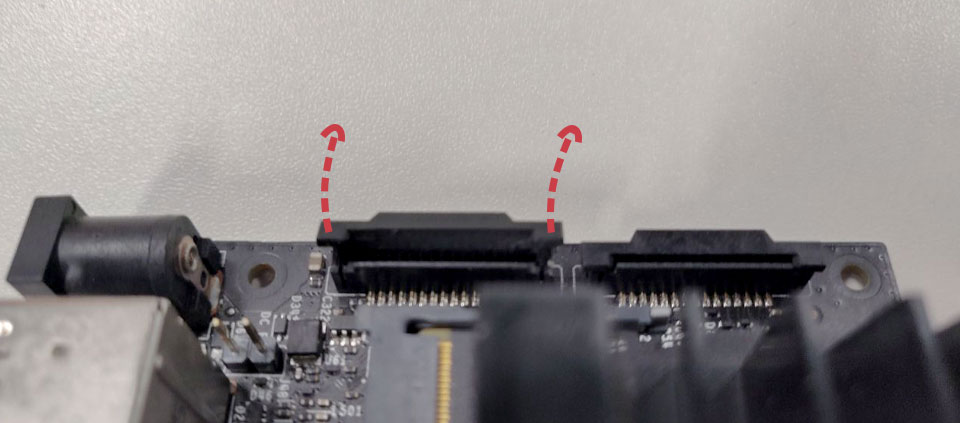
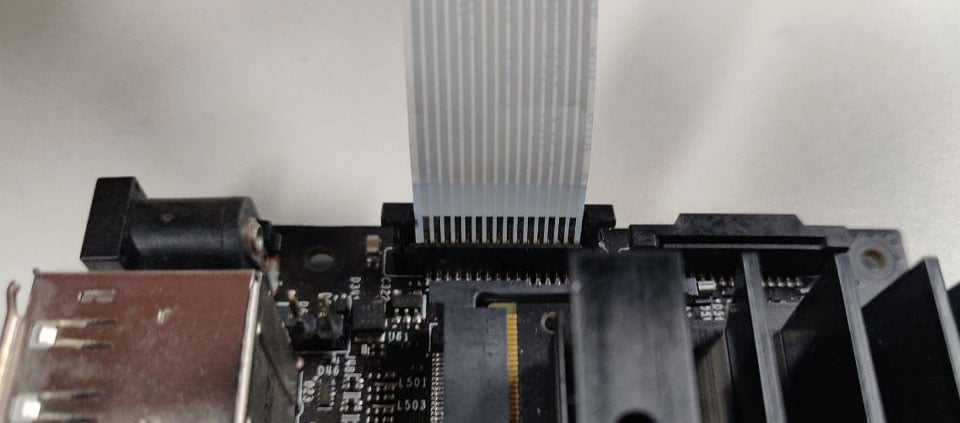
- Push in the camera ribbon. Make sure the contacts are facing the heatsinks. Do not bend the flex cable, and make sure it’s firmly inserted into the bottom of the connector.
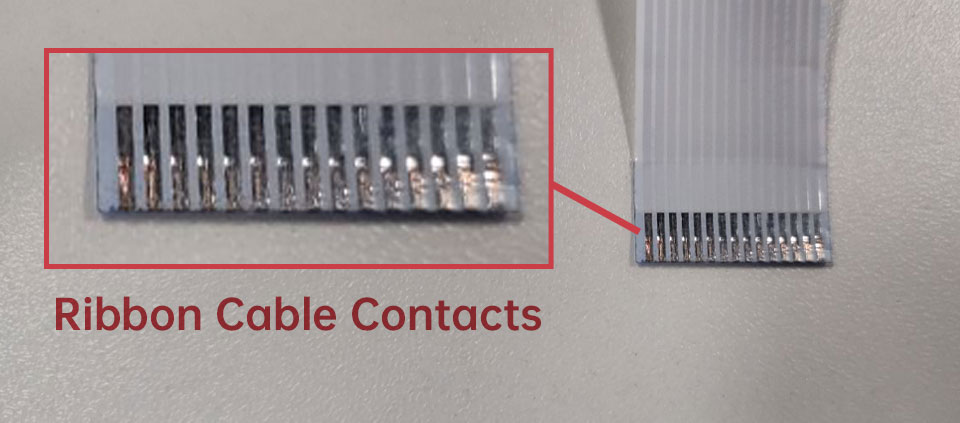 Ribbon Cable Contacts – 15pin-15pin
 Silver Contacts facing inside to the heatsinks
 Ribbon cable fully inserted to the bottom of the CSI connector
- Push the plastic connector down. Do it while holding the flex cable until the connector is back in place.
Software
Supported Platforms and JetPack L4T versions
Please refer to the following doc for specific supported Platforms and JetPack versions:
Supported Platforms and JetPack Version - Arducam Camera for NVIDIA Jetson
For IMX219 Motorized Focus Camera
First Use
- Download Arducam's Jetson Nano repository
git clone https://github.com/ArduCAM/Nvidia_Jetson.git
- Enter the folder with the autofocus demo
cd Nvidia_Jetson/IMX219_AutoFocus
- Run the demo
This example python code is modified from JetsonHacks sample code in order to work with Arducam Autofocus IMX219 camera module.
Tips: The I2C bus of the CAM0 interface of Jetson Nano B01 is 7, and the I2C bus of the CAM1 interface is 8. The I2C bus of the CAM0 interface of Jetson Xavier NX is 10, and the I2C bus of the CAM1 interface is 9.
sudo python Autofocus.py -i 7
# MIT License
# Copyright (c) 2019 JetsonHacks
# See license
# Using a CSI camera (such as the Raspberry Pi Version 2) connected to a
# NVIDIA Jetson Nano Developer Kit using OpenCV
# Drivers for the camera and OpenCV are included in the base image

import cv2
import numpy as py
import os

def focusing(val):
    value = (val << 4) & 0x3ff0
    data1 = (value >> 8) & 0x3f
    data2 = value & 0xf0
    os.system("i2cset -y 6 0x0c %d %d" % (data1,data2))

def sobel(img):
    img_gray = cv2.cvtColor(img,cv2.COLOR_RGB2GRAY)
    img_sobel = cv2.Sobel(img_gray,cv2.CV_16U,1,1)
    return cv2.mean(img_sobel)[0]

def laplacian(img):
    img_gray = cv2.cvtColor(img,cv2.COLOR_RGB2GRAY)
    img_sobel = cv2.Laplacian(img_gray,cv2.CV_16U)
    return cv2.mean(img_sobel)[0]


# gstreamer_pipeline returns a GStreamer pipeline for capturing from the CSI camera
# Defaults to 1280x720 @ 60fps
# Flip the image by setting the flip_method (most common values: 0 and 2)
# display_width and display_height determine the size of the window on the screen

def gstreamer_pipeline (capture_width=1280, capture_height=720, display_width=1280, display_height=720, framerate=60, flip_method=0) :
    return ('nvarguscamerasrc ! '
    'video/x-raw(memory:NVMM), '
    'width=(int)%d, height=(int)%d, '
    'format=(string)NV12, framerate=(fraction)%d/1 ! '
    'nvvidconv flip-method=%d ! '
    'video/x-raw, width=(int)%d, height=(int)%d, format=(string)BGRx ! '
    'videoconvert ! '
    'video/x-raw, format=(string)BGR ! appsink'  % (capture_width,capture_height,framerate,flip_method,display_width,display_height))

def show_camera():
    max_index = 10
    max_value = 0.0
    last_value = 0.0
    dec_count = 0
    focal_distance = 10
    focus_finished = False
    # To flip the image, modify the flip_method parameter (0 and 2 are the most common)
    print gstreamer_pipeline(flip_method=0)
    cap = cv2.VideoCapture(gstreamer_pipeline(flip_method=0), cv2.CAP_GSTREAMER)
    if cap.isOpened():
        window_handle = cv2.namedWindow('CSI Camera', cv2.WINDOW_AUTOSIZE)
        # Window
        while cv2.getWindowProperty('CSI Camera',0) >= 0:
            ret_val, img = cap.read()
            cv2.imshow('CSI Camera',img)

            if dec_count < 6 and focal_distance < 1000:
                #Adjust focus
                focusing(focal_distance)
                #Take image and calculate image clarity
                val = laplacian(img)
                #Find the maximum image clarity
                if val > max_value:
                    max_index = focal_distance
                    max_value = val

                #If the image clarity starts to decrease
                if val < last_value:
                    dec_count += 1
                else:
                    dec_count = 0
                #Image clarity is reduced by six consecutive frames
                if dec_count < 6:
                    last_value = val
                    #Increase the focal distance
                    focal_distance += 10

            elif not focus_finished:
                #Adjust focus to the best/
                focusing(max_index)
                focus_finished = True
            # This also acts as
            keyCode = cv2.waitKey(16) & 0xff
            # Stop the program on the ESC key
            if keyCode == 27:
                break
            elif keyCode == 10:
                max_index = 10
                max_value = 0.0
                last_value = 0.0
                dec_count = 0
                focal_distance = 10
                focus_finished = False
        cap.release()
        cv2.destroyAllWindows()
    else:
        print 'Unable to open camera'


if __name__ == '__main__':
    show_camera()
For IMX477 Motorized Focus Camera
Preparation
Driver Installation
Please refer Driver-for-imx477-camera to install driver.
First Use
- Download Arducam's Jetson Nano repository
git clone https://github.com/ArduCAM/MIPI_Camera.git
- Enter the folder with the autofocus demo
cd /MIPI_Camera/Jetson/IMX477/AF_LENS
- Auto focus
python Autofocus.py -i 7

Note
The I2C bus of the CAM0 interface of Jetson Nano B01 is 7, and the I2C bus of the CAM1 interface is 8.The I2C bus of the CAM0 interface of Jetson Xavier NX is 10, and the I2C bus of the CAM1 interface is 9.
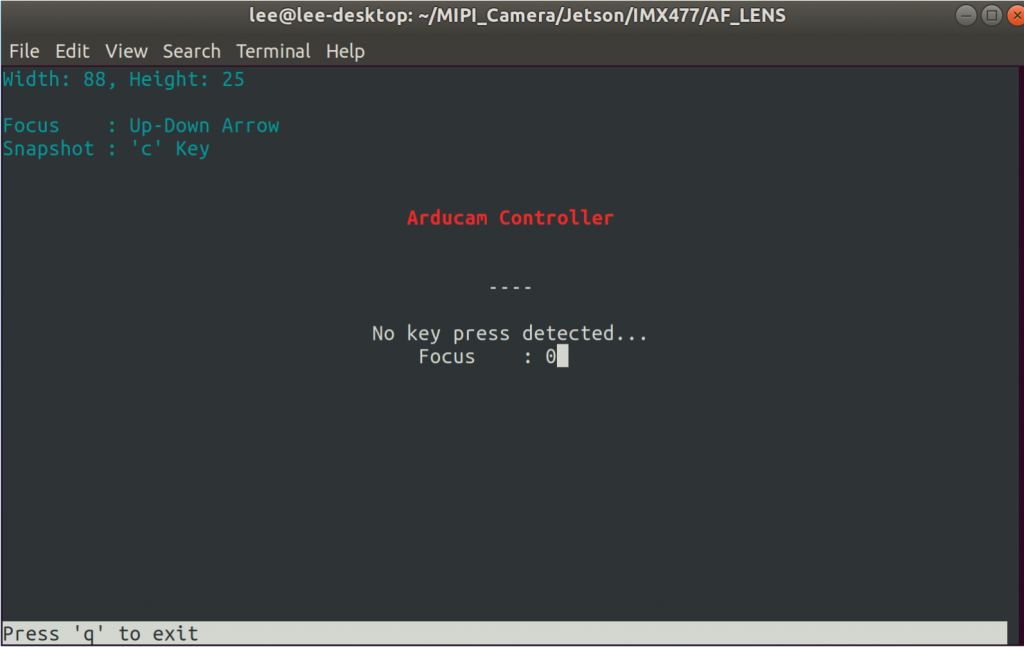
- Motorized focus
python FocuserExample.py -i 7
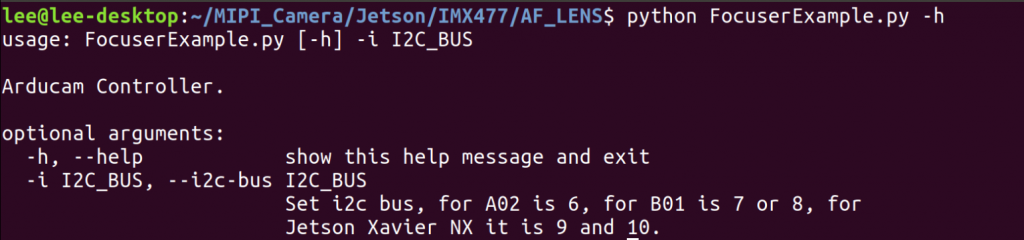
Help:
Example:
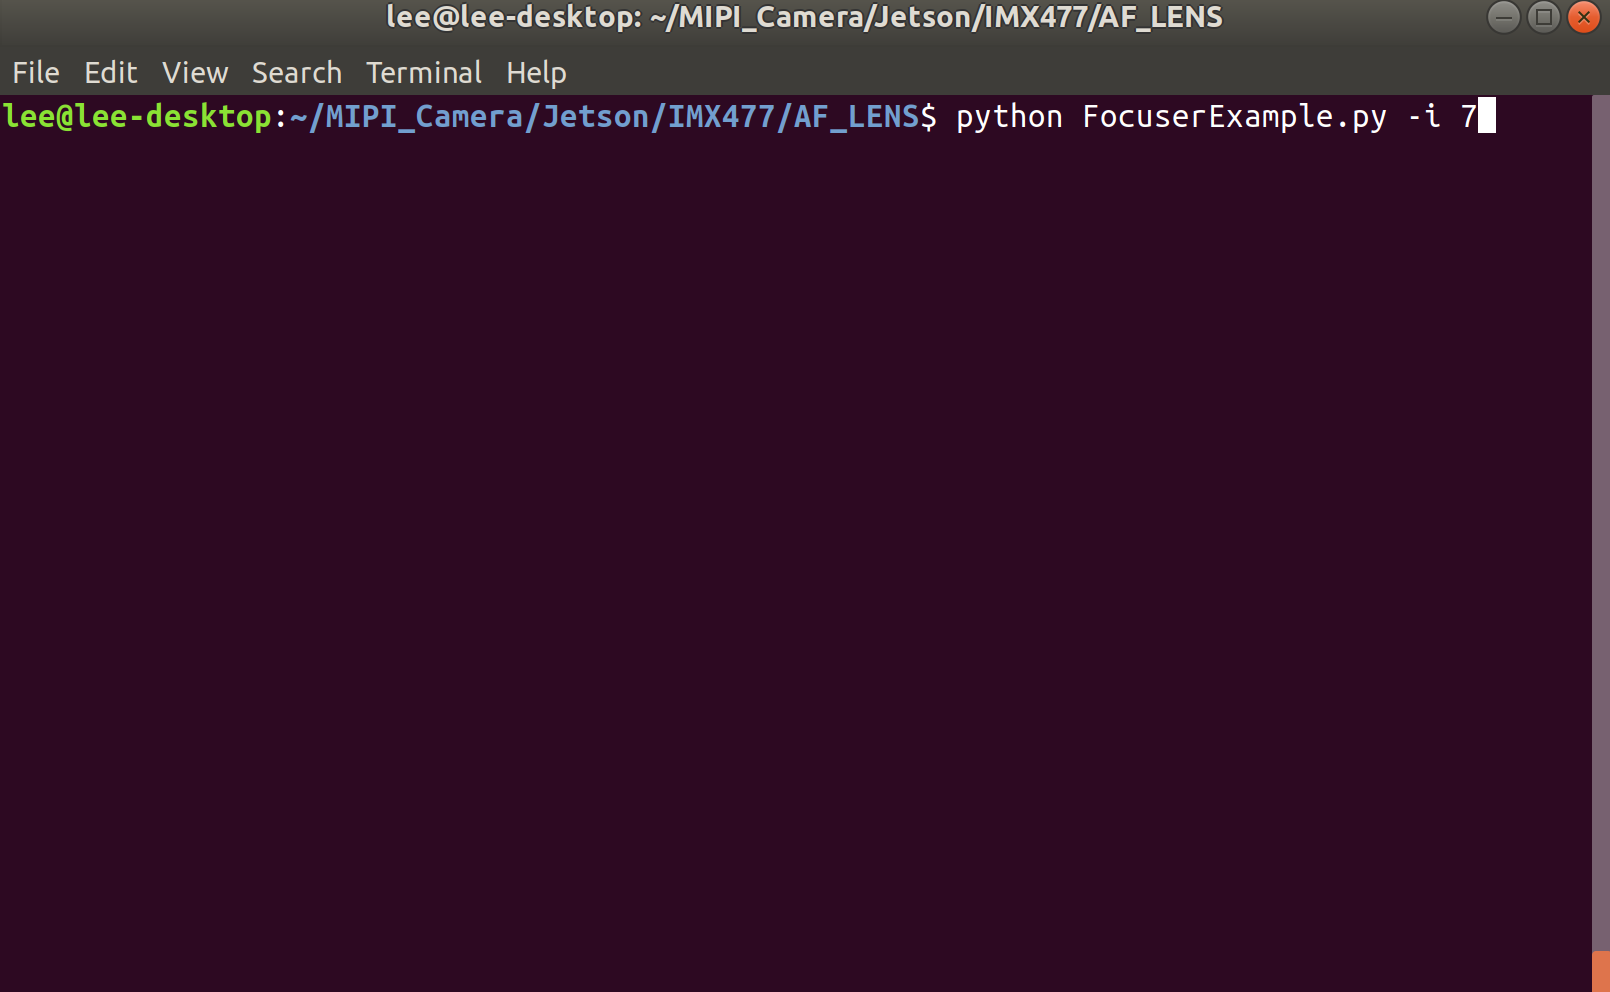
Screenshot:
For Jetvariety Motorized Focus Camera
The following camera is Arducam Jetvariety Motorized Focus camera:
| Product Image | SKU | Pin/Connect Type | Sensor | Resolution | Features | Lens Type | Field of View(HxV) | Focus Type | IR Sensitivity |  |
B0324 | 22/TOP | IMX230 | 21MP | High Resolution | Stock Lens | 64°(H) x 48°(V) | Autofocus | 650nm IR-cut filter |
|---|
Preparation
Driver Installation
Please refer Driver-for-Jetvariety-camera to install driver.
- Detect the camera
Input the following code to detect the camera. If the camera is detected, there will be /dev/video0 outputted.
ls /dev/video*
- Check the Formats and Resolution Supported
sudo apt-get install -y v4l-utils
v4l2-ctl --list-formats-ext
Run the Camera
- Download the Python Package
wget https://bootstrap.pypa.io/get-pip.py
sudo python3 get-pip.py
sudo pip3 install v4l2-fix
- Download the library
cd ~
git clone https://github.com/ArduCAM/MIPI_Camera.git
- Start Running
cd ~/MIPI_Camera/Jetson/Jetvariety/example
# directly preview
python arducam_displayer.py

# set resolution and formats to preview, example:
python arducam_displayer.py -f BG10 --width 1920 --height 1080
Adjust Focus
Note
Both manual focus and autofocus need to execute the above operation first, and then open another terminal and execute the following command.
Manually Adjust Focus
cd ~/MIPI_Camera/Jetson/Jetvariety/example/focus
python3 python3 FocuserExample.py
Autofocus
cd ~/MIPI_Camera/Jetson/Jetvariety/example/focus
python3 Focuser.py -i 7