How to build a Magic Wand with Edge Impulse for Arducam Pico4ML-BLE
1.Why Arducam Pico4ML-BLE?
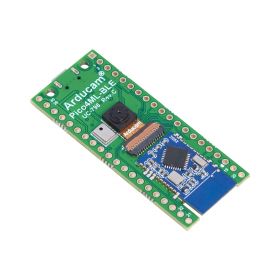
Do you want to build your own magic wand? You only need to have an Arducam Pico4ML-BLE.
Pico4ML-BLE is based on Pico4ML to increase the BLE module to realize the function of Bluetooth communication.
This is somewhat similar to Arduino Nano 33 BLE. This upgrade makes Arducam's Pico4ML the most versatile Machine Learning development kit on the market. Only increases the function of Bluetooth, it realizes wireless data collection, training, and model update by designing a web client based on WebBLE. The collected data is converted to a format that can be read by Edge Impulse through our conversion script, and then the transfer learning of the model is carried out.
Pico4ML B0330:
WebBLE is an application where we can share data while retaining ownership and provenance.
Using this app you can navigate to a site written in javascript that can interact with your Bluetooth(low energy) devices.
This allows you to write your applications for use from your iOS device. Learn more.
Tip
Edge Impulse is the leading development platform for machine learning on edge devices, free for developers and trusted by enterprises.
It committed to the learning and deployment of artificial intelligence on edge (embedded) devices, making artificial intelligence simple.
We believe this will become the next industry standard (Similar to Arduino, which has a profound impact on embedded). We support Edge Impulse to have a stronger audience. Learn more.
This article uses the Magic Wand example to introduce in detail how to use Edge Impulse for transfer learning and deploy it on the Pico4ML-BLE device.
2.Collect data for your custom wand project
Abstract
In this chapter, we will collect custom gestures, and then we can use these gestures to train a custom magic wand project in the next chapter.
2.1 Download magic_wand.uf2 file
Click here to download the magic_wand.uf2 file, and you can customize the download path.
2.2 Flash magic_wand.uf2 file
Long press the BOOTSEL button to enter the USB Mass Storage Mode until you connect the Arducam Pico4ML to the PC with a micro-USB cable and release the button.
At this time, an RPI-RP2 window will appear on the PC, just drag the magic_wand.uf2 file to the RPI-RP2 window. If the display device pops up, the writing is successful.
2.3 Turn on the Bluetooth permission
Please confirm whether the Bluetooth function is turned on in your computer settings.
Please use Google Chrome to navigate to this page:
chrome: //flags/#enable-experimental-web-platform-features,
and you will find the following figure. The next step is to enable the Experimental Web Platform features.

2.4 Open the webpage that records the magic wand gestures
Open Google Chrome and navigate to:
https://www.arducam.com/magic_wand/

Error: This browser doesn't support Web Bluetooth. Try using Chrome.
We found that in older versions of Chrome browser and users running Linux operating system, it is necessary to ensure that the experimental web platform function is enabled.
If this problem persists, please make sure you are browsing https://. For some reason, if you do not use a security protocol, then the network Bluetooth will not work.
2.5 Bluetooth connection
To do this, just click the Bluetooth button and a pop-up window will appear asking for pairing as the following figure.
Select your Bluetooth device, it should be called ATB1103 MIDI XXXX, where XXXX will be different, and then click the pairing button.
Please note that sometimes you have to repeat this step twice. Once you are connected, the Bluetooth button will turn green.


2.6 Gesture recording
After the Pico is paired, you can record some gestures. You will notice that every time you move the Pico and then stop, a new gesture is recorded.
This is because when the wand is held still, the gesture is automatically split.
These pauses are like spaces between words, so when you complete a gesture, you should stop moving your wand so that it will end cleanly.
Note
Note that the direction of the gesture is very important (For example, clockwise rotation and counterclockwise rotation are different).
2.7 Gesture mark
The gestures you drew will begin to appear in the list on the right side of the screen. You can look at the shapes displayed there to see if the gestures are drawn cleanly.
A good rule of thumb is that if you can't tell what a gesture is by looking at it, then the model will also have difficulty identifying it.
If you want to delete a record, just click the trash can icon at the top right of each gesture record. You may need to delete a lot of fake records, which were made when you moved the Pico to the position between each gesture).
In addition, be sure to label all your gestures for training. You can label each record by tapping the question mark at the top left of each gesture, and then entering your label. For example, the screenshot below shows the label Z added to the gesture of the letter Z.
We found that regularly collecting about 20 examples of 2-3 different gestures is enough to successfully train a satisfactory wand application.
To help you keep track of how many gestures you have, there is a number at the top right of the screen (For example, the number 1 shown in the figure below).
We also found that gestures like a circle (O) or Zoro (Z) often work quite well!
Finally, you can upload multiple JSON files to the training script, so don’t think you can record all the gestures at once. Very stressful!

2.8 Download data
When you have collected all the data, just click the blue Download Data button, and a JSON file containing all the gestures will be automatically downloaded!
We will use this file in Edge Impulse in the next section to train your custom model.
When you leave or refresh the web page, your recorded gestures will be lost, so please make sure you use the download data link to save them!
2.9 Data conversion
- Download Edge Impulse.
 cd ~/
 git clone https://github.com/Arducam/Pico4ML-Magic-Wand.git --recursive
- Enter ~/Pico4ML-Magic-Wand/tool folder.
cd ~/Pico4ML-Magic-Wand/tool
- Install python dependency library.
pip install -r requirements.txt
- Convert the json file downloaded in the previous convert to a png file.
python json2png.py --dataset <path>/wanddata.json
You can see the converted png file in the datasets folder.

3.Train your custom magic wand project
In this chapter, we will train a custom magic wand model based on the custom gestures we just collected.
3.1 Edge Impulse platform preparation.
- Log in to the official website to register an account.

- Creat new project.


- Click keys, select API Key and copy API Key. Connect Edge Impulse CLI and Edge Impulse through API Key. The API Key has the following form: ei_XXX, Every user will be different, as shown in the mosaic part below.

3.2 Data upload
Here are two methods for your reference.
Way 1: Upload data from the studio
Now you can upload data directly from the studio. Go to the Data acquisition page and click the upload icon. You can select files, categories, and tags directly from here.

Way 2: Upload via CLI
You can refer to here!
- Install Edge Impulse CLI.
Edge Impulse CLI is used to control local devices, access agents to synchronize data of devices without an Internet connection, and upload and convert local files.
a. Install Python 3, you can refer to here!
b. Install Node.js v14 or higher, you can refer to here!
c. Install the CLI tool.
npm install -g edge-impulse-cli
- Use the API key to authenticate.
edge-impulse-uploader --api-key ei_XXX
- Upload files via Edge Impulse CLI.
edge-impulse-uploader --api-key ei_... path/to/a/file.png
- Upload multiple files at once.
edge-impulse-uploader --api-key ei_... path/to/many/*.png
3.3 Configuration processing module
- Go to the Impulse design page.

-
Set the default image length and width to 32 x 32.
-
Select the Images module to indicate that we are classifying and training images (You can also use EdgeImpulse to classify sounds, videos, etc.).

- Select Neural Network (Kera) to set the learning model.

3.4 Image preprocessing
Click Image in the left menu, set the color format to RGB, and then click Save.

Next, select Generate features to start the process, perform image preprocessing, and the 3D visualization of the complete data set will be displayed on the right.

3.5 Configure the transfer learning model
- Click on NN classifier in the left menu.

- Set the Number of training cycles to 50 by default.
- Set the learning rate to 0.0005.
- Set the minimum confidence rating to 0.5 by default.
- Neural network architecture can be used by default or customized.
- Click Start training, the training process is about 4 to 5 minutes.
- After the model training is completed, you can view the accuracy, confusion matrix, and expected device performance.

3.6 Model export
After completing the steps of training design and model training, you can export the model.
- Go to the DEPLOYMENT page

- Select C++ library, select Build to generate, it automatically generates a compressed package file.

4.Deploy the trained model
4.1 Unzip files
Unzip the compressed package downloaded at the end of the previous step and copy it to the ~/Pico4ML-Magic-Wand directory.

Do not copy the CMakeLists.txt file.
4.2 Compile the file
Create a build file, and then compile.
mkdir build && cd build
 cmake .. && cmake --build . --parallel
4.3 Flash magic_wand.uf2 file
Long press the BOOTSEL button to enter the USB Mass Storage Mode until you connect the Arducam Pico4ML to the PC with a micro-USB cable and release the button.
At this time, a window named RPI-RP2 will appear on the PC, just drag the build/magic_wand.uf2 file to the RPI-RP2 window.
4.4 Test
Now open the serial debugging tool and test your custom model.
As a reminder, the serial monitor will output an ASCII character showing the gesture you just performed, underneath it will be the best match label and a confidence score between 0 and 100.
The confidence score indicates how much the model believes in your gestures. Please note that every time you move the board and then stop, a new gesture will be processed, so don't be surprised to get some weird results when you move the development board to make gestures.
................................ ................................ ................................ ................................ ................................ ................................ ................................ ................##.............. ..............##.##............. .............#.....#............ .............#.....#............ ............#..###.#............ ...........#......##............ ...........#........#........... ..........#.........##.......... ..........#..........#.......... .........#...........#.......... .........#............#......... ........#.............#......... ........#.............#......... ........#.............#......... .......##.............#......... .......#.............#.......... .......#.............#.......... .......#.............#.......... .......#............##.......... ........#...........#........... ........#..........#............ .........#........##............ ..........###...##.............. ............####................ ................................
Edge Impulse standalone inferencing (Raspberry Pico 2040) run_classifier returned: 0 Predictions
(DSP: 0 ms., Classification: 910 ms., Anomaly: 0 ms.): 0: 1.00 1: 0.00 2: 0.00 3: 0.00 4: 0.00 5: 0.00 6: 0.00 7: 0.00 8: 0.00 9: 0.00 Found 0 (99.61)