108MP USB3 Camera Evaluation Kit
Check Firmware Version
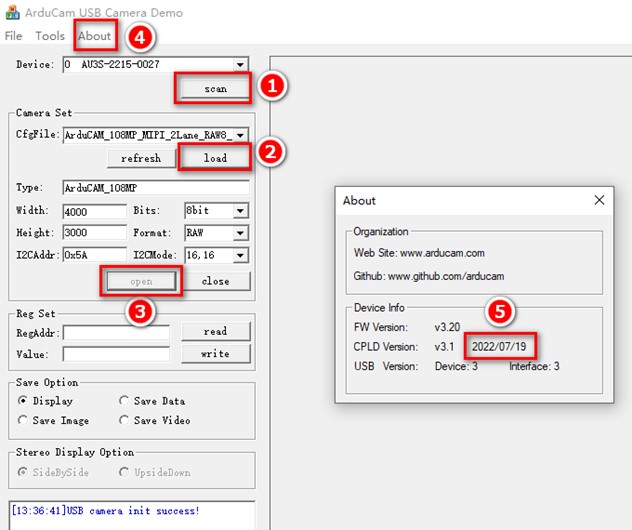
You can view the CPLD firmware version date through the Windows GUI: After [load] is configured, click [open], then click [About]. The CPLD version date for the EK030 kit should be 2022/07/19.
Windows GUI
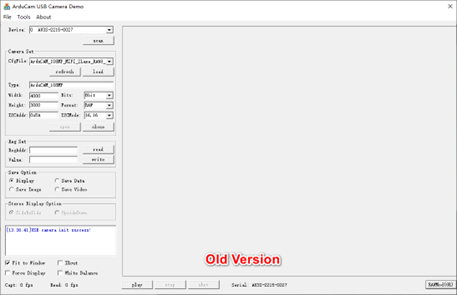
You will need the new version of Windows GUI to use the camera kit. The Picture below is the old version of the Windows GUI.
The new version of the Windows GUI installation program:
Windows Set-up
You can click the link to install Arducam USBSetup Tool:
Arducam USB Camera Shield Setup Tool for Windows x64
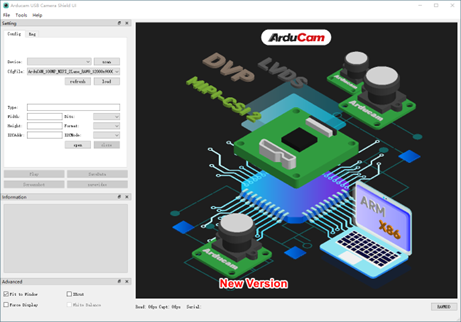
The new version of the Windows GUI:
Note
Windows 10 64-bit system is recommended when used on PC platform.
Configuration File
Tip
- The new version of the configuration file of this camera support manual exposure and manual white balance.
- The corresponding configuration file will be sent online when purchasing the product, please contact sales@arducam.com for details.
Instructions
Control Menu
We added controls for frame rate, exposure, gain, etc. in the configuration file:
During image display (after clicking [Play]), you can enter the control menu to adjust the image in real time.
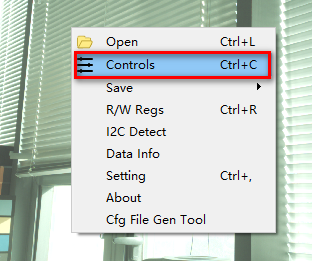
There are three ways to enter the control menu:
- [Tools] - [Controls];
- Right click on the display area of the screen and select [Controls];
- Shortcut key [Ctrl]+[C].
The control menu window is shown in the figure below:
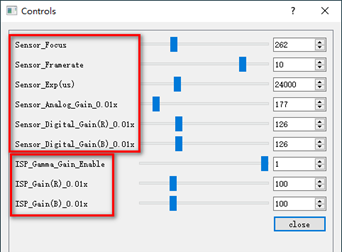
Among them, the parameters begin with Sensor is to adjust the camera (front end), and the parameters begin with ISP is to adjust the CPLD on the USB3 backboard (back end).
Note
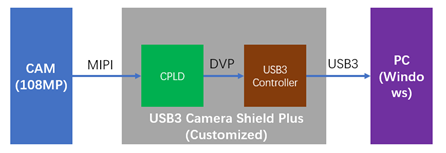
The CPLD of the USB3 camera shield of EK030 is a customized version, which adds Gamma and digital gain functions:
Description of control parameters
[Control Parameters]:
Control Parameters
- Sensor_Focus: Adjust the focus distance of the camera lens.
- Sensor_Framerate: Adjust the camera frame rate.
- Sensor_Exp(us): Adjust the camera exposure time, the unit is μs. For example, if the setting value is 24000, the corresponding physical duration is 24ms.
- Sensor_Analog_Gain_0.01x: Adjust the camera analog gain, the unit is 0.01. For example, if the setting value is 150, it means that the analog gain is 1.5.
- Sensor_Digital_Gain(R)_0.01x: adjust the camera digital gain Red channel, the unit is 0.01. For example, if the setting value is 126, it means that the R channel gain is 1.26.
- Sensor_Digital_Gain(B)_0.01x: adjust the camera digital gain Blue channel, the unit is 0.01. For example, if the setting value is 126, it means that the B channel gain is 1.26.
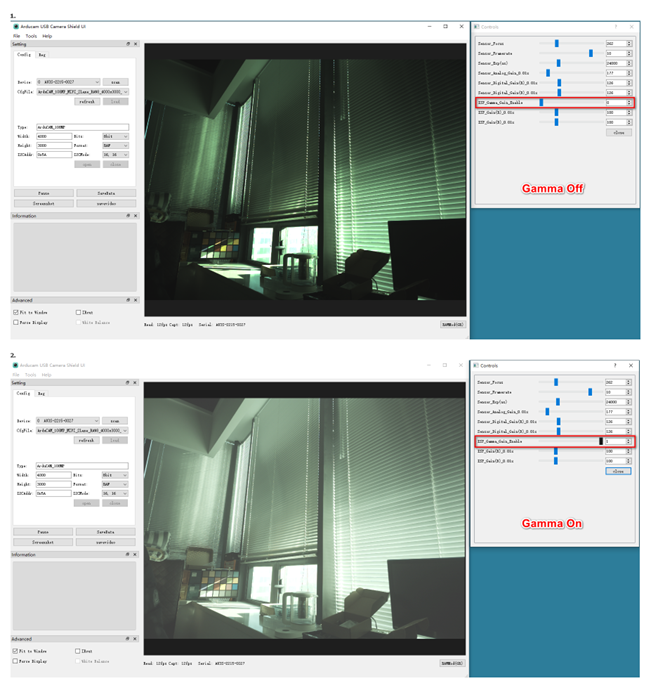
- ISP_Gamma_Gain_Enable: Gamma and digital gain switch on CPLD. 0 means disable, 1 means enable. Gamma and digital gain can only be turned on or off at the same time.
- ISP_Gain(R)_0.01x: adjust the CPLD digital gain Red channel, the unit is 0.01. For example, if the setting value is 150, it means that the R channel gain is 1.50.
- ISP_Gain(B)_0.01x: Adjust the camera digital gain of Blue channel, the unit is 0.01. For example, if the setting value is 150, it means that the B channel gain is 1.50.
[Adjustment instructions]:
Adjustment Instructions
- Camera brightness adjustment mainly adjusts exposure and analog gain.
- Exposure and frame rate may affect each other. When the exposure is too long, the frame rate will be reduced. If the exposure is extended to a certain extent, if the brightness of the image does not change, the frame rate will be lowered at this time, and the image will become brighter if the exposure is longer.
- If the analog gain is adjusted too high, noise may appear.
- White balance adjustment mainly adjusts the camera digital gain R channel and B channel. (The camera output is in RAW format, RAW has four channels R, Gr, Gb, B, and the white balance generally only adjusts the R and B channels)
- The back-end ISP_Gamma function is enabled by default, and the image effect will be better after it is enabled.
- The back-end ISP_Gain function is a backup, which is equivalent to the digital gain of the camera and is also used to adjust the white balance.
- Normally ISP_Gain is not adjusted , and the default value of the parameter is 100, that is, the gain factor is 1.0.
- ISP_Gamma and ISP_Gain can only be turned on and off at the same time. Once ISP_Gamma is turned on, ISP_Gain must also be turned on. But as the parameter is 1.0, it seems doesn't make difference.
Adjustment parameters
For different environments, you need to adjust the corresponding parameters.
There are three operation modes for adjusting parameters:
1. Drag the slider, suitable for roughly adjustment;
2. Input the setting value in the number box on the right, and press the Enter key after inputting;
3. Click the up and down arrows on the right, suitable for fine adjustment.
Adjustment parameter operation video:
Update configuration file
After the parameters are adjusted, you can update the new parameters to the configuration file to avoid modifying them each time.
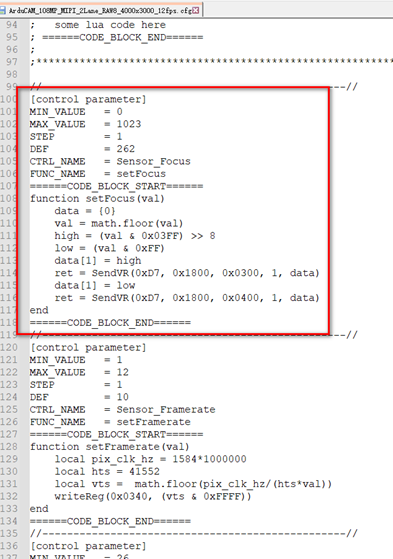
First, you need to modify the default value of the relevant parameters:
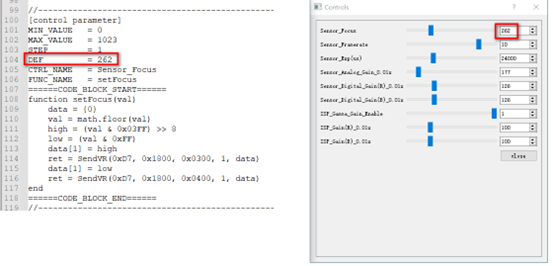
Write the adjusted parameter values to the row where DEF is located. Each parameter corresponds to a control code. There are 9 control parameters in total.
Note
Do not modify other parts of the slider control code, especially the formula calculation.
Then you need to modify the default values of the camera registers. The Windows GUI back-end converts these control parameters into register values.
When the configuration is loaded, the control parameter part of the code (the nine-segment [control parameter] part) will not take effect. The control parameter part will only take effect after the [Controls] window is opened.
Therefore, it is necessary to read the corresponding register value, and then write it to the corresponding part of the camera register initialization in the configuration file.
Example: The focal length register is modified as shown in the figure below:

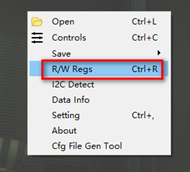
The registers corresponding to other parameters need to open the [R/W regs] window to read:
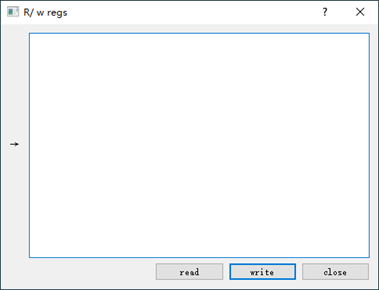
Copy the following content to the [R/W regs] window, and then click [read]
REG = 0x0340, 0x246A    //vts
REG = 0x0202, 0x0177    //exposre
REG = 0x0204, 0x0038    //analog_gain
REG = 0x0210, 0x0142    //digital_gain_red
REG = 0x0212, 0x0142    //digital_gain_blue
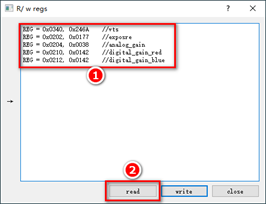
It will read the current register value:
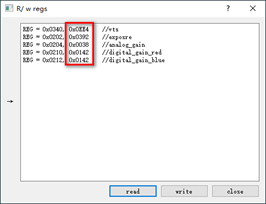
Just rewrite the 5 register values into the configuration file:

Remarks
- The frame rate adjustment is realized by controlling the VTS register.
- After the configuration file is modified, it needs to re - [Load] to take effect.
- The camera register value and the default value of the control part in the configuration file should be consistent, otherwise the screen will change when the [Controls] window is opened. (The control parameters will only work when the [Controls] window is opened.)