AMS OSRAM Cameras
Introduction
Earlier, we released the Mira220 series camera evaluation kits for rapid verification. The series includes Mira220 camera modules with three color filter arrays: monochrome, RGB, and RGB-IR. For details, please refer to:
Currently, we have successfully transplanted the AMS OSRAM Mira220 sensor into the Raspberry pi ecosystem through adaptation.
The Mira220 Pivariety global shutter camera module with ISP tuning can not only perfectly integrate into the Raspberry Pi smart ecosystem, but also has its own high near-infrared sensitivity to achieve high-quality image quality under different lighting conditions. (High NIR Sensitivity: Classing leading QE at 940 nm, ideal for challenging lighting conditions)
At the same time, in order to expand the application of such high-performance sensors in a wider range of scenarios. We will continue to increase cooperation with AMS OSRAM and launch more high-quality products, so stay tuned.
Product
| Product Image | SKU | Resolution | Sensor | Interface | Features | Focus Type | Lens Mount | Field of View(DxHxV) | IR Sensitivity |
|---|---|---|---|---|---|---|---|---|---|
.jpg) |
B0526 | 2.2MP | Mira220 | MIPI CSI-2 | High QE & NIR Sensitivity | Manual Focus | M12 Mount Lens | 80°(D)*68°(H)*53°(V) | Without IR-cut Filter |
Specifications
Common Specs
| Image Sensor | |
|---|---|
| Image Sensor | Mira220 |
| Still Resolution | 2.2 Megapixels |
| Color Filter Type | Monochrome |
| Shutter Type | Global Shutter |
| Optical Size | 1/2.7″ |
| Pixel Size | 2.79 µm x 2.79 µm |
| Sensor Active Area | 1600(H)×1400(V) |
| Output Format | RAW12 |
| Frame Rates | 1600×1400@30fps, 640×480@30fps |
| Functionality and Compatibility | |
| Supported OS | Raspberry Pi Bookworm/Bullseye OS |
| Supported Platforms | Raspberry Pi 5/4B/3B+/3/2/CM3/CM4/Zero W/Zero 2 W |
QE & IR Sensitivity
Make Sense
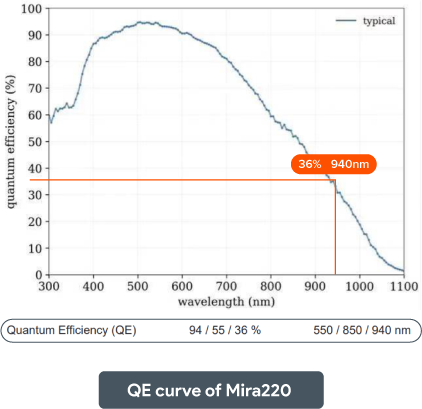
The Mira220 sets itself apart with a high quantum efficiency(QE) of up to 36% at the 940nm NIR wavelength.
Also Enhanced by NIR technology, it becomes your ideal companion in scenarios where light is scarce —— a key element for 2D and 3D sensing systems.
 |
 |
Quick Start Guide
Hardware Connection
Package Including
.jpg) |
.jpg) |
Camera Connection
Note
The connector on camera board is 15 pin csi connector.
.jpg) |
.jpg) |
Platform Connection
Note
-
Please try to connect to the cam1 port on Raspberry Pi 5 since the cam1 port is enabled by default.
-
The mipi csi connector on Raspberry Pi 5 is 22pin, that of on Raspberry Pi 3/4 is 15pin.
.jpg) |
.jpg) |
Software Configuration
Note
Since Raspberry Pi Bullseye OS 6.1.21, the arducam-pivariety driver has been merged into the Raspberry Pi kernel and the name of the device tree is changed to arducam-pivariety, dtoverlay=arducam-pivariety is required to set the overlay.
Supported Platforms and OS
| Note for Supported Platform and OS | |||
|---|---|---|---|
| Platform | Bookworm(rpicam/libcamera) | Bullseye(libcamera) | Buster(raspistill) |
| Raspberry Pi 5 | √ | ||
| Raspberry Pi 4B / 3B+ / 3A+ / Zero / Zero 2 W | √ | √ | |
| Raspberry Pi CM3 / CM3+ / CM4 (extra adapter board required) |
√ | √ | |
Info
If you are using Arducam Pivariety camera module on Raspberry Pi 5, please connect your camera module to camera 1 port.(The camera 1 port is enabled default.)
Raspberry Pi Bullseye OS 6.1.21 and Later/Bookworm OS
Step 1. Download the bash scripts
wget -O install_pivariety_pkgs.sh https://github.com/ArduCAM/Arducam-Pivariety-V4L2-Driver/releases/download/install_script/install_pivariety_pkgs.sh
chmod +x install_pivariety_pkgs.sh
Step 2. Install libcamera
./install_pivariety_pkgs.sh -p libcamera_dev
Step 3. Install libcamera-apps
./install_pivariety_pkgs.sh -p libcamera_apps
Step 4. Modify .Config file
Info
Please note that you need to reboot your device to enable the modifications after configuring the file.
- For Raspberry Pi Bookworm users running on Pi 5, please do the following:
sudo nano /boot/firmware/config.txt
#Find the line: [all], add the following item under it:
dtoverlay=arducam-pivariety
#Save and reboot.
If you want to enable the camera kit on the
cam0port of Pi5, please refer to the following modifications:
sudo nano /boot/firmware/config.txt
#Find the line: [all], add the following item under it:
dtoverlay=arducam-pivariety,cam0
#Save and reboot.
- For Raspberry Pi Bookworm/Bullseye users running on Pi 4, please do the following:
Bookworm OS on Pi4
sudo nano /boot/firmware/config.txt
#Find the line: [all], add the following item under it:
dtoverlay=arducam-pivariety
#Save and reboot.
Bullseye OS on Pi4 (Bullseye 6.1.21 and later versions)
sudo nano /boot/config.txt
#Find the line: [all], add the following item under it:
dtoverlay=arducam-pivariety
#Save and reboot.
- For Bullseye users running on Pi 0 ~ 3, please also:
Open a terminal
Run sudo raspi-config
Navigate to Advanced Options
Enable Glamor graphic acceleration
Reboot your Pi
If you encounter the display issues, please also execute the following steps:
Open a terminal
Run sudo raspi-config
Navigate to Advanced Options
Navigate to GL Driver
Select GL (Full KMS)
Reboot your Pi
Use libcamera to access camera
Preview
Check if the camera can be detected normally.
ls /dev/video0
The output result /dev/video0 indicates the camera is well detected.
libcamera-still -t 0
 |
 |
Color Card |
Clarity Chart |
Image Rotation
libcamera-still -t 0 --rotation=180
 |
 |
Color Card |
Clarity Chart |
libcamera-still -t 0 --rotation=0
Learn More
Please refer to the following page for more instance of libcamera apps:
libcamera apps for Raspberry Pi
External Trigger
External Trigger Connection
| Name | Pin |
|---|---|
| trigger input | REQ EXP |
| ground | GND |
Note
Please ensure that you have connected ground and trigger input on the camera board using jumper wires. And make sure the trigger and ground will be connected on the platform.(e.g. Raspberry Pi)
Here we display the connection on Raspberry Pi 4B:
.jpg) |
 |
trigger.py
You can copy the codes below and save a file as trigger.py
import RPi.GPIO as GPIO
import time

# set GPIO mode as BCM
GPIO.setmode(GPIO.BCM)

# define the used pin
pin = 4

# set pin as output mode
GPIO.setup(pin, GPIO.OUT)

# calculate duration(s)and period(s)
duration = 0.001  # high level is 1ms
period = 1 / 10  # frequency = 10Hz

try:
    while True:
        # output high level
        GPIO.output(pin, GPIO.HIGH)
        time.sleep(duration)

        # output low level
        GPIO.output(pin, GPIO.LOW)
        time.sleep(period - duration)

except KeyboardInterrupt:
    pass

finally:
    # cleanup resources
    GPIO.cleanup()
Execute the File
python trigger.py
You need to set the shutter time because external trigger requires a very short exposure time and a fill light with a high frame rate trigger to use.
libcamera-still -t 0 --shutter=1000
v4l2-ctl -d /dev/v4l-subdev0 -c trigger_mode=1
Then you can access the camera with external trigger mode.
