Quick start
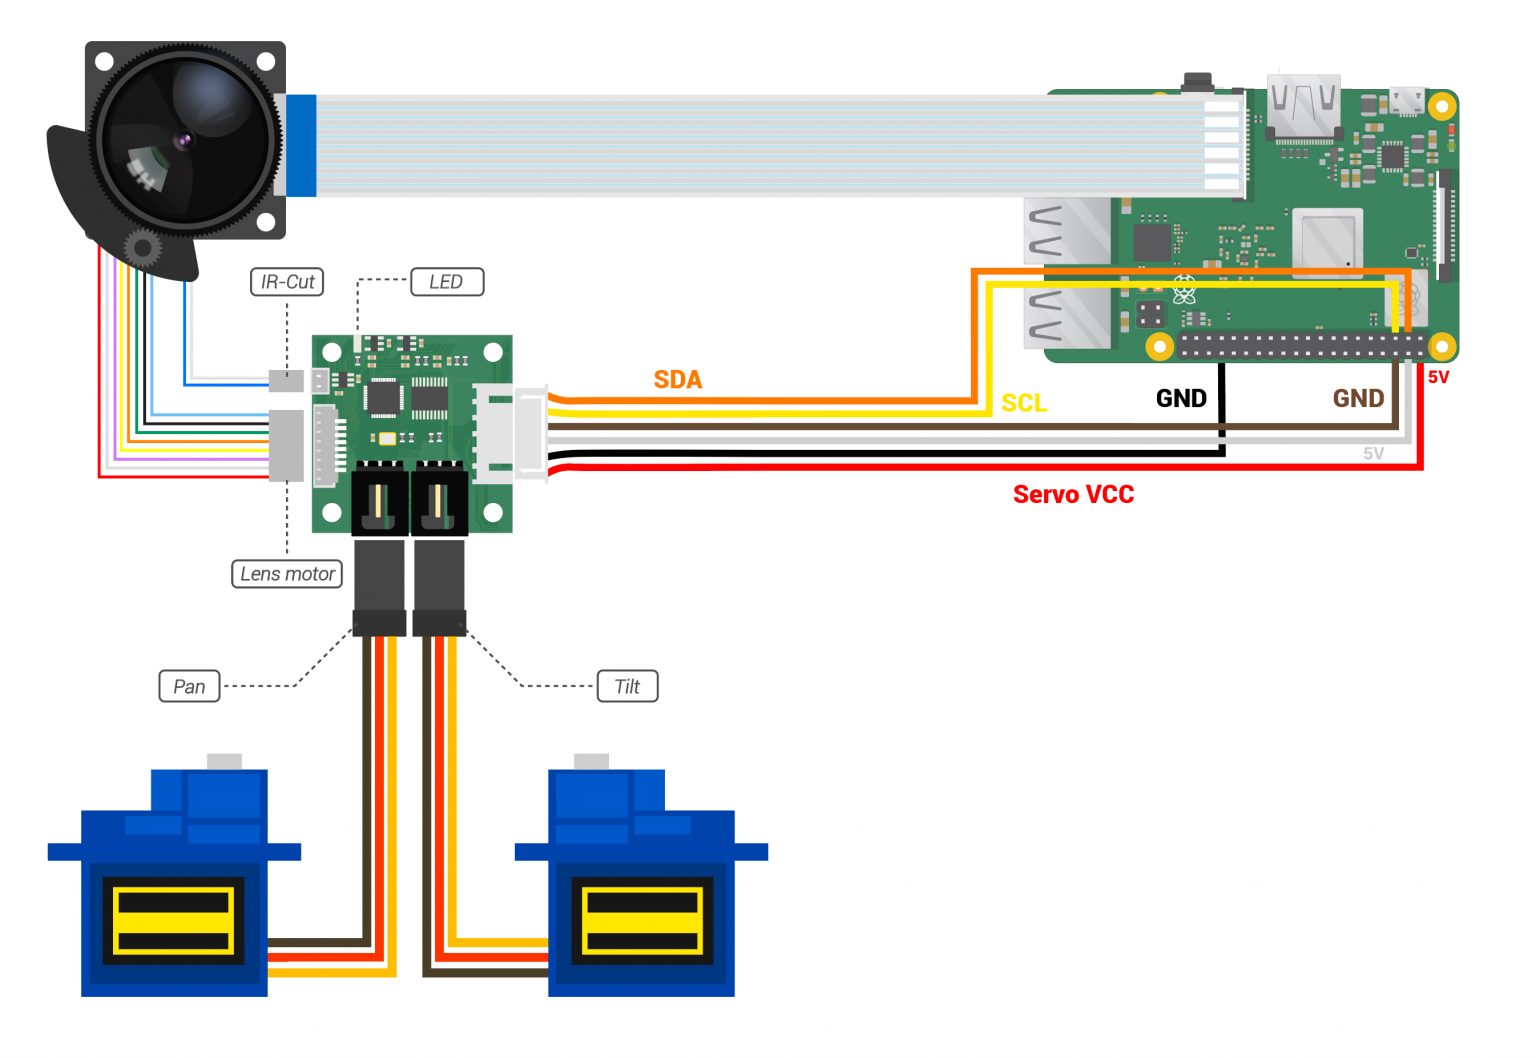
Hardware
Note
In this illustrator, the different colors of the jumper wires are just to make it easier to distinguish themFor example: from each other.
The order of those colors varies from item to item, so it may not match the one on your hand.
Therefore, instead of its color, you should rely on the position of the wire to correctly connect the jumpers.
Software
Find your corresponding camera in the following two links, and then execute the following command
Software Configuration for Raspberry Pi Native camera
Note
If you can not find your camera, please contact us directly.(support@arducam.com)
Run PTZ Cameras in Bullseye System
Step 1. Install the OpenCV
Step 2. Download the source code
Step 3. Run the demo
Run PTZ Cameras in Ubuntu
Step 1. Installing dependencies
sudo apt-get update && sudo apt-get upgrade
sudo apt install -y cmake
sudo apt install libyaml-dev
sudo apt install libpng-dev
sudo apt install -y libcamera-dev libepoxy-dev libjpeg-dev libtiff5-dev
sudo apt install -y python3-pip git
sudo pip3 install jinja2
sudo apt install -y libboost-dev
sudo apt install -y libgnutls28-dev openssl libtiff5-dev
sudo apt install -y qtbase5-dev libqt5core5a libqt5gui5 libqt5widgets5
sudo apt install -y meson
sudo pip3 install pyyaml ply
sudo pip3 install --upgrade meson
sudo apt install -y libglib2.0-dev libgstreamer-plugins-base1.0-dev
sudo apt install -y cmake libboost-program-options-dev libdrm-dev libexif-dev
sudo apt-get install python-opencv
sudo apt-get install python3-smbus
Step 2. Compiling libcamera
git clone git://linuxtv.org/libcamera.git
cd libcamera
meson build --buildtype=release -Dpipelines=raspberrypi -Dipas=raspberrypi -Dv4l2=true -Dgstreamer=enabled -Dtest=false -Dlc-compliance=disabled -Dcam=disabled -Dqcam=enabled -Ddocumentation=disabled -Dpycamera=enabled
ninja -C build   # use -j 2 on Raspberry Pi 3 or earlier devices
sudo ninja -C build install
#Adding dynamic link libraries to __int_py will not copy successfully
sudo cp -r ~/libcamera/build/src/py/libcamera/ /usr/local/lib/python3.10/dist-packages/
sudo rm /usr/local/lib/python3.10/dist-packages/libcamera/__init__.py
sudo bash -c 'cat /home/#your account name#/libcamera/build/src/py/libcamera/__init__.py >> /usr/local/lib/python3.10/dist-packages/libcamera/__init__.py'
Step 3. Compiling libcamera-apps
git clone https://github.com/raspberrypi/libcamera-apps.git
cd libcamera-apps
mkdir build
cd build
cmake .. -DENABLE_DRM=1 -DENABLE_X11=1 -DENABLE_QT=1 -DENABLE_OPENCV=0 -DENABLE_TFLITE=0
make -j4  # use -j1 on Raspberry Pi 3 or earlier devices
sudo make install
sudo ldconfig # this is only necessary on the first build
Step 4. Compiling python-kms++
git clone https://github.com/tomba/kmsxx.git
cd kmsxx
git submodule update --init
meson build
sudo ninja -C build install
sudo cp -r ~/kmsxx/build/py/pykms/ /usr/local/lib/python3.10/dist-packages/
sudo ldconfig
Step 5. picamera2
sudo apt install -y python3-pyqt5 python3-prctl libatlas-base-dev ffmpeg python3-pip
pip3 install numpy --upgrade
pip3 install picamera2
Step 6. Modify configuration file
Find the line where camera_auto_detect is and change it to camera_auto_detect=0
add dtoverlay=
For example:
Step 7. Allow accessing /dev/dma_heap on Ubuntu
# add rule in /etc/udev/rules.d/raspberrypi.rules and add rule
SUBSYSTEM=="dma_heap", GROUP="video", MODE="0660"
# Add user to video group Then reboot
sudo usermod -a -G video $USER
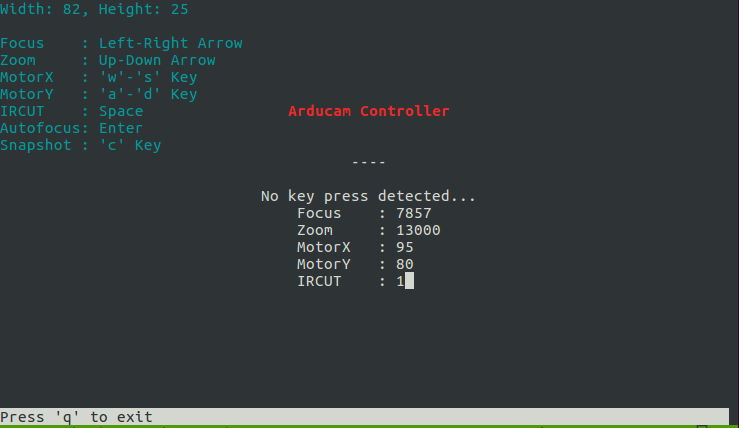
Step 8. Run project
git clone https://github.com/ArduCAM/PTZ-Camera-Controller.git
cd PTZ-Camera-Controller
sudo python3 FocuserExample.py